Advanced Analytics Early Access
Important
Early Access for Advanced Analytics is available only to customers who meet specific criteria. For more information about the early access program, contact your Infobip account manager.
The Answers analytics dashboard is the central hub for things chatbot performance and reporting. Come back to the analytics dashboard at any point to get real-time updates, and to put together custom reports.
Answers analytics are made up of several report types based on fundamental chatbot performance, however also offer you the option to build custom reports and dashboards to track custom aspects of chatbots performance.
Depending on your Answers package, the following Analytics features are available:
| Feature |
Start/Starter Package |
Grow/Enterprise Package |
Scale Package |
|---|---|---|---|
| Predefined dashboards |
Overview Sessions Messages Users Voice of the customer |
Overview Sessions Messages Users Dialogs and intents Voice of the customer |
Overview Sessions Messages Users Dialogs and intents Voice of the customer |
| Custom dashboards | No | No |
Insights Custom dashboard |
| Explore from here | No | No | Yes |
| Alerts | No | No | Yes |
| Export | No | Yes | Yes |
| Data refresh rate | 24 hours | 8 hours | 2 hours |
To view reports and dashboards, go to Answers > Analytics.
When you access analytics for the first time, click Enable in this section. A screen containing the terms and conditions is displayed. Go through the agreement. You must click Accept to access analytics.
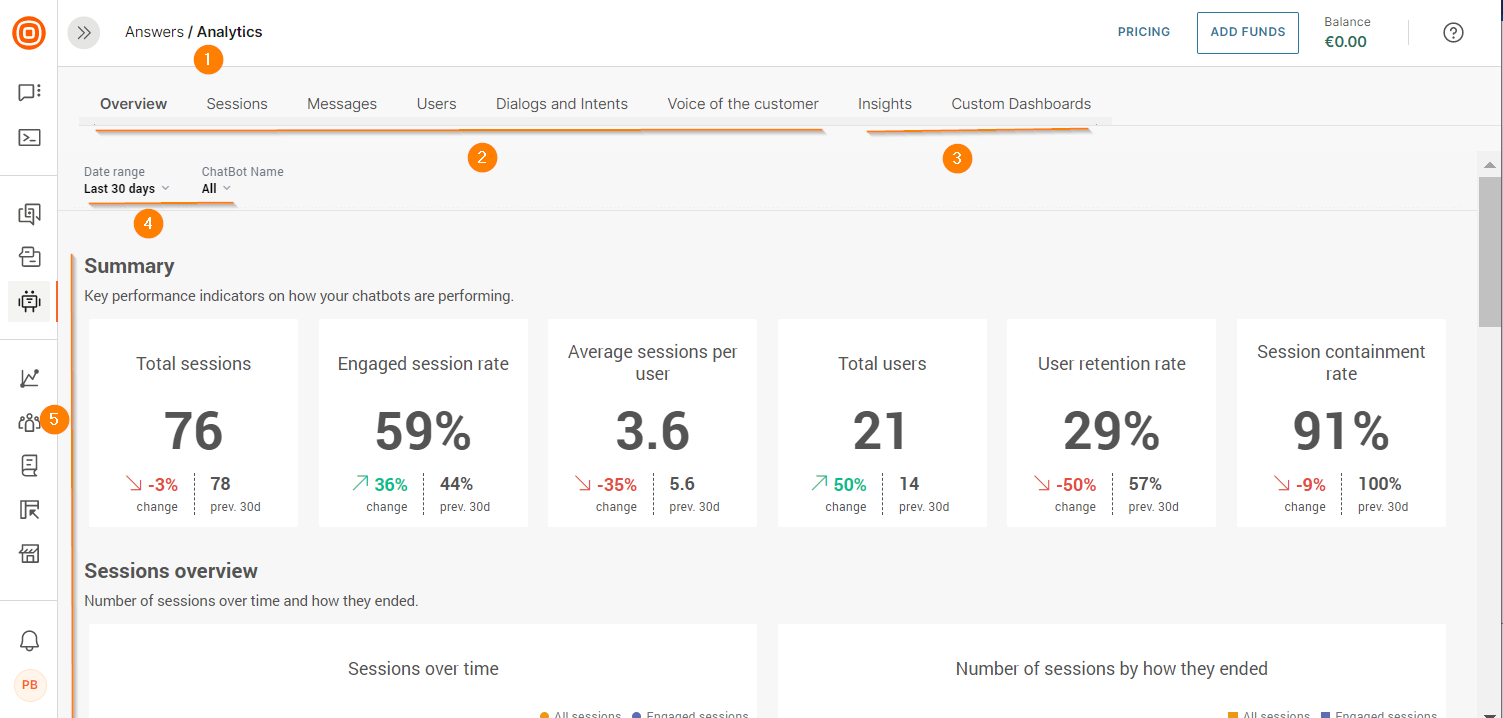
By default you will land on the overview view which details global chatbot performance at high level.
- Analytics tab - Entry to the analytics dashboard which will take you to the overview view
- Predefined dashboards - Set of predefined chatbot dashboards which come with Answers. Flick between the tabs for the various views
- Custom dashboards - Custom report and custom dashboard builder
- Filters - Filter overview by time and/or individual chatbot
- Overview view - These are all the high-level analytics widgets which make up the overview report. Flick between predefined dashboard tabs for further insight
Overview
The overview report provides you with a high-level view over all chatbot performance. It is designed to give you a glance at some of the fundamental metrics so you can quickly identify if chatbots are performing as expected.
Only active chatbots are included in analytics data and by default is set to a 30-day interval. Make sure to adjust filters as required.
Total sessions is the number of opened chat sessions initiated by users regardless if the chat timed out or was abandoned without any dialog having taken place. The value is the total whole number.
Engaged session rate is the rate at which end users initiated sessions and continued to exchange dialog with a chatbot at least twice. The value is the percentage of engaged sessions over total sessions.
Average sessions per user is the average number across all total sessions individual end users initiated chats. The value is the average number of sessions per user to the nearest decimal point (1.0).
Total users is the total amount of users which have interacted with chatbots. This includes all types of users from those who never got past the first message, to engaged users who made it to the end of the chat.
User retention rate is the rate at which users go on to engage with the chatbot after having initiated the chat. The value is the percentage across all users for the set filters.
Session containment rate is the rate at which sessions are closed without the end user having to close the session without attaining a resolution. Sessions which are passed to support agents are considered contained sessions. The value is the percentage of contained sessions over total sessions.
Sessions and users overview show you totals across time. Changing filters will affect the view. Hover over any points in the graph for more information.
Chatbots overview is the highest level view over chatbot base specific metrics and are made up of a high-level composition of all other stand reports. For more information about specific chatbot aspects, see the individual dedicated reports.
Predefined Dashboards
Use these reports to get a detailed insight into how chatbots are performing from various perspectives. This allows you to identify areas on which to refocus optimization efforts.
Sessions
Get key performance indicators around chatbot sessions
If sessions are showing short containment rates or early drop-off, this could be a sign that something more fundamental is off with the chatbot rather than a specific part of the customer journey

Sessions refer to the whole conversation from start to end between the chatbot and end user. Even though users can always restart or come back to a chatbot, sessions are always limited to one chat and end when the session is closed, either by initiation or timeout.
Total sessions is the number of opened chat sessions initiated by end users regardless if the chat timed out or was abandoned without any dialog having taken place. The value is the total whole number.
Engaged sessions is total number of sessions in which users initiated sessions and continued to exchange dialog with a chatbot at least twice. The value is the total whole number. Ideally this number should be as close to Total sessions as possible.
Engaged session rate is the rate at which end users initiated sessions and continued to exchange dialog with a chatbot at least twice. The value is the percentage of engaged sessions over total sessions.
Average sessions per user is the average number across all total sessions individual end users initiated chats. The value is the average number of sessions per user to the nearest decimal point (1.0).
Average engaged sessions per user is the average number across all engaged sessions individual users exchange dialog with a chatbot at least twice. The value is the average number of engaged sessions per user to the nearest decimal point (1.0).
Containment rate is the rate at which sessions are closed without the end user having to close the session without attaining a resolution. Sessions which are passed to support agents are considered contained sessions. The value is the percentage of contained sessions over total sessions.
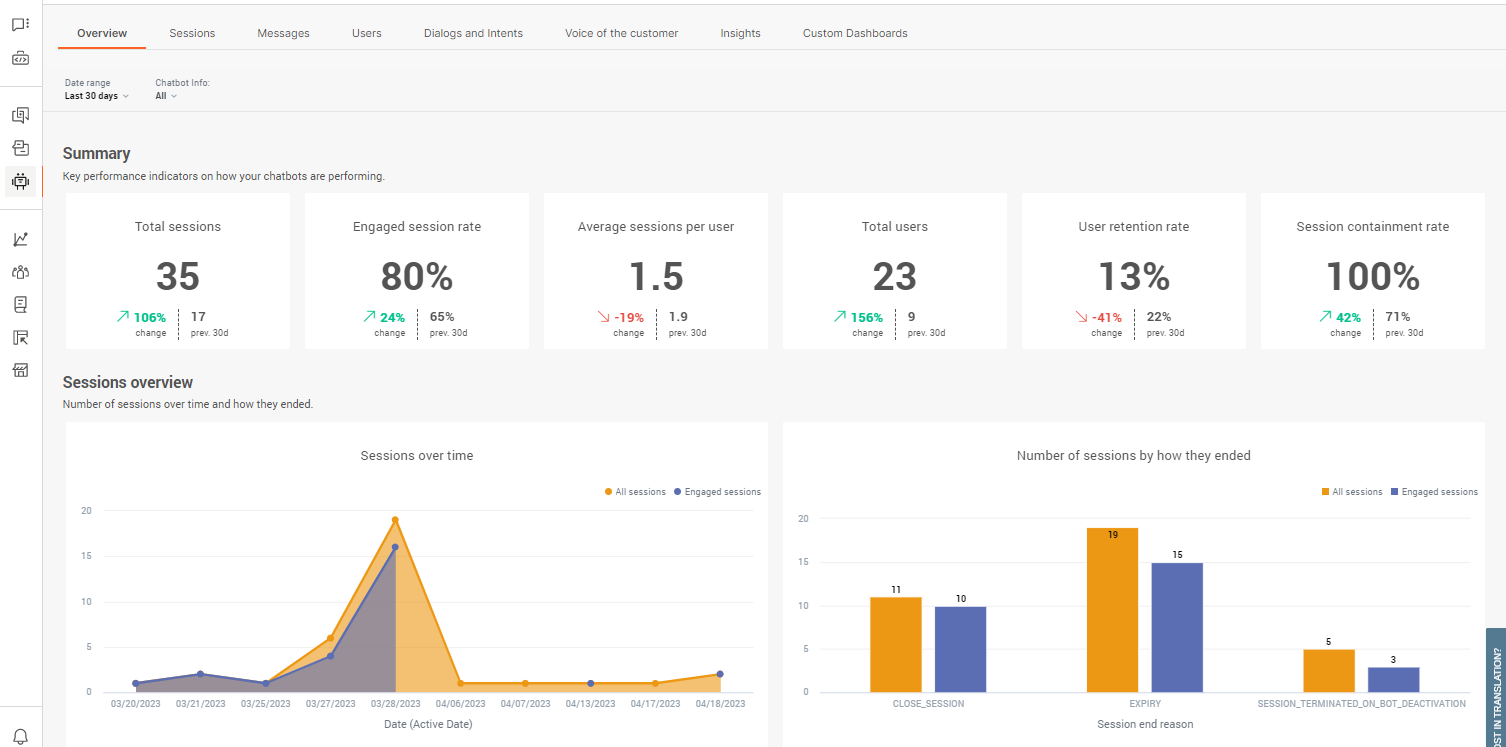
Sessions through time displays the number of sessions through time which lets you identify when chatbot interactions are most active. You can use this to determine when to plan extra human support if and when required. The first graph is for total sessions, the second graph is for engaged sessions. Hover over any points in the graphs for more information. Use the filters at the top of the report to modify the time view.
Session ends shows you how sessions are ending, for example if the chat is expiring due to a lack of user response. Use this chart to identify if chatbots are serving their purposes.
- Expired sessions - user stopped replying to the chatbot and the reply time lapsed
- Agents' takeover - chatbot couldn’t handle the request and the conversation was handed over to Conversations
- To agent - user requested further support or to be transferred to a human
- Close session - the conversation reaches the Close session element and chat ends
The duration will show you average session durations before session ends. Longer and brief durations can indicate ineffective customer journeys. Durations are in 00:00:00 format.
- Session duration - all sessions
- Engaged session duration - engaged only
- Interaction time - time users spend talking to chatbot
Session ends will always amount to total number of sessions – these are the possible end scenarios for each conversation with the chatbot. Depending on the type of chatbot you have, some expiry reasons should be expected as more common than the others. But, for example, if you notice that agent takeover is too high you can add more intents to cover more scenarios (additionally train the bot).
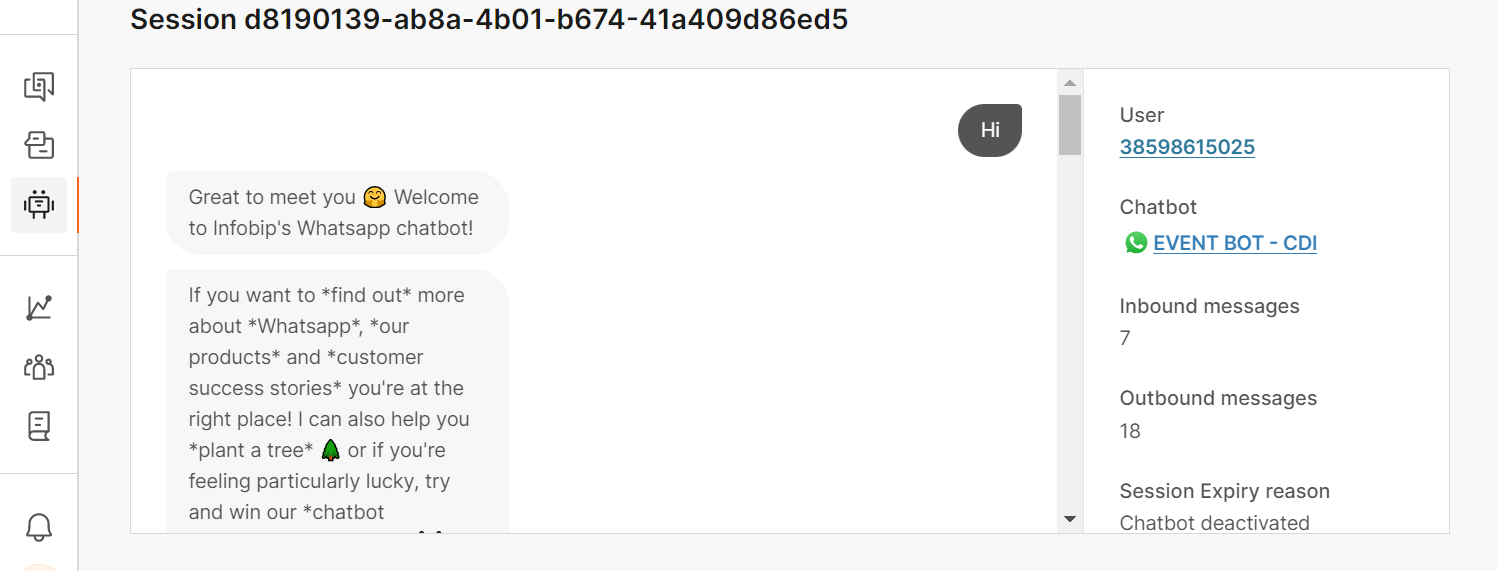
Session details provide details about the chatbot sessions. Use the metric headers to sort the table as required.
- Session ID - Unique identifier for the session
- User ID - Identifier for the end user. The format of the ID depends on the channel. Example: For WhatsApp, the user ID is the phone number and for Facebook, the user ID is the Facebook ID
- Session end reason - The reason the session ended. Example: Close_session, Expiry
- Start date - The date on which the end user sent the first message
- Time - The time at which the end user sent the first message
- Engaged session - Whether the end user sent a minimum of 2 messages during the session
- User messages - The total number of messages sent by the end user during the session
- Chatbot messages - The total number of messages sent by the chatbot during the session
- Duration - How long the session lasted
To drill down into a session, click its Session ID. The session transcript opens in a new window. You can view all the messages that are exchanged between the chatbot and the end user. Use this information to improve the chatbot. Example: You can identify dialogs that end users struggle with, end user messages that the chatbot did not understand, and parts of the session that are not performing as expected.
An overview of the conversation is displayed on the right. You can click the user ID to view information about the user. You can also click the link to the chatbot and make changes, if required.
API gives you an overview of all API calls going through the API element used in chatbots. Here you can identify if calls are executing and returning values as expected, as well as execution times in milliseconds. You'll need to filter the report by individual chatbots to see these.
Depending on the configuration of API calls in the chatbot itself, the endpoint URLs will display either the originalUrl (without resolved attributes in the URL) or resolvedUrl (with resolved attribute in the URL).
For more information on the API calls themselves, click on any of the URL endpoints. For each URL endpoint you can see how many times it was called and some other details.
- Response codes - all available responses a request can have
- Count - how many times the response code was triggered. Useful to see if any of the calls are not successful (and what type of response codes they trigger)
- Average duration - in milliseconds
If you selected a URL endpoint that didn’t display its resolved URLs in the Session analytics, once you click on it, you will be able to see all the resolved URLs for that endpoint. For each Resolved URL, you can check the following information:
- Response code - helps see which HHTP requests are not successfully completed
- Response duration - how long it took for the request to complete in milliseconds
- Timestamp - the exact execution time
Messages
Get key performance indicators around chatbot messages for both chatbot and user
Check if users are dropping off too quickly or getting the resolutions they need by comparing message totals across types. If engagement numbers are low, or if chatbots are sending many more messages than users, this might be an indication that your chatbot is not providing the best support it could
Messages are only sent either by the chatbot or by the user, but Answers is able to determine if the user is engaged with the chat and average message exchange across all sessions.
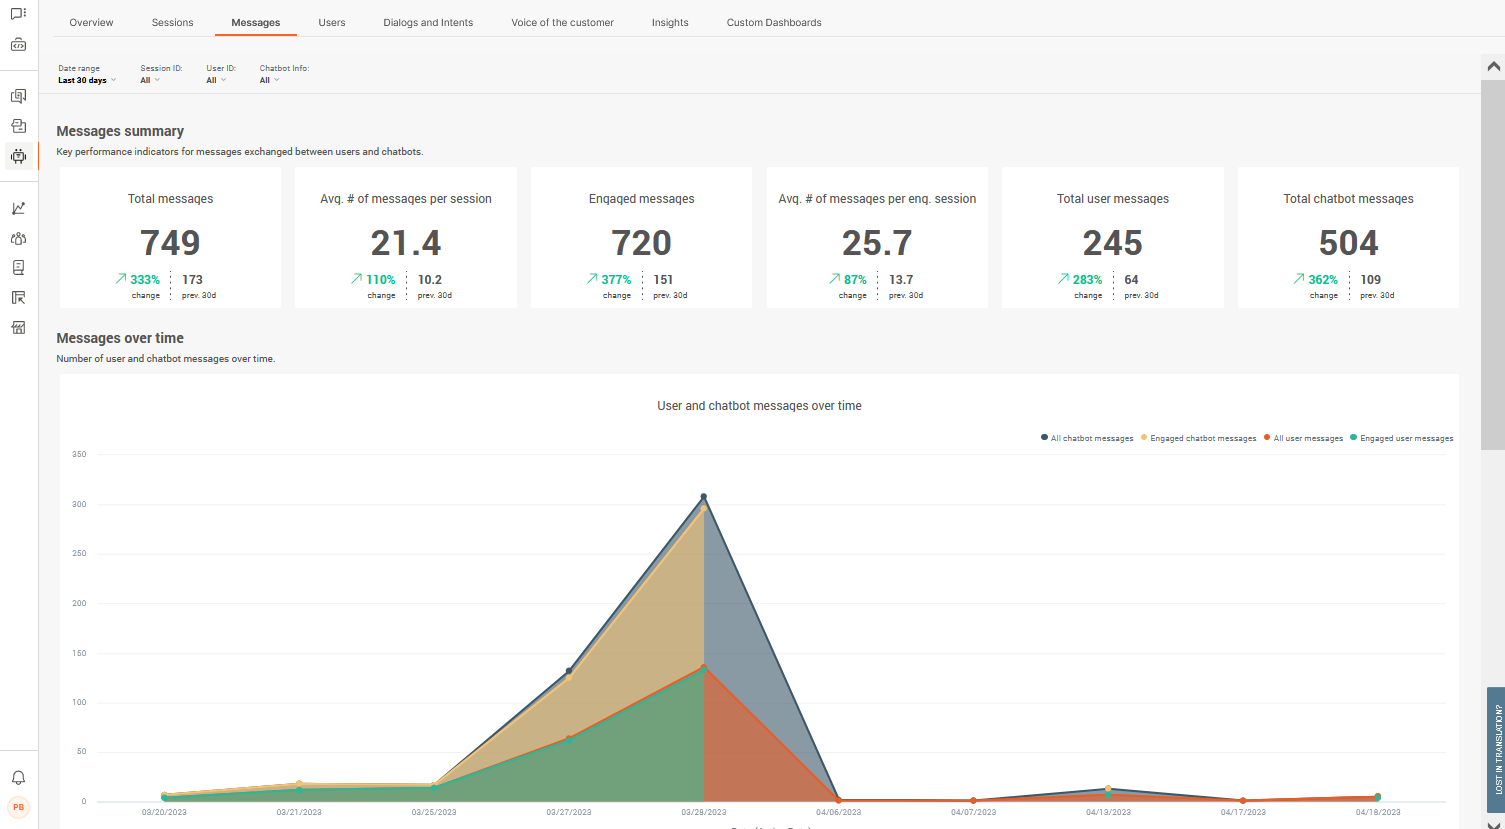
Total messages is the total number of messages exchanged whether users engaged with the chat or not. This number should be as close to the number of engaged messages as possible to indicate if the chatbot is working efficiently. If this number is much higher than total engaged messages, this can indicate that users are dropping off without resolutions. The value is the total whole number.
Average number of messages per session is the total average number of messages exchanged across all sessions whether users engaged with the chat or not. This number should be as close to the average number of messages per engaged session as possible to indicate if the chatbot is working efficiently. The value is the average number to the nearest decimal point (1.0).
Engaged messages is the total number of messages exchanged as part of an engaged session. I.e. when a user has responded at least twice to the chatbot. The value is the total whole number.
Average number of messages per engaged session is the total average number of messages exchanged during engaged sessions. The value is the average number to the nearest decimal point (1.0).
Total user messages is the total number of messages received from users, i.e. total number of incoming ⬅ messages. The value is the total whole number.
Total chatbot messages is the total number of chatbot messages sent to users, i.e. total number of outgoing ➡ messages. The value is the total whole number.
Messages through time displays the number of exchanged messages through time which lets you identify when chatbot interactions and message levels are most active. The first graph is for total sessions, the second graph is for engaged sessions. Hover over any points in the graphs for more information. Use the filters at the top of the report to modify the time view.
Engaged message count and averages provides you with an overview of engaged message totals for both the chatbot and end user over time, so that you can identify at which moment in time either side is peaking.
Users
Get key performance indicators around users
Understand how many people are coming back to chatbots for assistance, how many are finding a resolution, and how many are actually engaging with chatbots. Depending on chatbot's purpose (e.g. a chatbot to help with specific tasks), higher returning users could be a sign that it is efficient in helping users with their queries
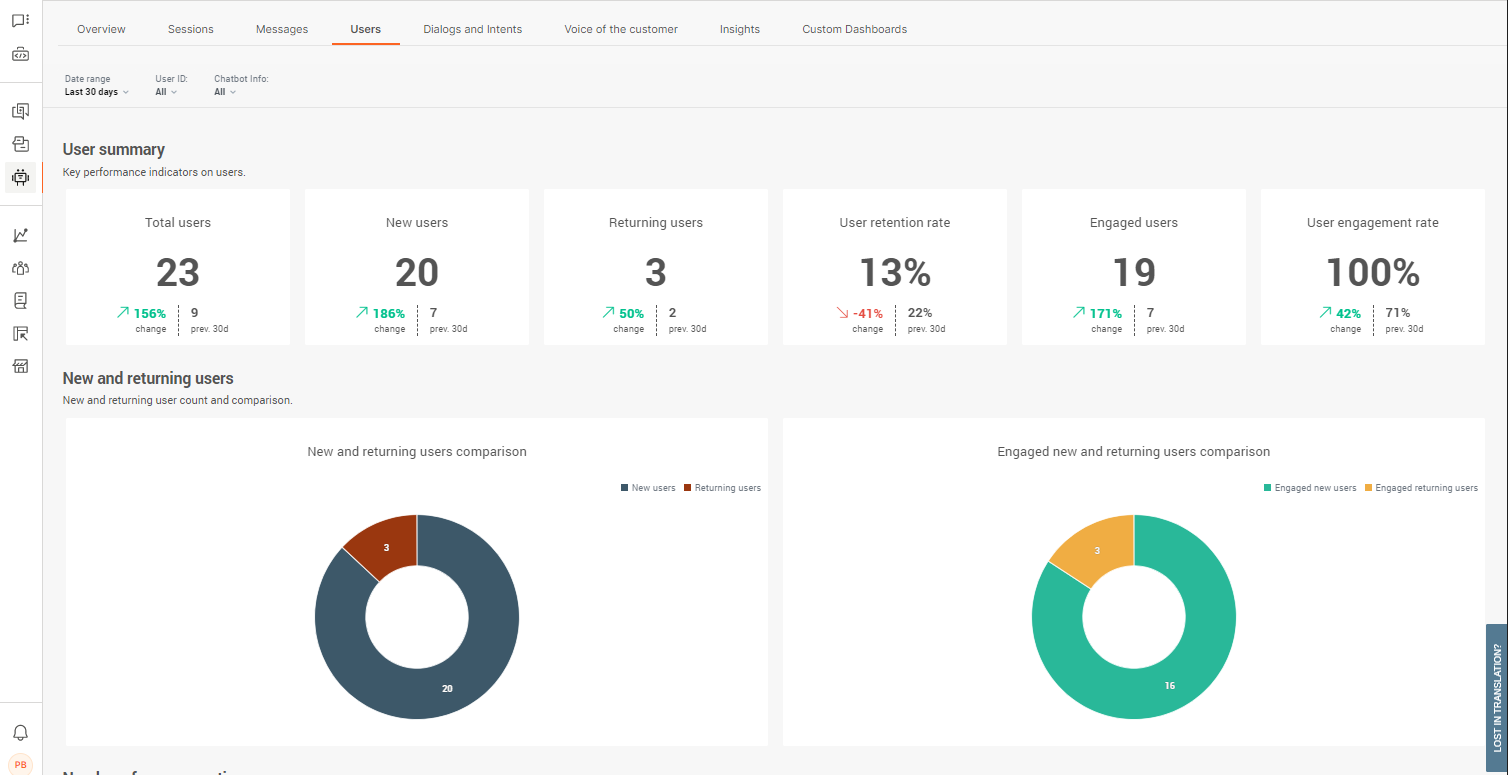
Users are those at the other end of the chat, the ones who are coming to the chatbot for assistance or queries. Users can be new or returning users and their action alone is to engage with the chatbot to get to their desired resolution. This of course depends on your chatbot efficacy and design quality.
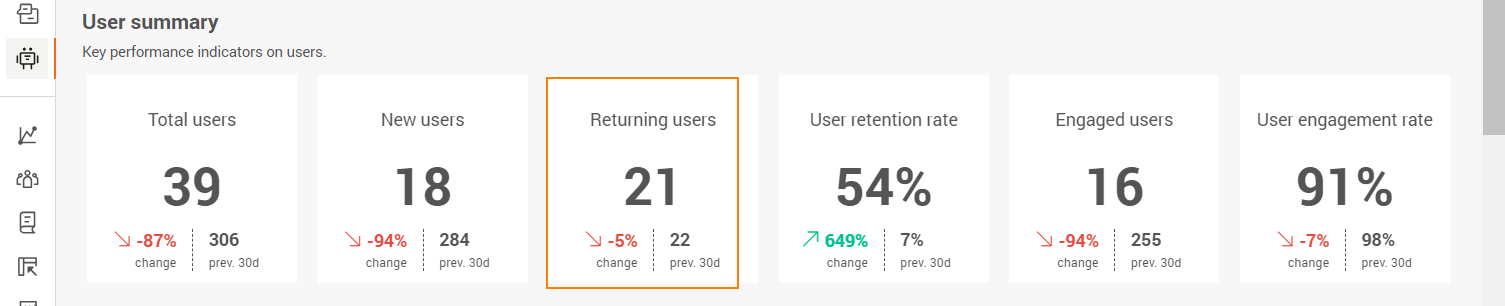
Total users is the total number of users tracked who have initiated a conversation with a chatbot. This is the total number for all sessions, engaged or not, as well as the total number of users, whether they are new or returning or not. The value is the total whole number.
New users is the total number of new or unique users initiating chats. This works by tracking the user's UUID and checking if there are any matches in chatbot records. If no matches are found, the user is considered a new user. The value is the total whole number.
Returning users is the total number of returning users initiating new chats. This works by tracking the user's UUID and checking if there are any matches in chatbot records. If a match is found, the user is considered to be a returning user. The value is the total whole number.
User retention rate reflects the percentage of users who managed to get to what would be considered a successful resolution or termination of chat, without abandoning the chat or it timing out. A low retention rate is a high indicator that your chatbot could use some optimization.
Engaged users in alignment with your user engagement rate, engaged users is the total number of users who sent at least two messages back to the chatbot. Ideally, this number should be as close to the Total users value. The value is the total whole number.
User engagement rate reflects the percentage of users who go on to engage with the chatbot after initiating the chat. Chat engagement is considered to have occurred after the user has sent back at least two messages to the chatbot.
New and returning users see how your new and returning user numbers compared with each other for all sessions, as well as engaged sessions. Depending on your chatbot's purpose, higher numbers of returning users requesting support can be an indicator of them not finding effective resolutions.
User count through time displays the number of users initiating chats through time which lets you identify when chatbot interactions and message levels are most active among new and returning users. Hover over any points in the graphs for more information. Use the filters at the top of the report to modify the time view.
User details gives you a detailed look into users at a much more granular level. Use the metric headers to sort the display as required.
- User ID - Identifier for the end user. The format of the ID depends on the channel. Example: For WhatsApp, the user ID is the phone number and for Facebook, the user ID is the Facebook ID
- Sessions - total number of sessions the user had with the chatbot
- Inbound messages - the total number of messages sent by the user to the chatbot
- User status - whether the user is a new or returning user
To go into further details about individual users, click a user ID and you will also get details about their sessions.
- Total sessions - number of sessions the user has taken part in
- Inbound messages - the total number of messages this user sent to the chatbot
- First time seen - the first time the user chatted with the chatbot (time of user's first message)
- Last time seen - the last time the user actively chatted (time of the user’s last message)
- Average session duration - the average time conversations lasted between this user and the chatbot
- CSAT score - is the score they left you at the end of the chat. You need to have the CSAT element present in chats for this
Click the Session ID to view conversation records. You can scroll through all the messages exchanged between the chatbot and the user and check the overview of the conversation on the right side.
Dialogs and intents
Get key performance indicators around used dialogs and triggered intents
Understand which parts of the customer journey are performing better than others in order to learn about your customer better and their preferred routes of interaction with chatbots. This can be a huge driver in optimization efforts by following parts of logic that are proving more effective when it comes to user interaction

Dialogs are the concrete stages in the customer journey to which users are routed depending on their actions and responses. Intents work in a similar way but work with AI chatbots based on machine learning and intent recognition.
Read the section about what makes up a chatbot for more information about dialogs and intents.
Top dialogs and intents displays the top 10 dialogs and intents which are being triggered the most, along with total numbers. Default dialogs and welcome intents are most likely going to be at the top, followed by where you most often take users next. Make sure to use the filters as required when you need a closer look.
You can also use these analytics to see correlations between top dialogs and intents. Larger differences between the two means that users are getting to dialogs via other ways than the intent it is based on. In line with this, you can check the numbers under the Unrecognized intents and Unhandled messages analytics.
Top start and exit dialogs are the 10 most common places in which chats start with end users. New sessions will likely begin with your default dialog, but can also be initiated elsewhere if returning users, or configured settings are leading to a spot mid-customer journey. Exit dialogs is where sessions are ending and the reasons can be one of the following:
- Expired sessions - user stopped replying to the chatbot and the reply time lapsed
- Agents' takeover - chatbot couldn’t handle the request and the conversation was handed over to Conversations
- To agent - user requested further support or to be transferred to a human
- Close session - the conversation reaches the Close session element and chat ends
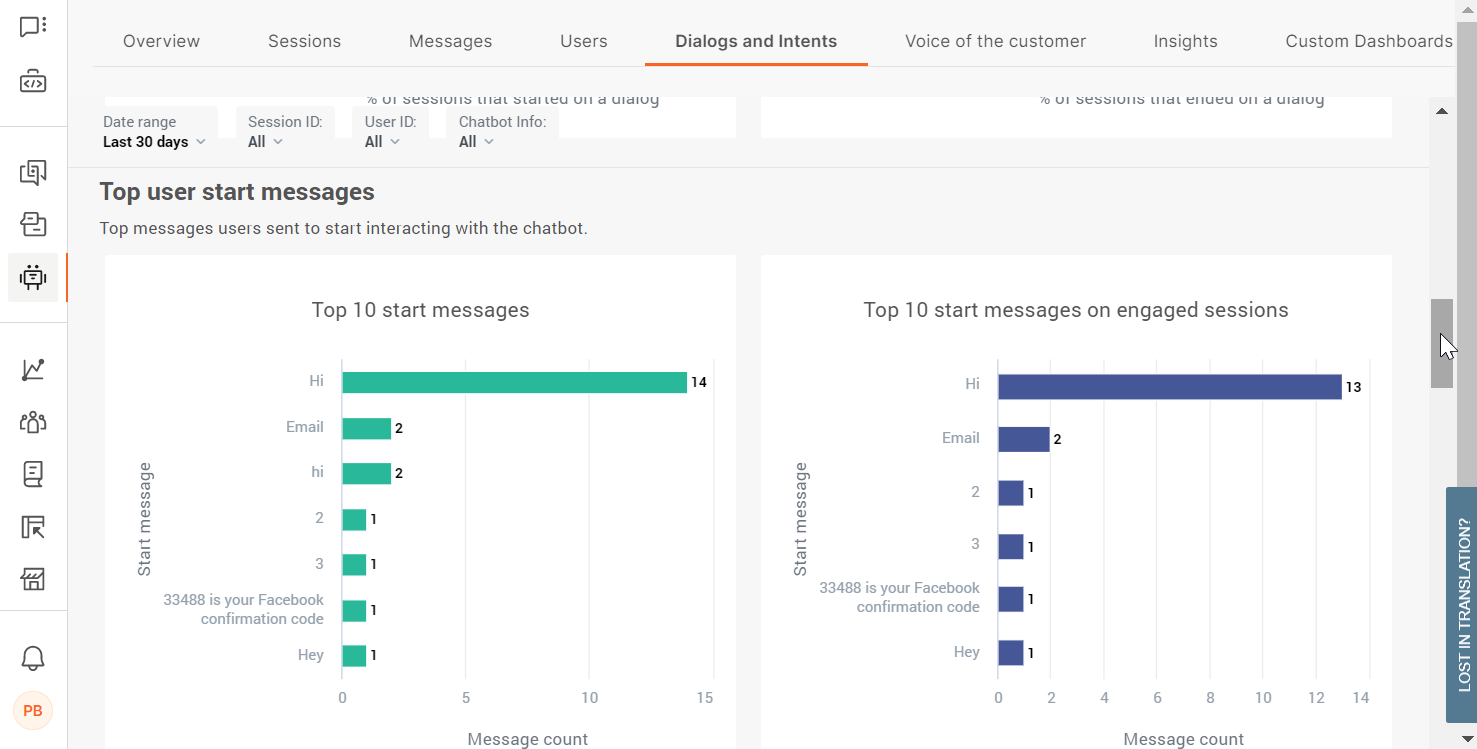
Top user start messages records the top 10 most commonly used messages coming in from users which initiate the chat. Totals are recorded for all sessions in the first graph, then separated out to engaged sessions only in the second. Use these to add to your keyword synonym detection and intents if they are not present. Note that these values do not appear as unrecognized inputs in further reports.
Dialog insights gives you a detailed look into dialogs at a much more granular level. Use the metric headers to sort the display as required.
- Times triggered - how many times a dialog has been entered by a user
- Users - the total number of users who entered this dialog
- Sessions - in how many sessions the dialog is present and was triggered
- Start % - percentage of how often this is first dialog at chat initiation
- End % - percentage of how many times this was the last dialog before the session ended
- Expired sessions - the number of dialogs where the user let the session expire
- Close session - the number of times conversation ended naturally at the designed point for closing sessions
- Go to agent action - the number of time the user requested to talk to an agent
- Agent’s takeover - agent took over the conversation from the chatbot
Bear in mind that the number of sessions, users, and times the dialog was triggered will differ due to the fact that the end user might select to enter this dialog several times while talking with the chatbot.
Intent insights gives you a detailed look into intents at a much more granular level. Use the metric headers to sort the display as required.
- Times recognized - the number of times the chatbot recognized a user’s utterance and forwarded the user to the correct intent
- Users - total number of users routed to the intent
- Sessions - total number of sessions in which the intent was recognized
- Start - total share percentage the intent was the first one
Unhandled messages are messages which did not pass validation either because an attribute element type could not be matched, or because a keyword could not be matched from user input.
- Message - the specific message where the chatbot is having problems
- Dialog - name of the dialog where it happened
- Element type - which element didn’t recognize the incoming message (either Process User Input or Attribute)
- Message count - how many times this particular message was received
- Session count - how many sessions this happened in
- User count - the total number of users who sent the message
Use these analytics to tweak parts of the configuration where users, as well as the chatbot, may be having issues in providing a correct response. This could be anything from informal language being used, like slang, to an attribute type incorrectly set up.
Not understood messages tracks all unrecognized intent messages users are sending which the chatbot doesn't recognize, meaning that the chatbot could not assign them to any intent. These insights are crucial in optimization efforts around chatbot training as it gives you a clear insight into user behavior and what kind of responses to expect, and the existing gaps in chatbot configuration.
- Message - the specific message where the chatbot is having problems
- Dialog - name of the dialog where it happened
- Element type - which element didn’t recognize the incoming message (either Process User Input or Attribute)
- Message count - how many times this particular message was received
- Session count - how many sessions this happened in
- User count - the total number of users who sent the message
Be aware that the start messages do not appear under unrecognized intents and unhandled messages.
Voice of the customer
Get key performance indicators around customer satisfaction coming from the CSAT element
As well as getting information from the other predefined dashboards to find key indicators, use customer satisfaction feedback to gather data directly from the users themselves. Allowing users to engage with a CSAT survey is the quickest route to finding out about the level of service you provide through your chatbot
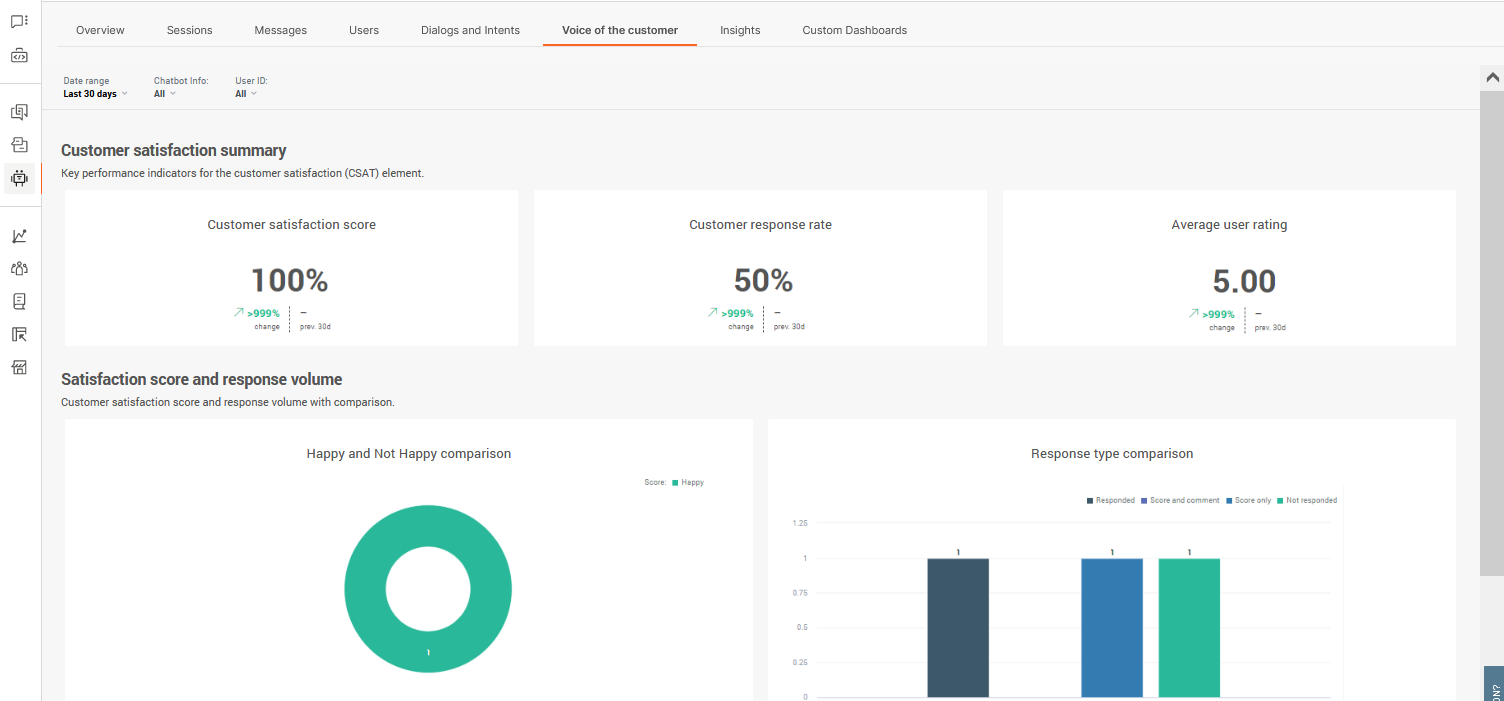
In order for Answers to be able to gather customer satisfaction statistics, you need to use the CSAT channel element wherever possible to collect information from users. This isn't automatically done so make sure to add it at the end of customer journeys.
Score is the total average score across all submissions as well as the change rate over the filtered date range. Scores are usually only submitted by engaged users as they will have needed to conclude the chat.
Response rate is the total percentage of users who made it to the CSAT stage (dialog which contains the CSAT element) in your customer journey who submitted a response. If your score is low and the response rate is high, this is a much stronger indicator that the chatbot could use some optimization.
Average rating is the average score you have received across all submitted scores. Note that scores can be set up differently for the CSAT element so it may not always reflect an accurate score if multiple chatbots are using different scoring logic.
Score and response volume analytics indicate whether your users are happy or not happy with the service they received using your chatbot. Happy/not happy logic is based on the score they provide, and Answers follows a standard logic when considering the score. Read about the CSAT element for more information. Response type comparison can be used to see which users are providing useful feedback by leaving comments vs those who are not.
Satisfaction details gives you a further look into feedback at a much more granular level. Use the metric headers to sort the display as required.
- Session ID - session universally unique identifier (UUID)
- User ID - Identifier for the end user. The format of the ID depends on the channel. Example: For WhatsApp, the user ID is the phone number and for Facebook, the user ID is the Facebook ID
- Comment - the comment left with the score submission. This is empty is none
- Date & time - this is when feedback was submitted
- Score - happy/not happy based on the numeric score submitted
- Rating - is the numeric score submitted
Use this information to improve your chatbot after it has been running and interacting for a while. Negative feedback and comments are quick wins for fixing any levels of support your chatbot might be lacking.
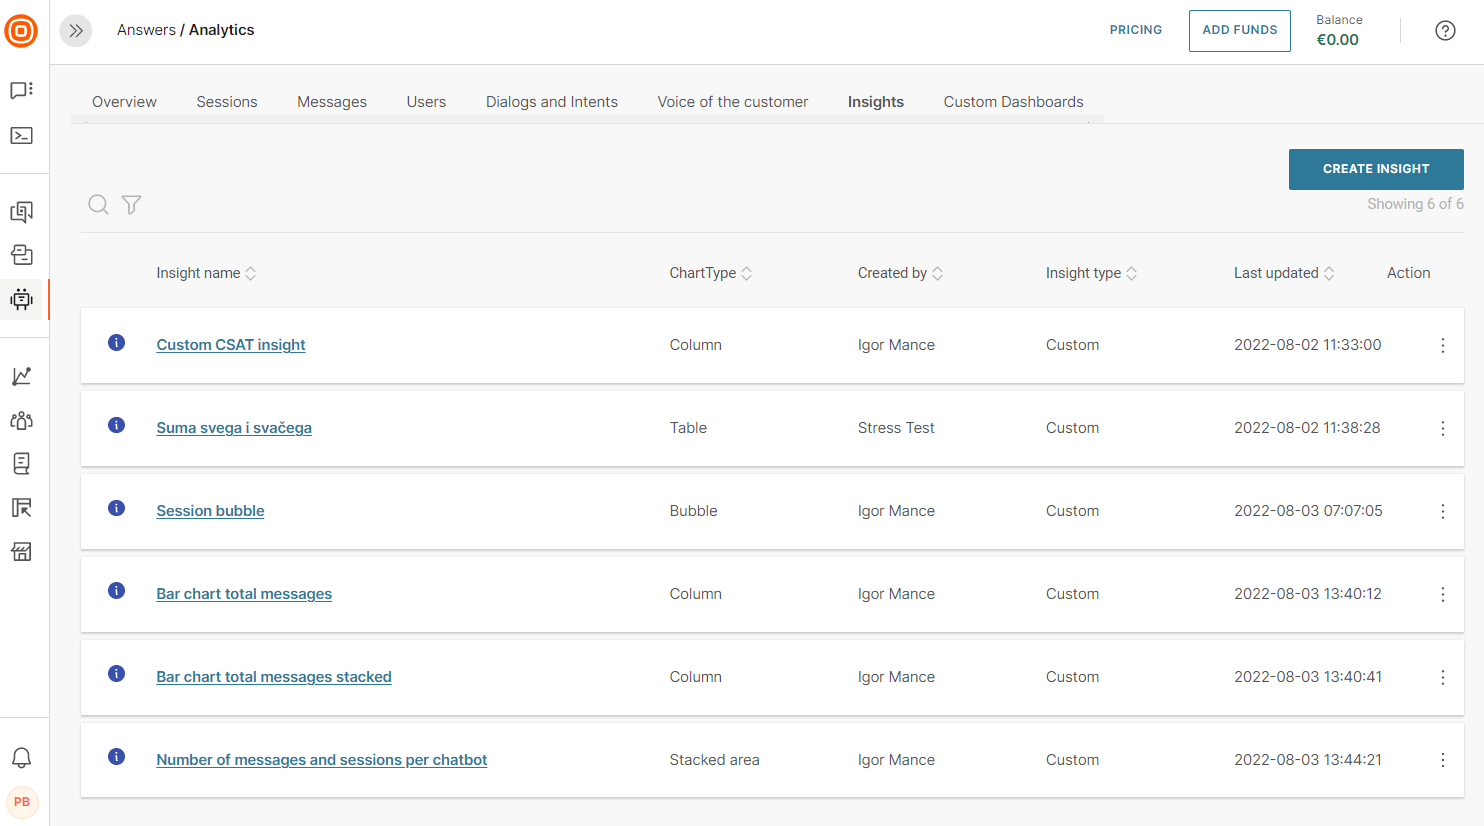
Custom dashboards
Insights
Insights are multi-layer analytics that enable you to add and slice data based on multiple metrics. Insights are the most extensive report types. You can use insights either as a standalone report or as part of a custom dashboard.
To access insights, on the web interface, go to Answers > Analytics > Insights. You can do the following:
- Create an insight
- View a list of insights
- View details of an insight. Click the information icon against the insight
- Search for an insight by its partial or complete name
- Filter insights. Example: by insight type or last updated
- Sort insights. Use the table headers
- Export insights
- Set the number of insights you can view on a single page
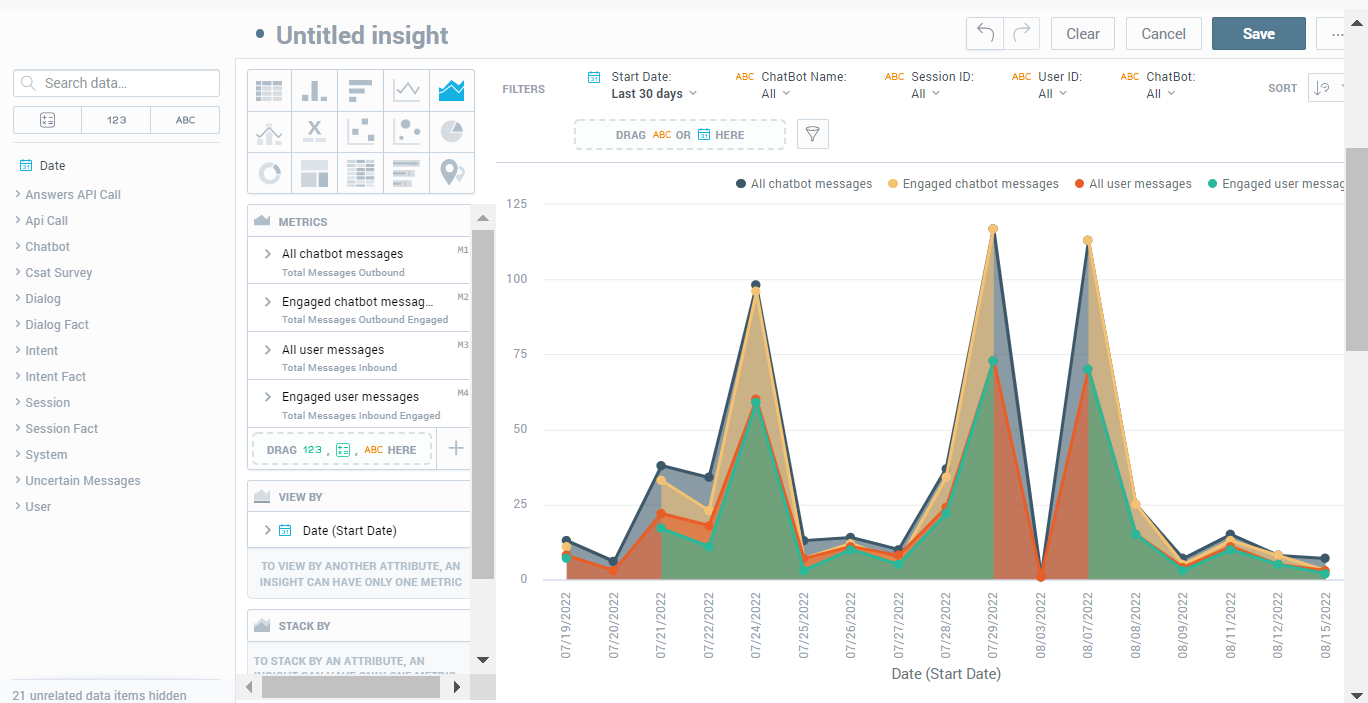
Insight Editor
Use the Insight editor to do the following:
- Create an insight
- View a list of insights
- Export an insight
To access the Insight editor, go to the Analytics > Insights tab. Click Create Insights.
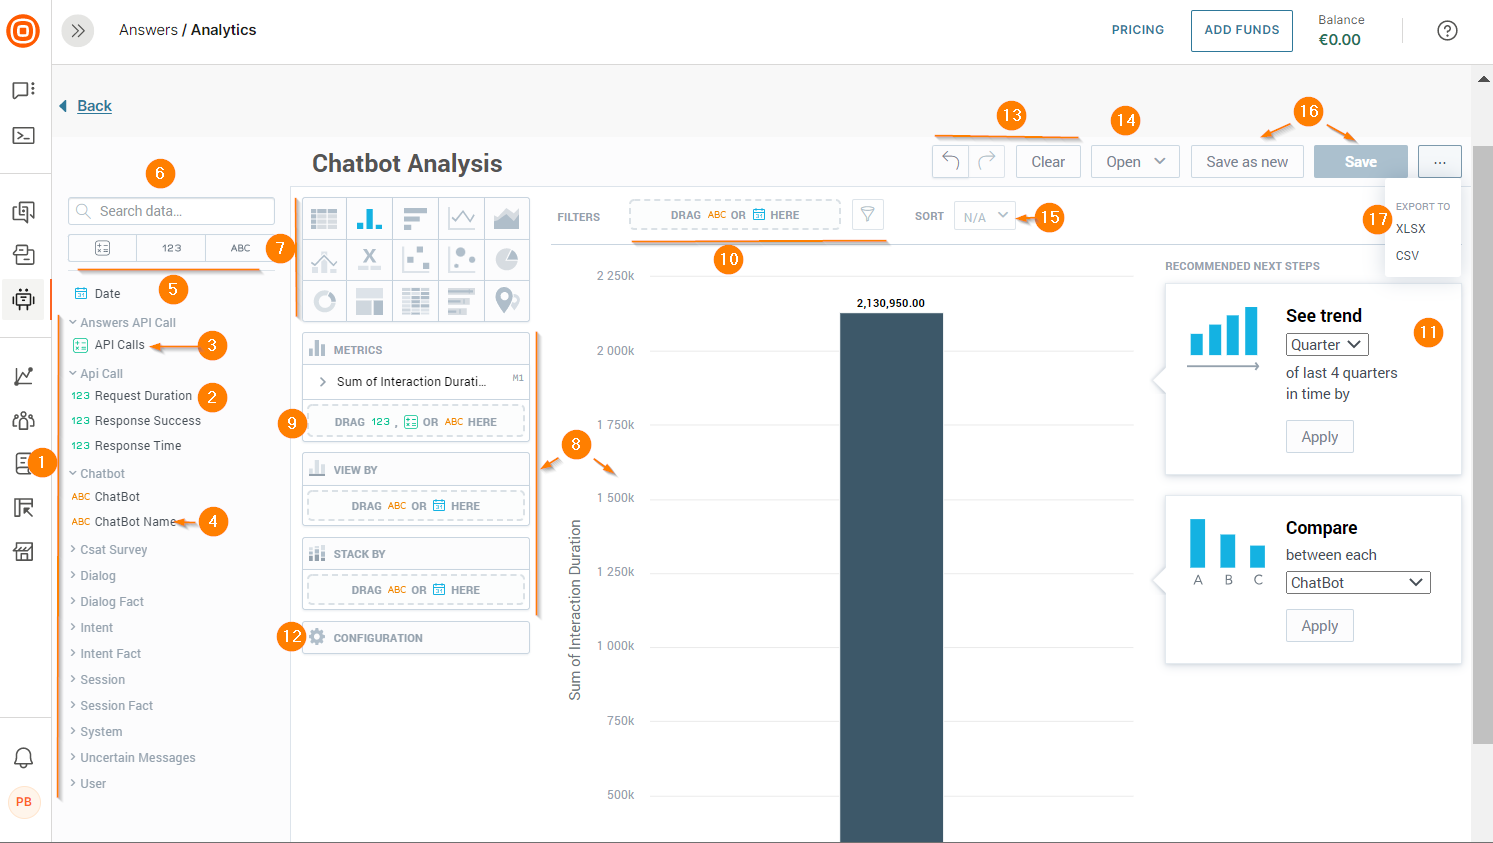
- Data catalog: Contains facts, metrics, and attributes. Expand the menu items to view the data items
- Facts: Quantitative data that you can add to the insight
- Metrics: Quantitative data that you can add to the insight
- Attributes: Qualitative data that you can add to the insight
- Filter options for data catalog: Click the relevant data type (metrics, facts, and attributes) to view a list of data items of that type
- Search: Type the partial or full name of a data item
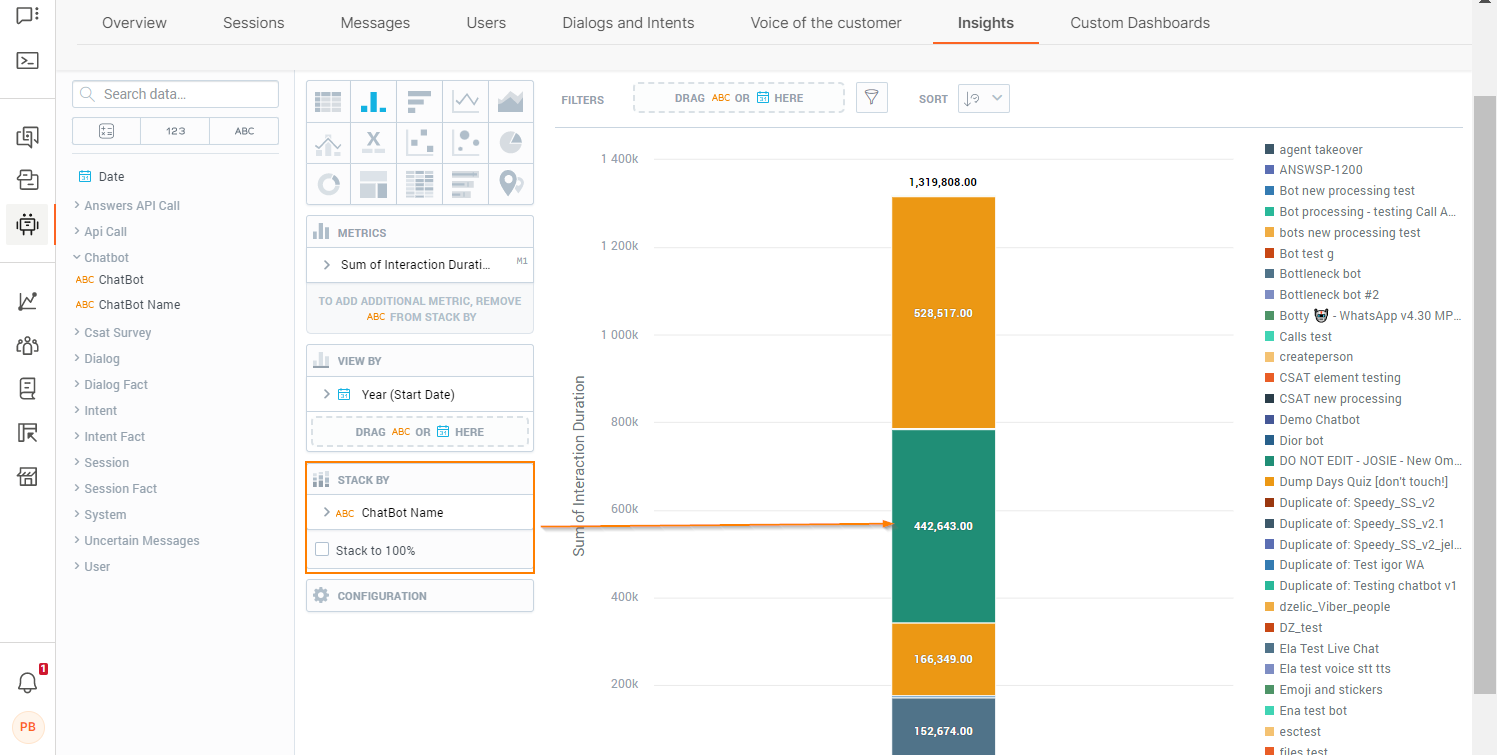
- Insight type: Change the chart type depending on your requirements. The system recreates the insight to match the selected type. Each chart type may support specific types of data. Example: The Stack by field is available for a column chart but not for a table
- Active zones: Drag and drop items from the data catalog to these areas of the canvas. The editor provides guidance about the supported data items for each active zone
- Ad hoc metrics: Use basic arithmetic functions to create these metrics
- Filter: Filter the insight based on specific criteria. To filer, drag and drop the Date or any attribute from the data catalog to this field. Alternatively, click the filter button and select the required attributes. The editor displays a message if there is any data that cannot be filtered
- Recommendations: Modify the insight based on usage patterns
- Configuration: Format the insight. Example: Change colors or position the legend. You may be unable to modify some charts
- Undo, Redo, and Clear: Undo or redo your changes. Click Clear to remove all data from the insight
- Open: View an insight. You can filter to view a list of only the insights that you created. Alternatively, type the partial or full name of an insight in the Search field
- Sort: Sort the data in your insight alphabetically, numerically, or chronologically. Sorting is available for bar charts, column charts, area charts, combo charts, bullet charts, pie charts, donut charts, and heatmaps
- Save
- Export: Refer to the Export Insight section.
Create Insight
Follow these steps to create an insight:
- On the Analytics > Insights tab, click Create Insights.
- Choose an insight type. Each chart type supports specific data types.
- Drag and drop one or more data items (fact, metric, attribute) from the data catalog to the active zones. You can view the data immediately after you add items to the fields. To create a new metric, add at least two data items.
- (Optional)
- To get more detailed data, drag and drop the Date or an Attribute to the Rows/Columns field (only for tables) or to the View by, Trend by, or Attribute fields (for other chart types).

- To split the data into stacked groups, drag and drop an Attribute to the Stack by or Segment by field. For Line charts, there must be only one data item in the Metrics field.
- To format the chart, use the Configuration options.
- To make changes, use the Undo, Redo, and Clear options. To delete a data item, click the item in the editor and drag it to the left.

- Use additional customization options. For more information, refer to the Additional Customization Options documentation.
- Name the insight.
- Click Save.
Additional Customization Options
Use one of more of the following options to customize the insight further.
Refine Data Items
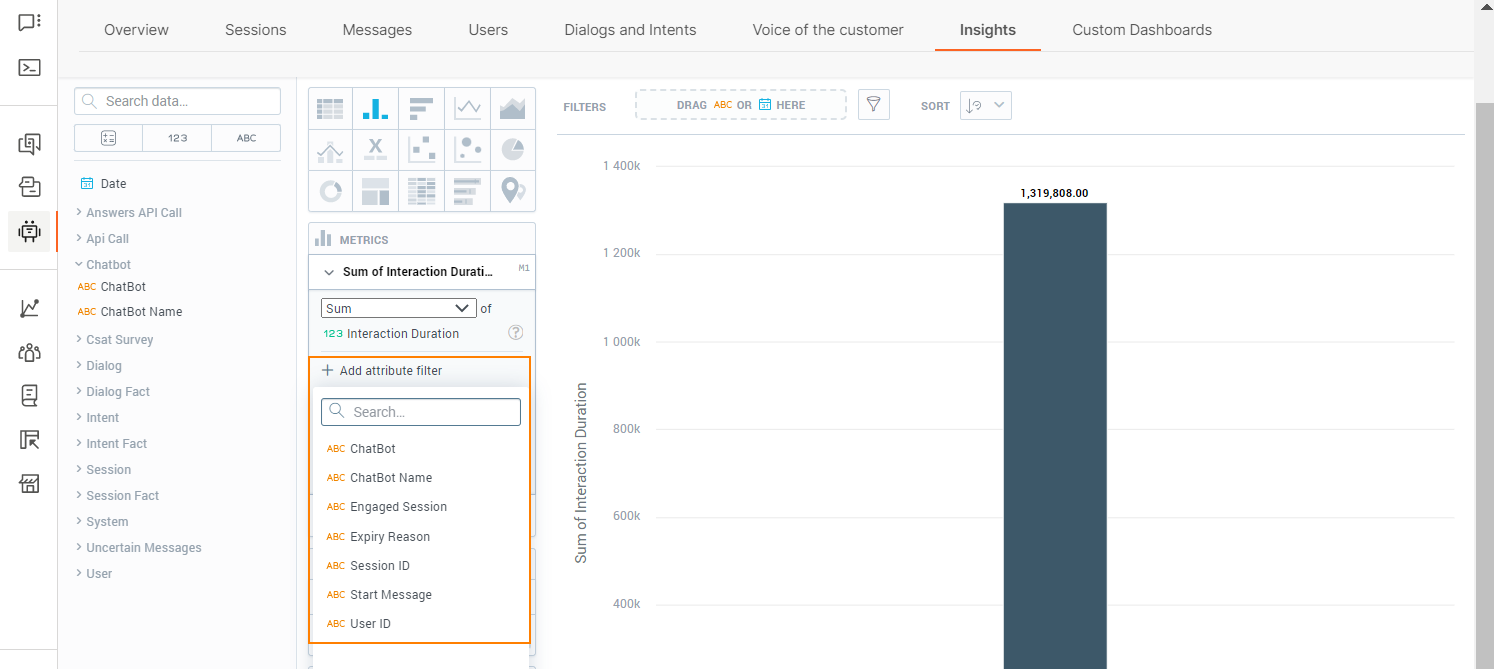
You can refine facts, metrics, and attributes. In the Metrics section, click the arrow against a data item.

You can do the following:
- Choose the type of calculation. This option is applicable only to Facts

- Display as a percentage
- Filter the attribute. Click Add attribute filter and then either choose a filter from the list or search for a filter by its complete or partial name. You can add the date and a maximum of 20 data items (metrics, facts, and attributes). All filters that you add are applied at the same time.
- Format the data values

Add Filters to the Insight
This section is for filtering the insight. For details about filtering the Attribute section, refer to the Refine Data Items section.
To filter the insight, drag and drop Date and other attributes to the Filter at the top.

(Optional) Click the item added to the Filter and choose the required options.
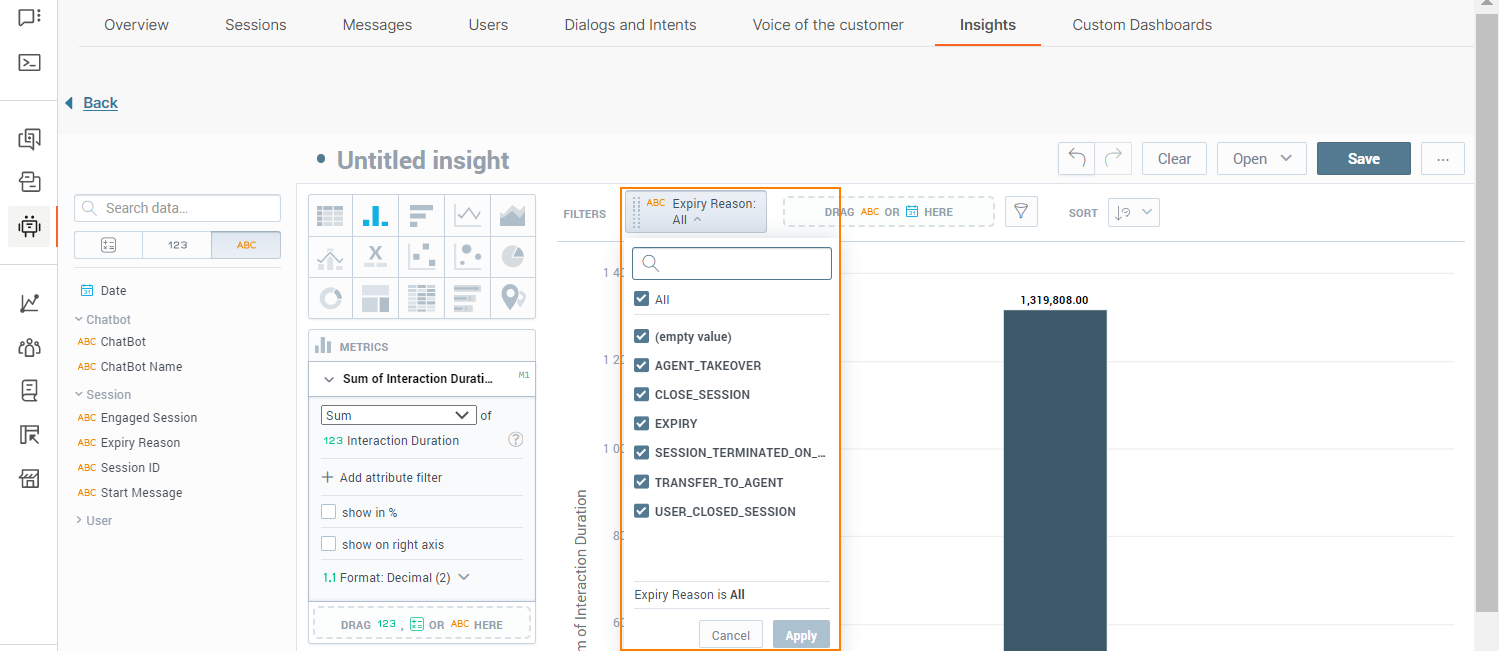
(Optional) Click the filter icon and choose the filters to apply.
![]()
Export Insight
On the Insights tab, click the three dots against an insight and choose one of the following file formats:
- .csv
- .xls
The insight is downloaded as a static file.

Custom Dashboards
Dashboards are visual representations of data. Create custom dashboards to obtain specific, relevant information about the performance of your chatbots. You can do the following:
- Track changes to your KPIs
- Compare current data across time periods
- Add, slice, and filter data
- Set alerts when there is a change in a KPI
The dashboards contain one or more of the following components.
- Insights: Multi-layer analytics that enable you to add and slice data based on multiple metrics.
- Key Performance Indicators (KPIs): Mono-layer analytics that display a single metric in numeric format. KPIs can be a whole number, decimal number, or a percentage.
- Attribute filter: Additional filters that you can add to the standard filtering options to filter reports by specific chatbot components. These filters are predefined and are based on the standard Answers fields.
Dashboards can contain more than one item of the same type. Example: multiple insights.
All the elements on the dashboard must together fulfil a common purpose.
To access dashboards, on the web interface, go to Answers > Analytics > Custom Dashboards. You can do the following:
- View dashboards. By default, the latest dashboard that you created is displayed. To view other dashboards, choose the dashboard from the Custom Dashboards menu.
- Create dashboards. You can either use custom metrics to customize an existing predefined dashboard or create a new custom dashboard from scratch.
- Edit dashboards.
- Export dashboards. Supported file type is .pdf.
- Share dashboards with other people in your organization.
Create Dashboard from Existing Predefined Dashboard
- On a predefined dashboard widget, click the menu button and click Explore from here.
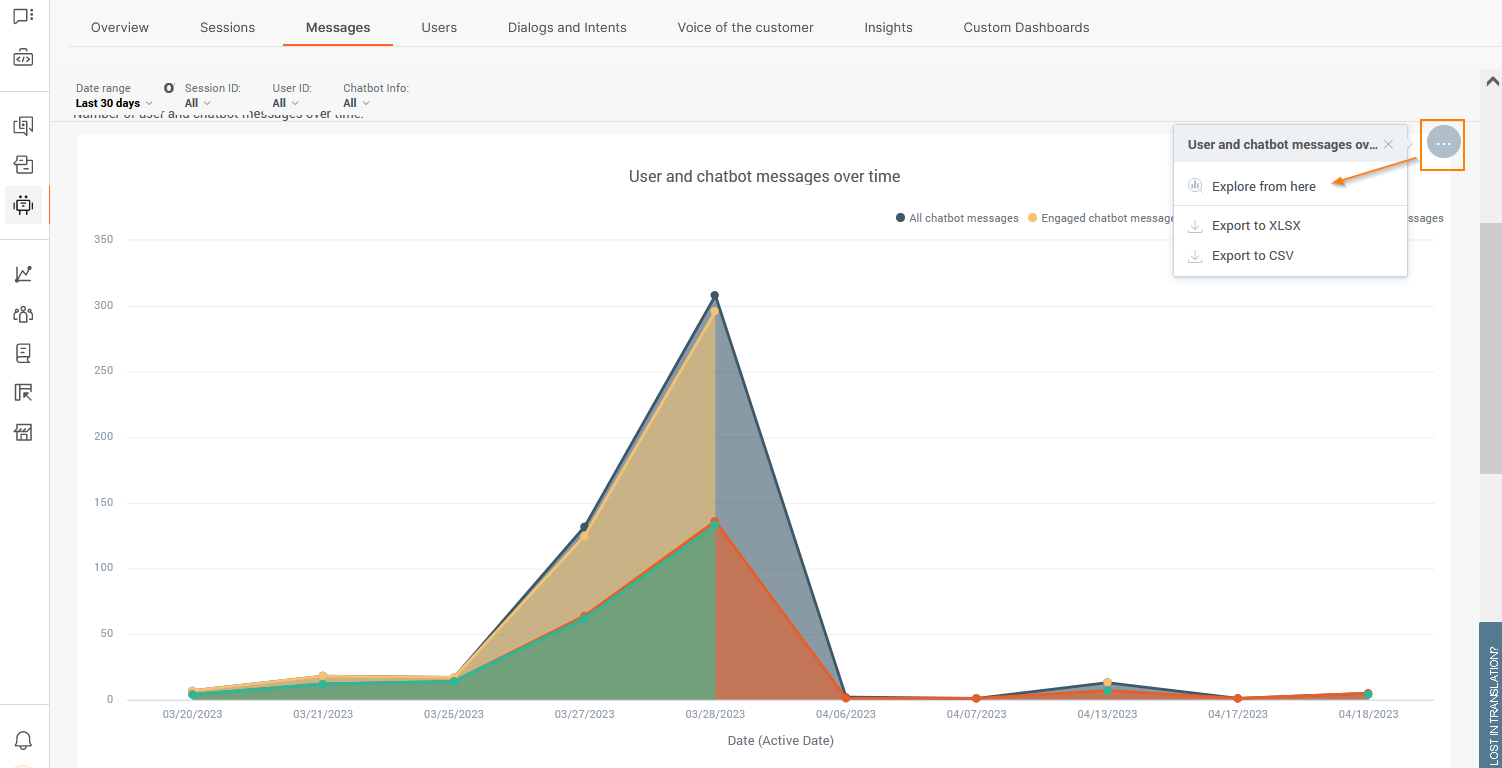
The report opens in the insight editor. For more information about the insight editor, refer to the Insights > Insight Editor documentation.
- Add other reporting elements to the editor.
- Click Save.
Create Dashboard from Scratch
Follow these steps to create a dashboard:
- Go to Analytics > Custom dashboards > Custom dashboards, and click Add dashboard.
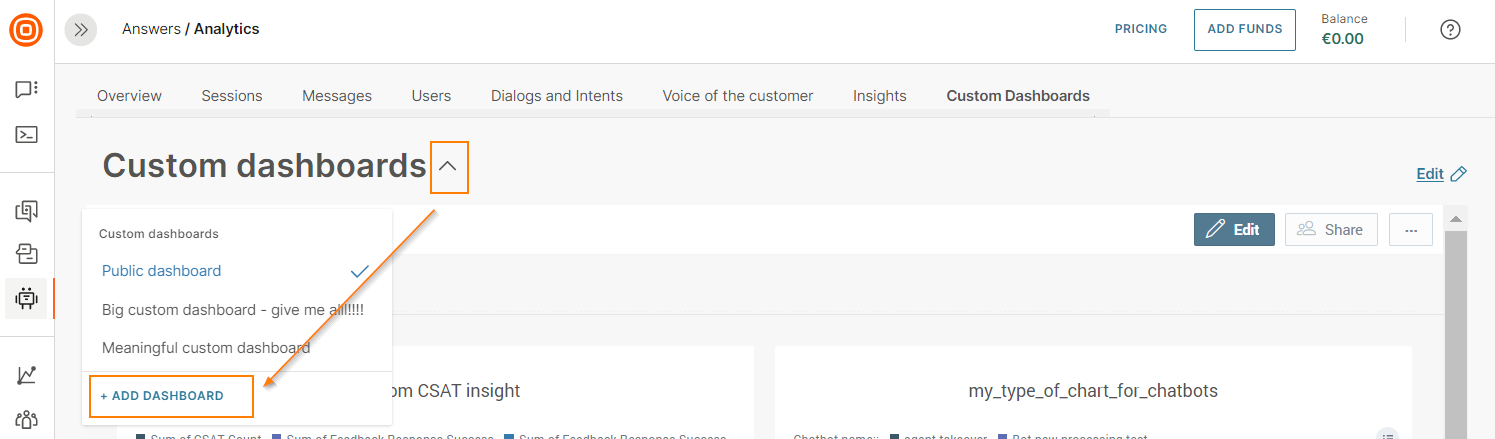
- Enter the dashboard name. Choose one of the following dashboard availability options:
- Public: Accessible by everyone who has access to Analytics on the Answers account
- Shared: Shared with specific users or groups
- Private: Visible only to the creator of the dashboard
- Click Create.
- Drag and drop one or more of the following items to the dashboard editor. You can also add more than one item of the same type. Example: multiple attributes. The editor provides guidance about where you can add each of these items.
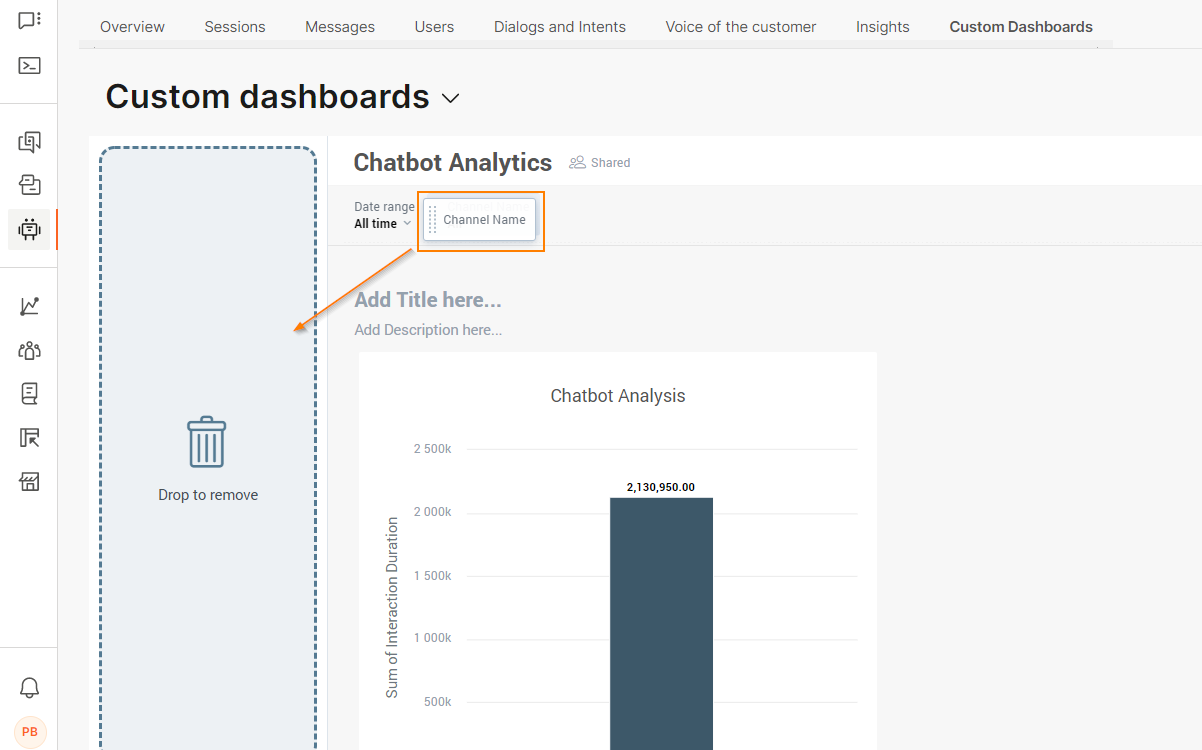
- Attribute Filter: After you add the Attribute Filter element, search for or choose an attribute from the list. Example: channel name, CSAT score. For each attribute, choose the values to filter. By default, all values are selected. You can add or edit these filters at any time, for example, if there are new reports.

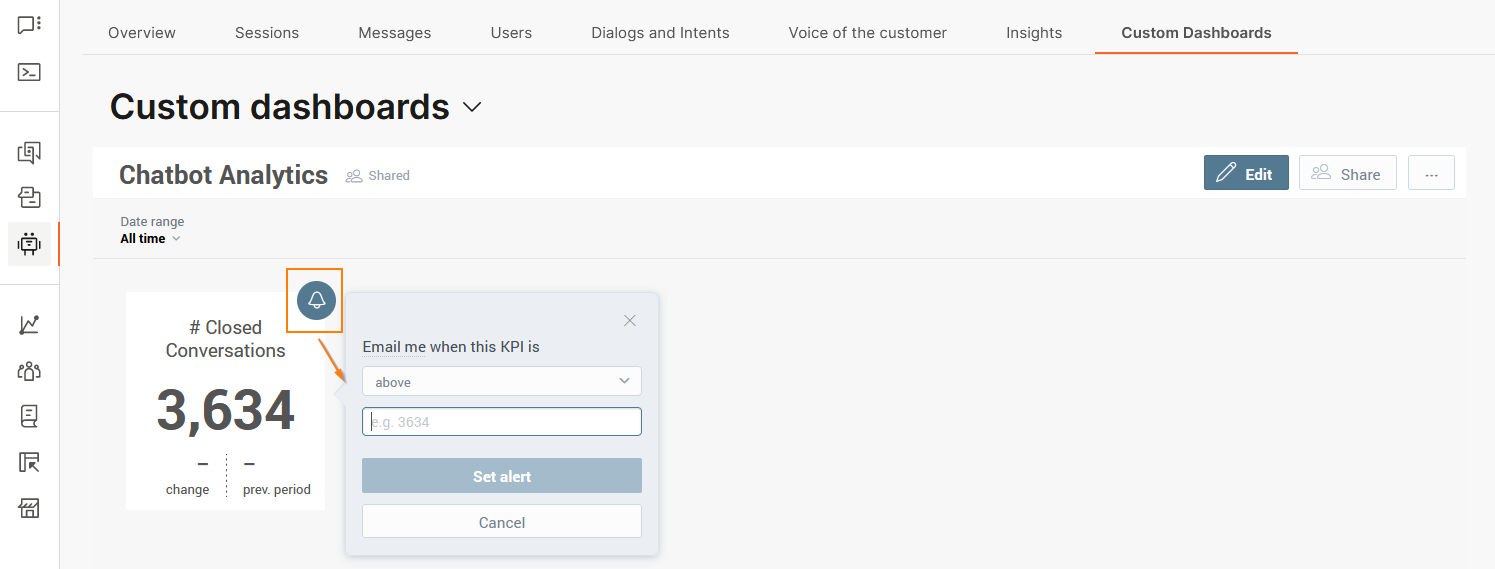
- Key Performance Indicator: After you add the KPI element, search for or choose a metric from the list. Example: session duration, new users.
You can also do the following:
- Filter by date or by one or more attributes. Choose an attribute in the Filter by section.
- Compare data between time periods. Choose the time period in the Comparison section. You can also choose whether to display the result in green or red color.
- Drill into a specific dashboard. Choose an existing dashboard in the Drill into dashboard section. When your custom dashboard is ready, you can click the KPI to view the selected dashboard.

- Set Alerts for KPI Changes: After you save the dashboard, you can set up email notifications for KPI changes. For more information, refer to the Alerts documentation.
- Insight: Create a new insight to display results by multiple data types. For more information, refer to the Insights documentation.
- Saved Insights: Search for an insight or choose an existing one from the list to display results by multiple data types. You can add insights that you created or those that are shared with you.
After you add the insight, click the insight to view the menu options. You can do the following:
- Add filters or hide the insight title: Click Configuration
- Make changes: Click Edit
- Enable zoom option for the insight: Click Interactions > Zoomable insight.
- Drill into data. For more information, refer to the Drill into Data documentation.
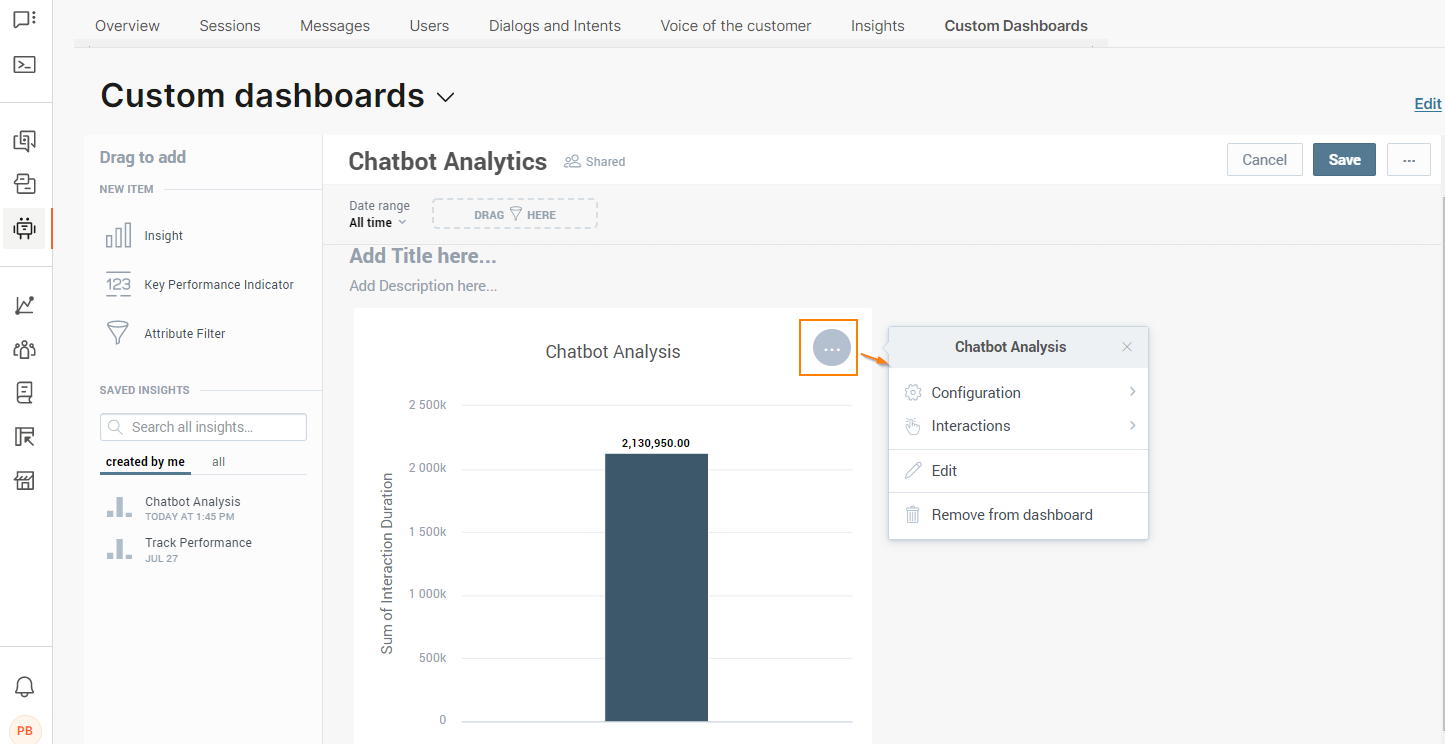
- Add titles and descriptions for each section.
- (Optional) To configure or delete a KPI or Insight, click the item to get the menu options, and then click Remove from dashboard. To delete an attribute filter, click the item and drag and drop it to the left.
- Click Save.
Drill into Data
After you add an insight to the dashboard, you configure drilling for the insight. You cannot drill into a KPI.
You can drill into the following:
- Insight
- Dashboard
- URL
After you configure the drilling, when you click on a fact, metric, or attribute in the View mode, the target insight, dashboard, or URL opens.
You can configure multiple drilling options for the same insight. Example: You can configure drilling into an insight and a dashboard.
To configure drilling:
- Click the insight to view the menu options.
- Click Interactions > Drill Interactions > Add interaction.
- Choose the data item for which you want to drill.
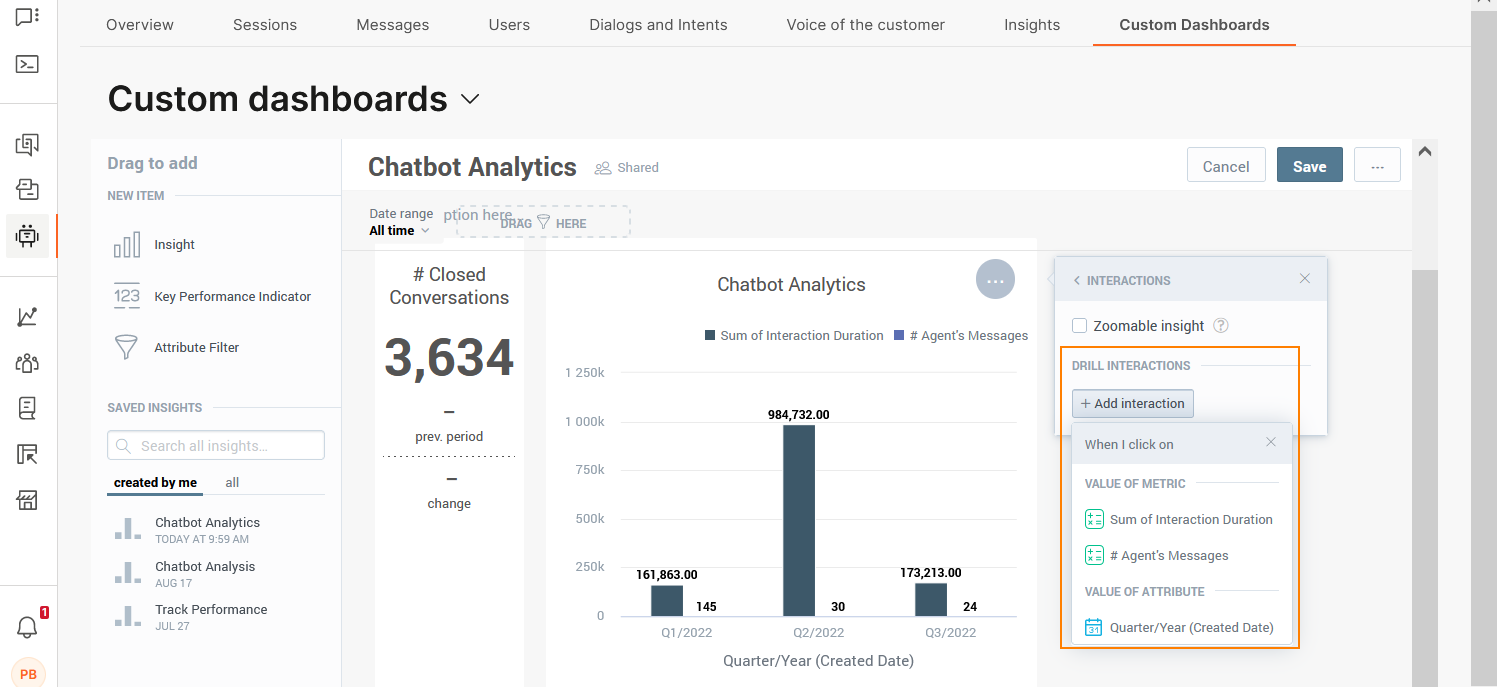
- In the I want to section, choose whether you want to drill into the insight, another dashboard, or a URL.
- Drill into dashboard: Choose an existing dashboard. You can choose dashboards that you created or those that are shared with you.
- Drill into insight: Choose the insight to which you want to drill. You can choose insights that you created or those that are shared with you.
- Drill into URL: Either choose an existing URL or create a custom URL.
- Click Save.
To view the results:
- On the dashboard, go to the insight.
- Click the item into which you want to drill. Then, click an item in either the Drill down or Drill into sections.


Data types
This section shows information about the data types.
Metrics
Metrics are numeric data that are calculated based on occurrences. The values of the metrics change constantly over time with new data. Metrics are in the form of numbers. They can be a whole number, a number to the nearest decimal point (1.0), or a percentage.
The use and results of these metrics depend on the context. Example: If you filter the Dialogs Triggered metric by dialog, the report shows the number of times a specific dialog was triggered. If you filter the Dialogs Triggered metric by session, the report shows the number of dialogs that were triggered in a specific session.
The following table shows the metrics that are available for custom insights and custom dashboards. The table shows the purpose of each metric and the formula that is used to calculate the metric.
| Metric | Description | Formula | Related Object |
|---|---|---|---|
| API Success Responses | The number of 'API Success' responses |
SELECT SUM(Number of Events) WHERE API Response Success = 1 |
Answers API Call |
| Average API Response Time | The average response time of an API call | SELECT SUM(Response Time)/SUM(Number of Events) | Answers API Call |
| Chatbot Containment Rate | The percentage of completed sessions that were not escalated to an agent | SELECT (SELECT Sessions WHERE Expiry Reason NOT IN (AGENT_TAKEOVER, TRANSFER_TO_AGENT) ) / Sessions | Chatbot |
| Dialogs Triggered | The number of times a specific dialog was triggered | SELECT IFNULL(Total Users Dialog,0) + (select 0*_Filter Dialog Fact) | Dialog |
| Number of Sessions per Dialog | The number of sessions that went through a specific dialog | SELECT COUNT(Session ID, Records of Dialog Fact) | Dialog |
| Session Ending Dialog (%) | The percentage of sessions that ended with a specific dialog | Select IFNULL( ( (Select SUM(Dialog Trigger Count) where Event Type <>DIALOG_START) / (Select SUM(Dialog Trigger Count) BY ALL OTHER where Event Type<>DIALOG_START WITHOUT PF EXCEPT Date (Start Date),ChatBot) ) ,0) | Dialog |
| Session Starting Dialog (%) | The percentage of sessions that started with a specific dialog | Select IFNULL( ( (Select SUM(Dialog Trigger Count) where Dialog = Start Dialog ) / (Select SUM(Dialog Trigger Count) BY ALL OTHER where Dialog = Start Dialog) ),0) | Dialog |
| Users Triggered Dialog | The total number of end users who interacted with a specific dialog (including dialogs without end users) | SELECT IFNULL(Total Users Dialog,0) + (select 0*_Filter Dialog Fact) | Dialog |
| Number of Users per Intent | The number of end users who triggered a specific intent | SELECT IFNULL(Total Users Intents,0) + (select 0*_Filter Intent Fact) | Intent |
| Intents Recognized (Count) | The total number of the times the chatbot recognized an intent | SELECT IFNULL(Total Users Intents,0) + (select 0*_Filter Intent Fact) | Intent |
| Session Starting Intent (%) | The percentage of sessions that started with a specific intent | Select IFNULL ( (Select sum(Intent Recognized Count) where Intent Start = YES) / (Select Count(Session ID,Records of Session Fact) by all other) ,0) | Intent |
| Avg. Inbound Messages per Engaged Session | The average number of inbound messages per engaged session | SELECT Total Messages Inbound Engaged / Sessions Engaged | Message |
| Avg. Inbound Messages per Session | The average number of inbound messages per session | SELECT Total Messages Inbound/Sessions | Message |
| Avg. Messages per Engaged Session | The average number of messages per engaged session | SELECT Total Messages/SUM(Sessions) where Session Inbound Messages > 1 | Message |
| Avg. Messages per Session | The average number of messages per session | SELECT Total Messages/SUM(Sessions) | Message |
| Avg. Outbound Messages per Engaged Session | The average number of outbound messages per engaged session | SELECT Total Messages Outbound Engaged / Sessions Engaged | Message |
| Avg. Outbound messages per Session | The average number of outbound messages per session | SELECT Total Messages Outbound / Sessions | Message |
| Session Inbound Messages | The total number of inbound messages per session | Select SUM(Message Count) by Session ID where Direction=INBOUND | Message |
| Total Inbound Messages per Engaged Session | The total number of inbound messages per engaged session | Select Total Messages Inbound where Session Inbound Messages > 1 | Message |
| Total Inbound Messages per Session | The total number of inbound messages per session | Select Total Messages Inbound by all other except Session ID | Message |
| Total Messages Inbound | The total number of inbound messages | SELECT Total Messages where Direction=INBOUND | Message |
| Total Messages Outbound | The total number of outbound messages | SELECT Total Messages where Direction=OUTBOUND | Message |
| Total Messages Outbound per Engaged Session | The total number of outbound messages per engaged session | Select Total Messages Outbound where Session Inbound Messages > 1 | Message |
| Total Messages Outbound per Session | The total number of outbound messages by session | Select Total Messages Outbound by all other except Session ID | Message |
| Total Messages per Engaged Session | The total number of messages per engaged session | SELECT Total Messages where Session Inbound Messages > 1 | Message |
| Total Messages | The total number of messages | SELECT SUM(Message Count) | Message |
| Total Unrecognized Inbound Messages | The number of inbound messages for which the intent was not recognized | SELECT SUM(Message Received Count) | Message |
| Average Interaction Duration | Average duration of an interaction | Select AVG(Interaction Duration) where Date (Start Date) between Timeline Start and Timeline End | Session |
| Average Session Duration | Average duration of a session | Select AVG(Session Duration) where Date (Start Date) between Timeline Start and Timeline End | Session |
| Avg. Engaged Session Duration | Average duration of engaged sessions | Select Avg. Session Duration where Session Inbound Messages > 1 | Session |
| Engaged Sessions Ratio (%) | The percentage of sessions that were engaged | SELECT Sessions Engaged / Sessions | Session |
| Number of Engaged Sessions | The number of engaged sessions | Select Sessions where Session Inbound Messages > 1 | Session |
| Number of Sessions | The total number of sessions | Select Count(Session ID,Records of Session Fact) | Session |
| Session API Calls | The total number of unique API calls | SELECT SUM(Number of Events) | Session |
| Session Duration | The total duration of a session | Session | |
| Avg. Sessions per User | The average number of sessions per end user | Select Sessions/Users | Session |
| Avg. Session CSAT Score | The average of session CSAT survey score | SELECT SUM(Score) / COUNT(Records of CSAT Survey) WHERE NOT (Score = (empty value)) | Session CSAT |
| Session CSAT Happy Percentage | The percentage of happy CSAT session responses in all responses | SELECT (SELECT SUM(CSAT Count) WHERE Score = Happy)/(Select SUM(CSAT Count) WHERE Score IN (Not Happy,Happy)) | Session CSAT |
| Session CSAT Not Responded | The number of session CSAT surveys without a response | Select SUM(CSAT Count) where Response Success = 0 | Session CSAT |
| Session CSAT Responded | The number of session CSAT surveys responded | Select SUM(CSAT Count) where Response Success = 1 | Session CSAT |
| Session CSAT Response Rate (%) | The session CSAT survey response rate in % | Select Session CSAT Responded/SUM(CSAT Count) | Session CSAT |
| Session CSAT Responses (Score and Comment) | The number of sessions with both CSAT score and comment | Select SUM(CSAT Count) where Response Success = 1 and Feedback Response Success = 1 | Session CSAT |
| Session CSAT Responses (Score Only) | The number of session CSAT responses with score only | Select SUM(CSAT Count) where Response Success = 1 and Feedback Response Success = 0 | Session CSAT |
| Avg. Engaged Sessions per Engaged User | The average number of engaged sessions (sessions with more than 2 responses from end users) per engaged end user (end users who responded more than 2 times within a session) | SELECT Sessions Engaged / Users Engaged (within period) | User |
| Chatbot Users |
The total number of end users who interacted with the chatbots within the selected time Timeline date filter is required |
Select Count(User ID,Records of Session Fact) where Date (Start Date) between Timeline Start and Timeline End | User |
| Chatbot Engaged Users |
The total number of engaged end users Timeline date filter is required |
Select Count(User ID,Records of Session Fact) where Session Inbound Messages > 1 and Date (Start Date) between Timeline Start and Timeline End | User |
| New Engaged Users | The total number of new end users who responded more than 2 times during their conversation with the chatbot | SELECT ( Select Count(User ID,Records of Session Fact) where (select min(select _ System Start Date by Records of Session Fact,Date (Start Date)) by User ID,all other with pf except Date (Start Date)) >= (select min(Date (Start Date)*SIGN(_ System Start Date)) by all other) AND Session Inbound Messages > 1 ) | User |
| New Users | The total number of new end users | SELECT ( Select Count(User ID,Records of Session Fact) where (select min(select _ System Start Date by Records of Session Fact,Date (Start Date)) by User ID,all other with pf except Date (Start Date)) >= (select min(Date (Start Date)*SIGN(_ System Start Date)) by all other) ) | User |
| Returning Engaged Users | The number of returning end users who responded more than 2 times during their conversation with the chatbot | Select IFNULL(( Select Count(User ID,Records of Session Fact) where (select min(select _ System Start Date by Records of Session Fact,Date (Start Date)) by User ID,all other with pf except Date (Start Date)) < (select min(Date (Start Date)*SIGN(_ System Start Date)) by all other) AND Session Inbound Messages > 1),0) | User |
| Returning Users | The total number of end users who were active during the selected period, and had interacted with a chatbot before that period started. | Select IFNULL(( Select Count(User ID,Records of Session Fact) where (select min(select _ System Start Date by Records of Session Fact,Date (Start Date)) by User ID,all other with pf except Date (Start Date)) < (select min(Date (Start Date)*SIGN(_ System Start Date)) by all other)),0) | User |
| New vs Returning User Flag | The status of each end user (New or Returning user) | Select New Users | User |
| User Retention Rate | The percentage of returning end users within the selected time period | SELECT Returning Users / Users | User |
In the Insights editor, metrics are grouped by related objects. Example: In the following image, the API Success Responses metric is present under Answers API Call.
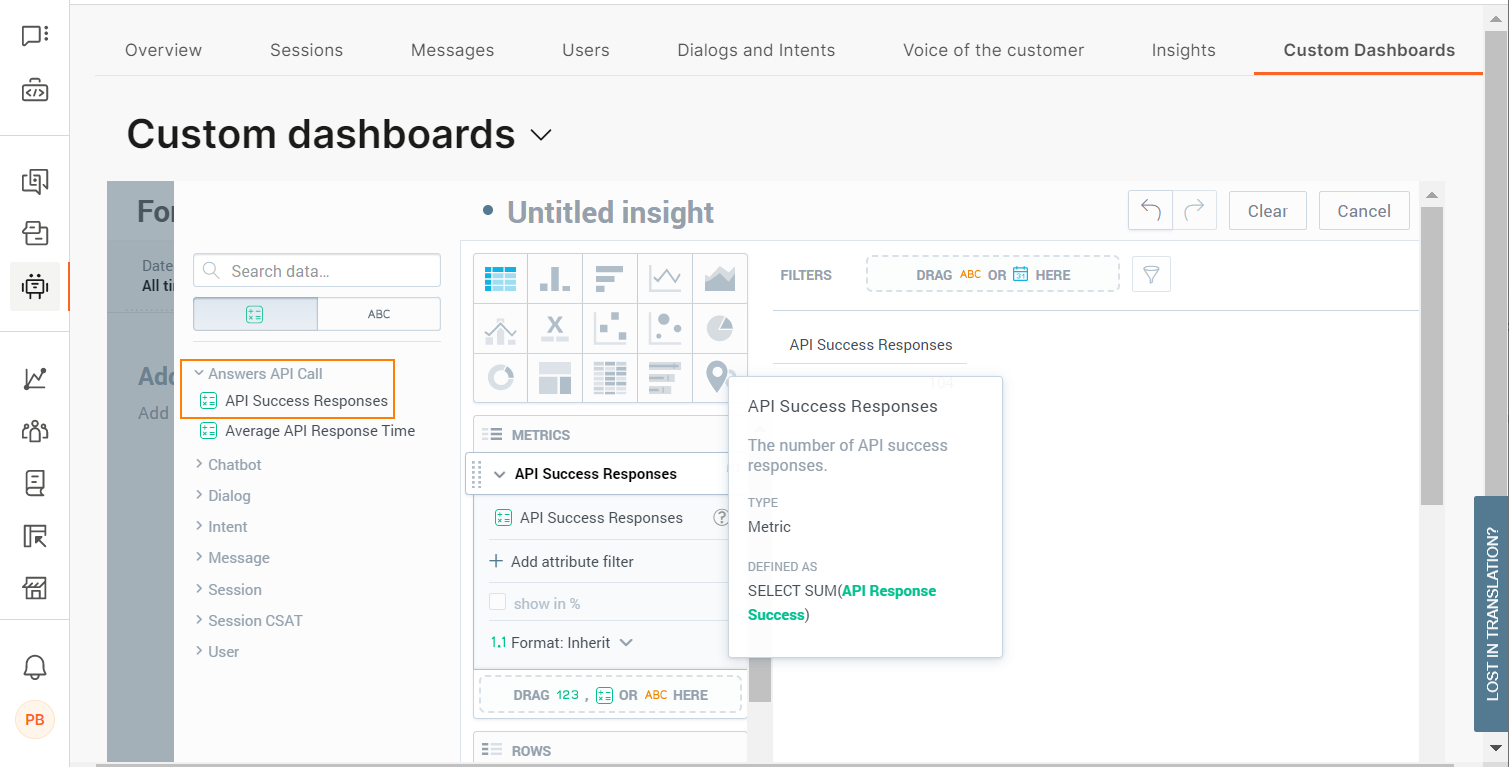
You can also view the information, which is present in the table, in the Insights editor. Hover over the question mark symbol against a metric to view its information.

Alternatively, after you drag a metric to the Insights editor, hover over the question mark symbol against a metric to view its information.

Attributes
This section shows information about the attributes that are available for custom insights and custom dashboards.
| Attribute | Description | Related Object |
|---|---|---|
| Original URL | The value of the original URL | Answers API Call |
| API Request Type | The type of the request. This is usually GET or POST | Answers API Call |
| API Response Code | The standard HTTP response status codes of the response | Answers API Call |
| URL | The value of the URL, which might differ from the original URL | Answers API Call |
| User ID | The unique ID for every end user who interacted with the chatbot | Answers User |
| Chatbot Info | The unique identifier of the chatbot. This can be a chatbot name or an ID | Chat Bot |
| Chatbot Name | The name of the chatbot | Chat Bot |
| Chatbot Element Type | The dialog and other chatbot element types | Chat Bot |
| Customer's Company Country | The country of origin of the end user's company | Customer |
| Customer's Company Industry | The industry to which the end user’s company belongs, based on their primary business activity | Customer |
| Customer's Company Name | The full name of the of the end user's company | Customer |
| Customer's Company Region | The region of the end user's company | Customer |
| Customer's Company Segment | The segment of the end user's company | Customer |
| Customer Info | Information about the end user. Includes ID, name, or stored value from People | Customer |
| Dialog Info | The information (ID or name) about the dialog | Dialog |
| Dialog Name | The name of the dialog | Dialog |
| Is Start Dialog? | Indicates whether the dialog is a Start dialog (Y) or not (N) | Dialog |
| Global Dialog ID | The global ID of the dialog | Dialog |
| Intent Info | The information (Unique ID or name) about the intent | Intent |
| Intent Name | The name of the intent | Intent |
| Session Start Intent | Specifies whether this was the starting intent (Y) for the session or not (N) | Intent |
| Message Direction | The direction of the message (inbound or outbound) | Message |
| Session Uncertain Message | The message that is described as uncertain | Message |
| Session Start Message | Displays the first message that was sent to the session | Message |
| Is Session Engaged? | The binary attribute that indicates is the session engaged. A session is engaged if the end user exchanged at least 2 messages with the chatbot after the session started | Session |
| Session Expiry Reason | The reason a session expired | Session |
| Session ID | The unique identifier of the session | Session |
| Session Start Dialog | The ID of the dialog at the start of the session | Session |
| Session CSAT Comment | The comment that the end user provided about the session in the survey | Session CSAT |
| Session CSAT Score | The score that the end user provided about the session in the survey | Session CSAT |
In the Insights editor, attributes are grouped by related objects. Example: In the following image, the API Request Type attribute is present under Answers API Call.
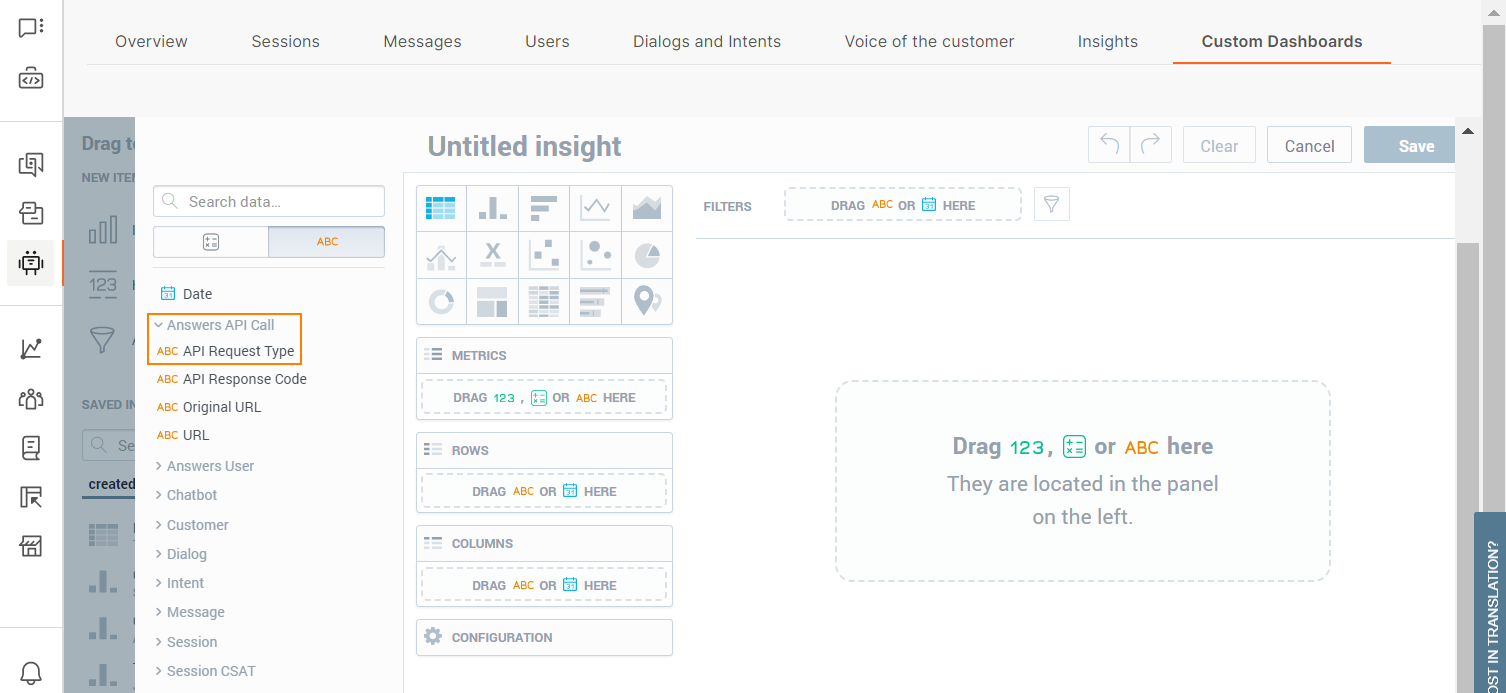
You can also view the information, which is present in the table, in the Insights editor. Hover over the question mark symbol against an attribute to view its information.

Alternatively, after you drag an attribute to the Insights editor, hover over the question mark symbol against an attribute to view its information.

Alerts
Set up alerts to receive an email notification when a KPI value crosses the specified threshold.
You can add alerts only to KPIs and not to other components, such as insights.
To add an alert to a KPI:
- Go to the Custom Dashboards tab.
- Choose the required dashboard.
- Hover over the KPI for which you want to add an alert.
- Click the bell icon.
- Set the following parameters:
- Choose whether to receive the notification when the KPI value is above or below the threshold.
- Enter the threshold value.
- Click Set alert.
You will now receive the alert at the email address associated with your Infobip account.
Monitor Chatbot Performance
Identify whether the chatbot that you designed performs according to your assumptions. You can identify the following:
- Is there a large discrepancy between total and engaged sessions?
- Do end users return to conversations?
- Use CSAT and get feedback from your end users.
- Do many users request agent help or do agents need to take over conversations?
Identify if there is a discrepancy between total and engaged sessions
In the Sessions tab > Sessions summary section, you can see the total number of sessions and the number of engaged sessions.
An engaged session indicates that the end user continued the conversation with the chatbot after they sent the initial message. So, it is preferable for sessions to be engaged.

If you notice that that are large number of sessions are not engaged, it could mean one or more of the following:
- Your end users lose interest in talking with the chatbot after they receive its reply. Identify how to make the initial message from the chatbot more engaging. Consider whether end users know how to respond to the chatbot and offer options or examples of messages that they can send to the chatbot. Explain what the chatbot can do for them.
- Instead of an end user, another chatbot is sending messages to your chatbot. To check whether this might be the case, go to the Users tab and click the suspected User ID. Then, click the Session ID to see all the messages in the conversation.
- The chatbot does not know how to reply to the end users' messages. The reason could be that the chatbot cannot identify the intent of the initial message and reply to it correctly. Check whether the end users' initial messages are part of your chatbot's training. Add these messages as keywords (rule-based chatbots) or training phrases (AI chatbots).
Identify how many end users return
Depending on the type of chatbot, you might want your end users to return and have new conversations with your chatbot.
Example: If you have a retail chatbot, a large number of returning end users is desirable because it indicates that the end users liked the experience. But if you have a chatbot that does first line of support, a large number of returning end users indicates that their queries were not resolved the first time they contacted your chatbot.
To see the number of returning users, go to the Users tab.
See the number of sessions for returning users. If an end user has a large number of sessions, go to the Sessions tab. Click the Session IDs for the end user to see all the messages in the conversation and identify what challenges they faced.

Use customer satisfaction score
Use customer satisfaction (CSAT) score to see how satisfied your end users are after they finish their conversation with the chatbot.
To see CSAT information, you must have CSAT configured in your chatbot. Refer to the documentation for the CSAT element.
After you configure CSAT, you can check how many end users are happy or unhappy. CSAT enables end users to leave comments, which can help you identify what frustrations they face or what makes them happy.
To view the CSAT information, go to the Voice of the Customer tab.

How many dialogs request agent assistance?
An end user might be redirected to an agent in one or more of the following cases:
- The chatbot assistance is limited by design. Example: The chatbot is designed only to provide initial support.
- The chatbot is unable to understand what the end user wants.
- An agent needed to take over the conversation because the chatbot could not resolve the end user’s query.
- The end user requested to be transferred to an agent.
Go to the Dialogs and Intents tab > Dialog and intent insights > Dialog insights section. See which dialogs resulted in either Go to agent action or Agent’s takeover. If these dialogs are not designed to require agent's assistance, it indicates that the dialog or the chatbot needs to be redesigned.

Improve your chatbot
Identify if conversations are ineffective and learn how to fix them.
- How end users start conversations and enter a dialog.
- Are there messages that were not assigned to intents?
- What types of messages could the chatbot not process?
Dialog entry
In the Dialogs and intents tab > Top user start messages section, identify the most common messages that end users send as conversation entry points.
Check whether these messages are present in the Not understood user messages and Unhandled user messages sections. If you find that end user start messages are present in these sections, correct these errors.
Not Understood User Messages
Use the Dialogs and intents tab >Not understood user messages list to identify end user messages for which the chatbot cannot identify an intent.
You can add these messages to the training dataset as applicable, or even create new intents for the messages.
If this list includes any messages that are also present in the Dialogs and intents tab > Top user start messages section, you might need to include relevant messages in the training dataset of your starting intent.

Unhandled user messages
In the Dialogs and intents tab > unhandled user messages section, check user messages that the chatbot was not able to handle. The list gives an overview of where end users do not know how to respond to the chatbot or responded incorrectly.
You might need to add more synonyms to the keyword to help the chatbot understand variants of end user responses.

Train the chatbot
After you analyze the data for your conversations, use your findings to train the chatbot.
- Add missing phrases to intents.
- If necessary, add intents where required to improve the conversational design.
- Add more synonyms to keywords where required.
- Update the User input element to include missing options for end user responses. Example: Add relevant keywords.