Get to know Conversations
Once you have set up the environment, the agents can start managing conversations and customer inquiries. All conversation management happens within the Agent panel.
To start, the agent needs to log in to the Infobip web interface and navigate to the Conversations module on the left menu navigation.
For performance optimization, agents should mark their availability by changing their status when taking over a conversation. The status reflects several things, however, it is important because this way Supervisors can track and manage team capacity in real-time.
To change the status, the agent should navigate to their User profile in the bottom left corner → Choose status from the drop-down menu below their agent name and profile picture.
The default status is Active and the agent can change this status at any time.
Available statuses are:
- Busy
- Offline
- Away
Agents can set these per their current workload to denote their availability in the contact center.
Agent panel consists of two main areas:
- My Work – Displays all conversations agent is working on at the moment
- All Work – Shows all conversations and queues
All Work panel
All Work is a place for supervisors and agents to have all conversations listed and grouped by certain criteria. Infobip platform offers predefined views and allows users to create their own custom views.
The All Work panel encompasses all conversations and queues, including those assigned to others. Conversations are grouped into views that are defined by filters and can be private or global.
-
Predefined views contain views that are industry standards and will certainly help users to better navigate between conversations.
-
Custom views allow users to create filters and cover some of their specific cases that they often filter and these views can be:
- Private - Each individual user can create views for themselves. These help individual users to organize conversations and be more productive and are visible only to the creator.
- Global - a set of views available to all users. Supervisors can create views (up to 8 global views) for all agents to use that will help them manage conversations more efficiently.
Also, global views include predefined views which are industry standards and help agents in their tasks:
- Unassigned (consists of all open conversations without the assignee)
- All (consists of all open conversations regardless of the queue)
- History (consists of all closed conversations regardless of the queue)
- All Bots (consists of all conversations currently handled by bots)
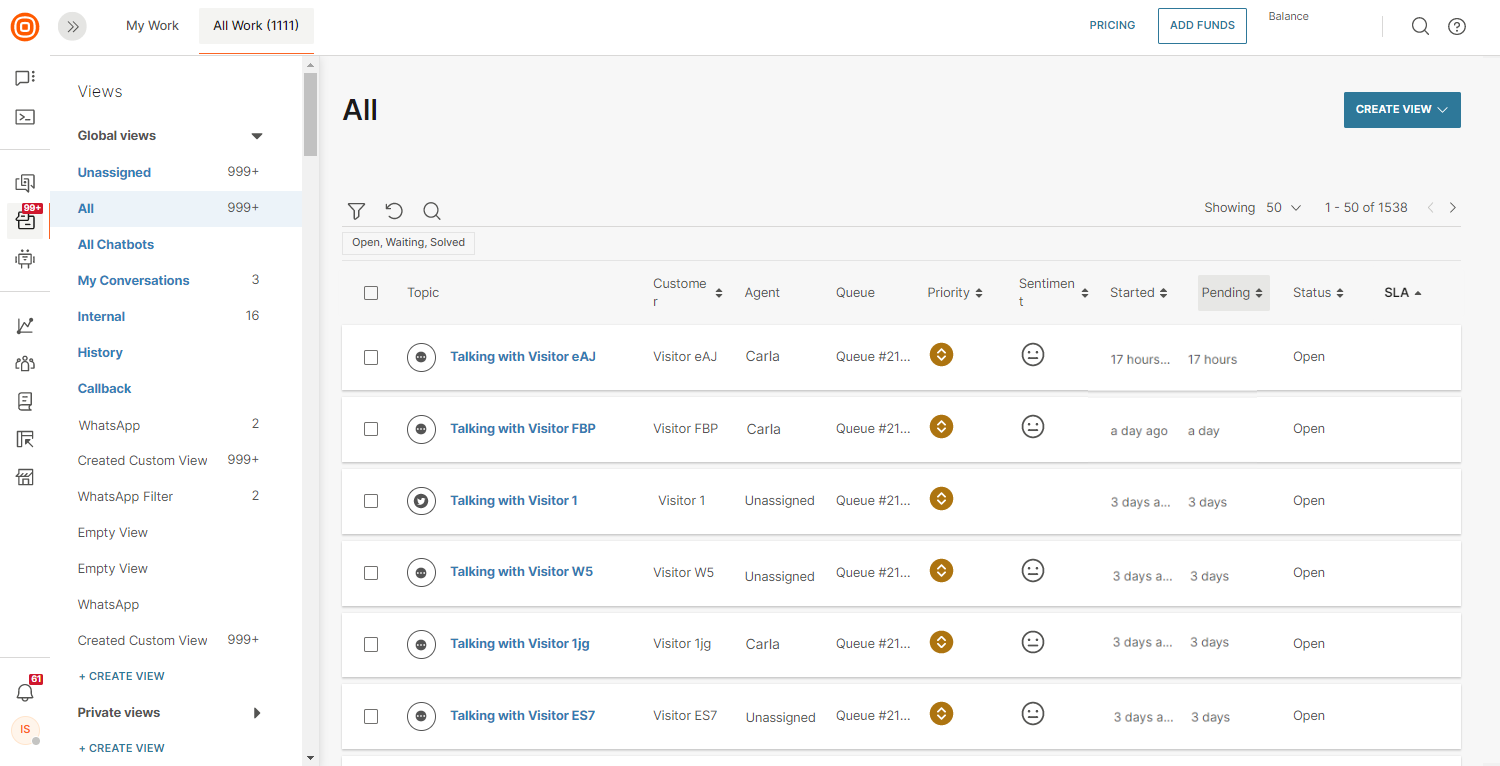
When you click on a specific queue/view, a list of all conversations within that queue/view will appear. Conversations are listed from newest to oldest.
Each conversation in the list contains the following information:
- Channel icon
- Conversation topic
- Customer
- Assigned Agent
- Assigned Queue
- Priority
- Sentiment (if enabled on account)
- Started - The date when the conversation is created
- Pending - Time elapsed from the last customer message if the agent reply is still pending
- Status - Shows the conversation status (Open, Waiting, and Solved)
- SLA - Shows if a particular conversation has breached SLA
Agent can open a conversation by clicking on it or assign it to themselves by selecting the conversation(s) and clicking the Assign To Me button.
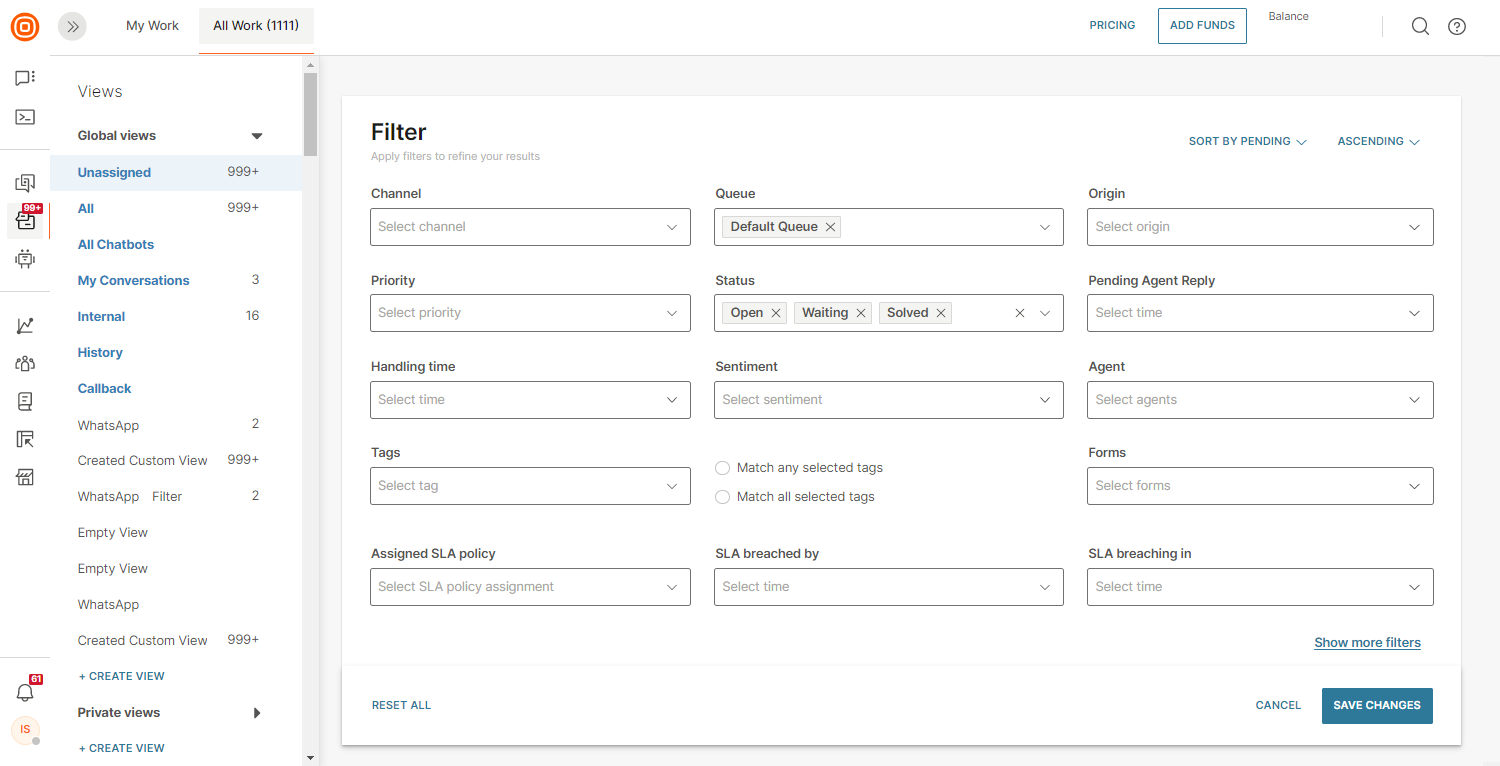
Clicking + Create View or the filter icon opens a filter tray offering options to filter conversations in the current view or queue. Also, minimized tray shows which filters are applied in the current view.
Below Views, in the Queues section, you can find specific queues. Queues consist of any queue defined by the supervisor combined with the default queue. The Default queue consists of all open conversations that did not land in any user-defined queue. Each agent can see only those queues they are assigned to as a resource while supervisors have access to all queues.
To learn more about queues, refer to the Queues and Routing article under the Supervisor guide page.
Information about the number of conversations within the queue/view is visible next to the queues and predefined views.
Click on the table header to sort by customer, priority, requested, or pending. By default, all conversations are sorted based on the pending column in a descending order to alert to the longest waiting times from the customer end. Search and quick filter by priority and channel in the top right corner above the table.
Additionally, more advanced filtering options are available in All Work under Filters:
- Channels
- Date
- Priority
- Status
- Pending agent reply
- Queues
- Agents
- Customers
- Tags
With the Pending agent reply filter, Supervisors, as well as Agents can see how long the end user has been waiting for a reply, react promptly to avoid long waiting times and ensure good customer experience.
Closed conversations filtering and querying
In All Work, closed and non-closed conversations are placed separately in dedicated views, which means that these conversations cannot be filtered together.
Whenever a conversation is closed, it is placed in the History view, but you can create exclusive Custom views (Private and Global) for closed conversations only.
 The Private and Global custom views support either the selection of closed or non-closed status in the filter. Selecting one will automatically disable the other.

If you create a new view with no status selection, it will only show non-closed conversations.
INFO
Temporary views created from Analytics show a generic warning message that by default only non-closed conversations appear, but Closed status can be explicitly selected in the filters.
It is recommended to enter the conversation start date to get better results when filtering conversations. In cases where the selected date range is wider (6 months or more), another warning message appears indicating that it might lead to longer query times.

Bulk actions
Users often need a way to modify several conversations at once (e.g., an agent is on sick leave so all their tasks should be shared among the team).
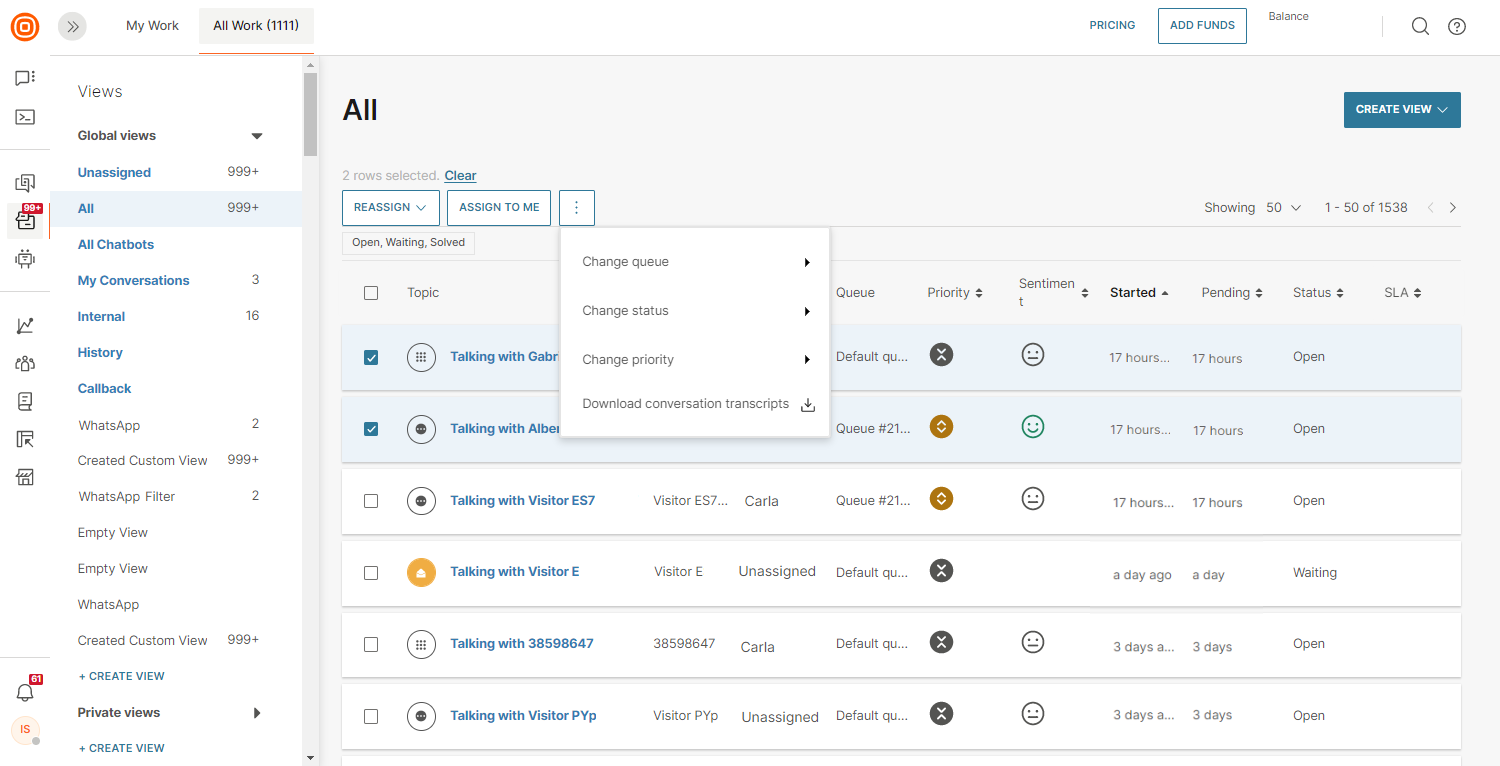
The following bulk actions are available in the All Work panel:
Assign/reassign list
- The Reassign button appears after the conversation(s) are selected and clicking it enables the selection of agents to whom the conversation can be reassigned
- The assignment logic follows the regular assignment rules (e.g., a conversation cannot be assigned to an agent who is not part of the current conversation queue)
Change priority
Navigate to the 3-dot icon to select the action and change the priority.
Change status
Change the status by clicking on the 3-dot icon to select the action.
Change queue
Click the action to display a searchable list of available queues.
Download conversations
Download all selected conversations (up to 100) and create a .zip file storing them in selected file format (.txt or .xlsx).
To perform any of these actions, either check the upper left check box which selects all the conversations on the list, or select the checkbox next to a specific conversation. Once you have selected the check box, bulk actions appear in the top right corner.
Persistence in All Work
The persistence in switching between the All Work and My Work tabs is particularly important when agents manually select their work and do not want to lose track of where they picked a conversation from.
With tab switching, you can access the last state of the page you visited, and with the back button, you can access multiple saved states of the pages. The system remembers the page, scroll position, filters applied, etc.
Persistence is on two levels:
- Persistence when switching between All Work and My Work tabs: When you select a conversation from All Work and click to open it, the conversation is expanded under the My Work tab. When you return to the All Work tab, you are directed to the view, filters, and scroll position you started with. The nature of persistence in the tab switching enables you to access the last saved state of the page.
2. Persistence when clicking the back button in the browser: When you select and open a conversation from All Work, the conversation is expanded. When the back button is clicked, you are taken to the last page and its saved state.
Service-level agreement
If the Supervisor has successfully set up at least one SLA policy, this will be displayed in the All Work panel as a new column so agents can see the SLA for every conversation, where applicable.
This column offers the following information:
- SLA time closest to achieving the breach
- Or SLA time which has the largest breached time (if both currently counted SLA timers have already been breached)
Agents can also use the filtering options and check the conversations regarding SLA only:
- Assigned SLA policy identifies all conversations with an assigned SLA policy.
- SLA breached by is a time-based filter that provides the list of conversations that have already breached the chosen timeframe.
- SLA breaching in is a time-based filter that provides the list of conversations that are close to breaching in the chosen timeframe.
CDP Data
Digital Channels
The CDP data in Digital channels (WhatsApp, Viber, SMS, MMS, Voice, Video, Live Chat, In-app Messaging, Google Business Messaging, Messenger, Instagram, Telegram, KakaoTalk, LINE, Apple Business Messages, and Twitter) reflects differently on the Topic in All Work and My Work based on the following:
- Conversation is created (and if customer does not exist in CDP) - For each digital channel, a different ID (customer number as fetched by the gateway) is used as a default if the first name is not present (Talking with
). - Customer exists in CDP (and is linked to the conversation) the topic is presented as Talking with
. - Customer info is updated/linked to a different profile.
- CDP profile is updated while the Conversation is closed; in the three cases above, the display name from CDP is updated only when the Customer Context Card is expanded (Talking with
).
The Customer Context Card in My Work is also impacted differently considering the following events:
- Conversation is created (and if customer does not exist in CDP) - Customer name (name or ID as fetched by the Gateway) is displayed and other selected attributes on the Customer Context Card are displayed with NULL values.
- Customer exists in CDP (and is linked to the conversation) - Customer name and other selected attributes on the Customer Context Card are displayed and updated on the expansion.
- Customer info is updated/linked to a different profile - The Customer Context Card is expanded to unlink or link to a new profile.
- CDP profile is updated while the Conversation is closed - Customer name and other selected attributes on the Customer Context Card are displayed and updated on the expansion.
For Email, when a conversation is created, the Email subject is the Topic in My Work and All Work. In both places, agents can manually change the subject and topic which is reflected on the Conversation table.
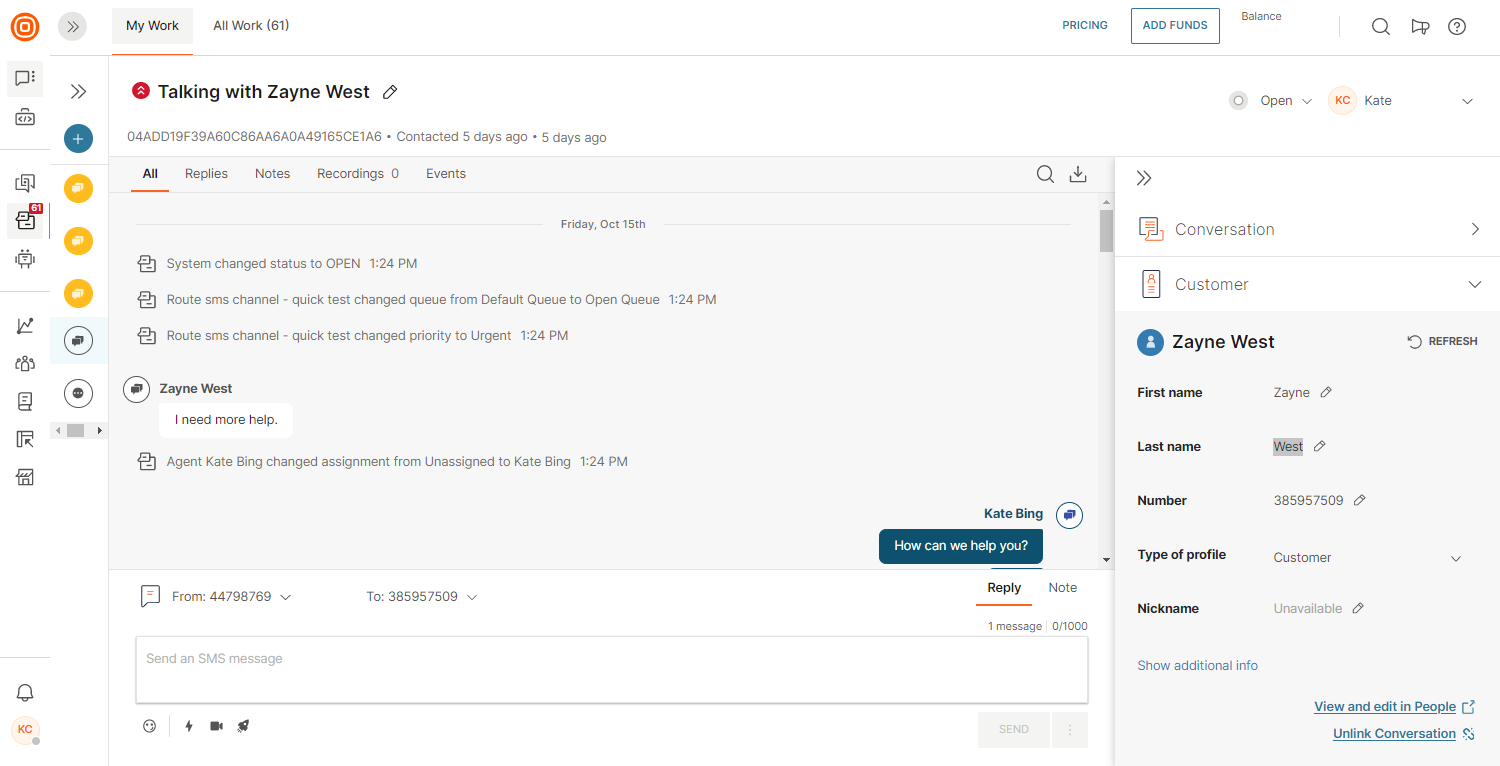
My Work panel
My Work is the main agent dashboard where agents can:
- Check conversations assigned to them
- Check details about each conversation
- Manage conversations and conversation details
- Create new conversations
On the left side, agents can see the list of conversations assigned to them. The Assigned conversations list contains conversations with the following status:
- Open
- Solved
- Pending
They are listed by date of the last customer message received (last received is always on top of the list).
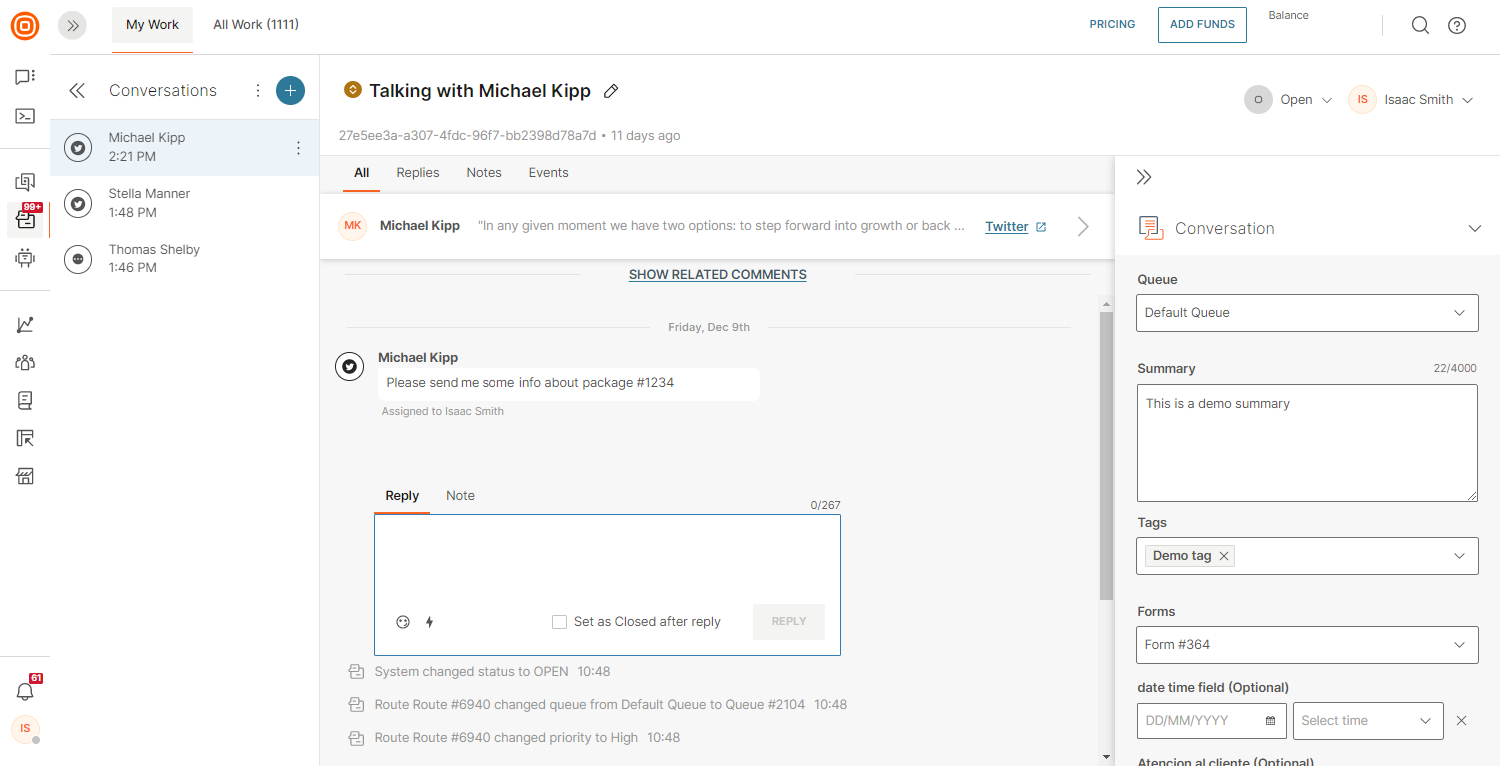
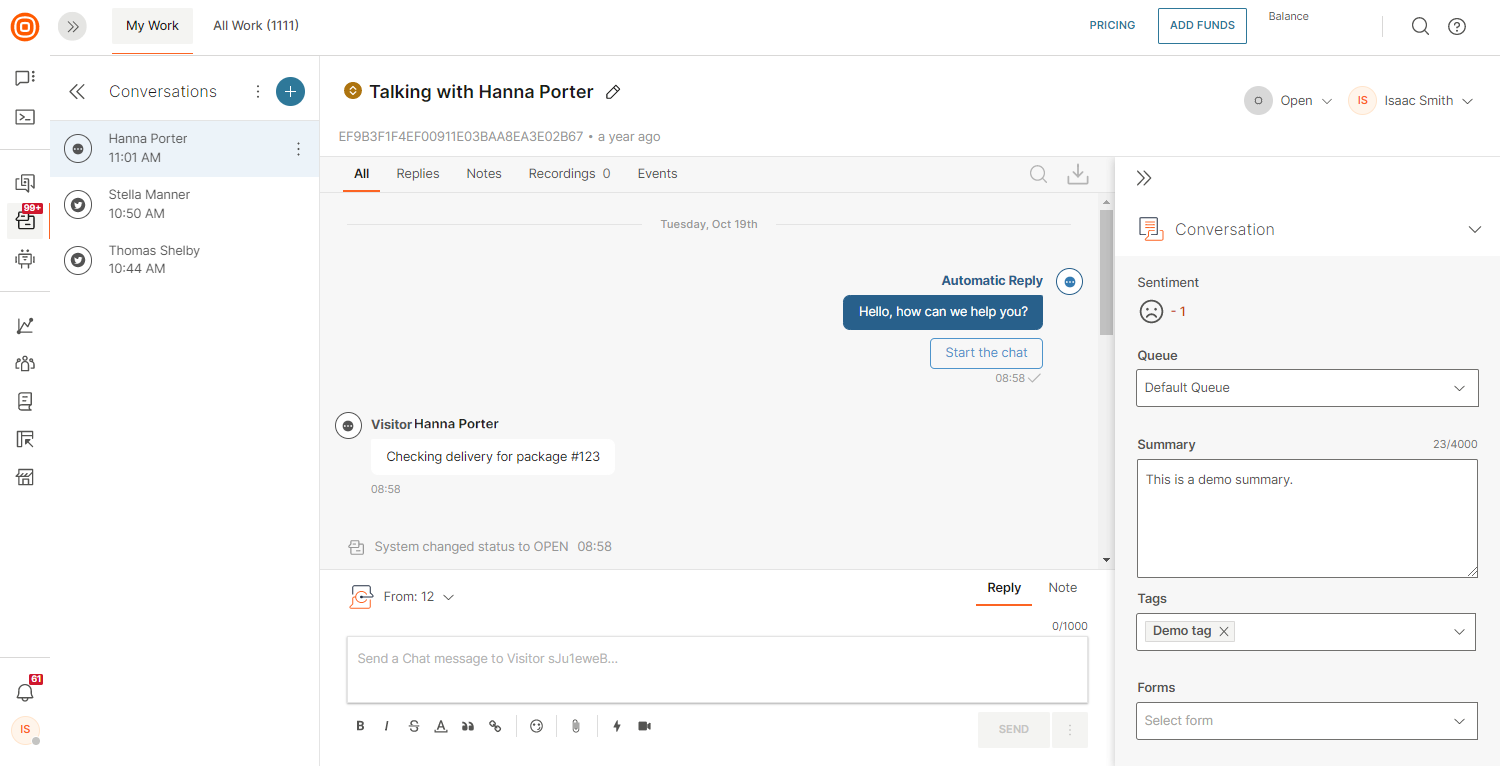
For each conversation, in the right-side panel, agents can check the following:
- Timestamp of the last received message
- Customer name
- Preview of the last received message
Also, conversations containing unread message(s) will be marked as bold and the counter with the number of unread messages will appear next to it. Conversations marked as Closed are not shown on the list.
NOTE
The left side panel contains recently viewed conversations but you can also see all conversations that the agent has checked recently regardless if they were assigned to them or not.
When a conversation contains unread messages, the notification indicator appears until the conversation is opened. Click + to start a new conversation. Each conversation is opened and managed in My Work.
Within the selected conversation, the Agent can do the following:
- Type, send, and receive messages
- Change conversation priority, topic, and status
- Type public notes
- Reassign conversation - the Agent can take unassigned conversations or move their conversations to other agents. The agent cannot take over conversations assigned to other agents. However, supervisors can change the assignee without limitations
- Change queue
- Type summary
- Manage tags
- Manage customer profile
The main part of the conversation is the interaction between agents and customers where agents can see the conversation history. Conversations is a true omnichannel platform. For example, if the customer uses messages to establish their brand on one channel and then later on another channel, messages can be part of one continuous conversation.
When a customer message is received for the first time, a conversation is created with the following attributes:
- Conversation name
- Conversation ID
- Participants (customer/agent(s)/bot)
- Date of creation
- Message status (default one is Open)
- Message text
- Message channel indicator
- Customer info (if customer recognized)
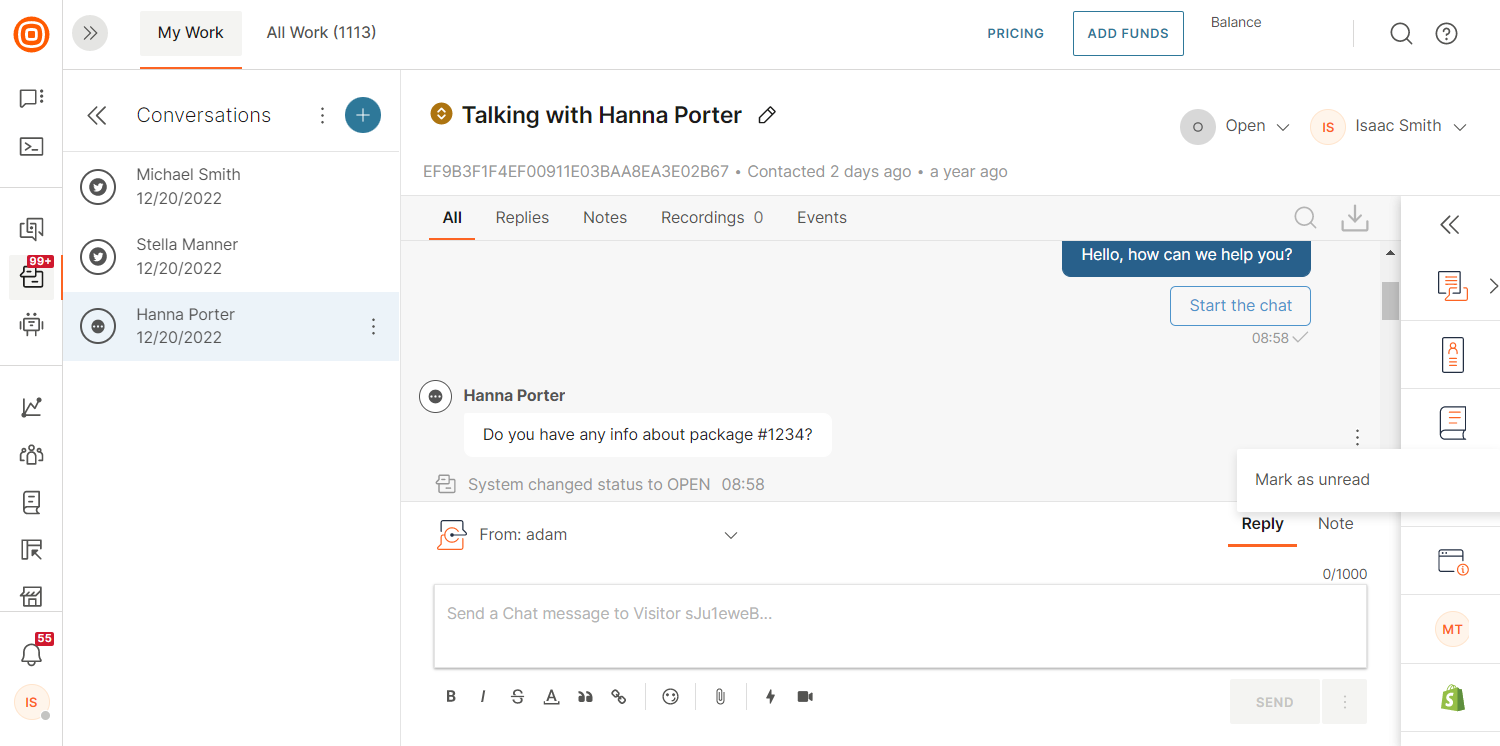
Mark message as unread
Sometimes agents will see customers’ messages but cannot handle them right away, and these messages are automatically marked as read. You have the option to mark messages as unread so that they do not end up unnoticed, meaning that you can get back to them as soon as possible.
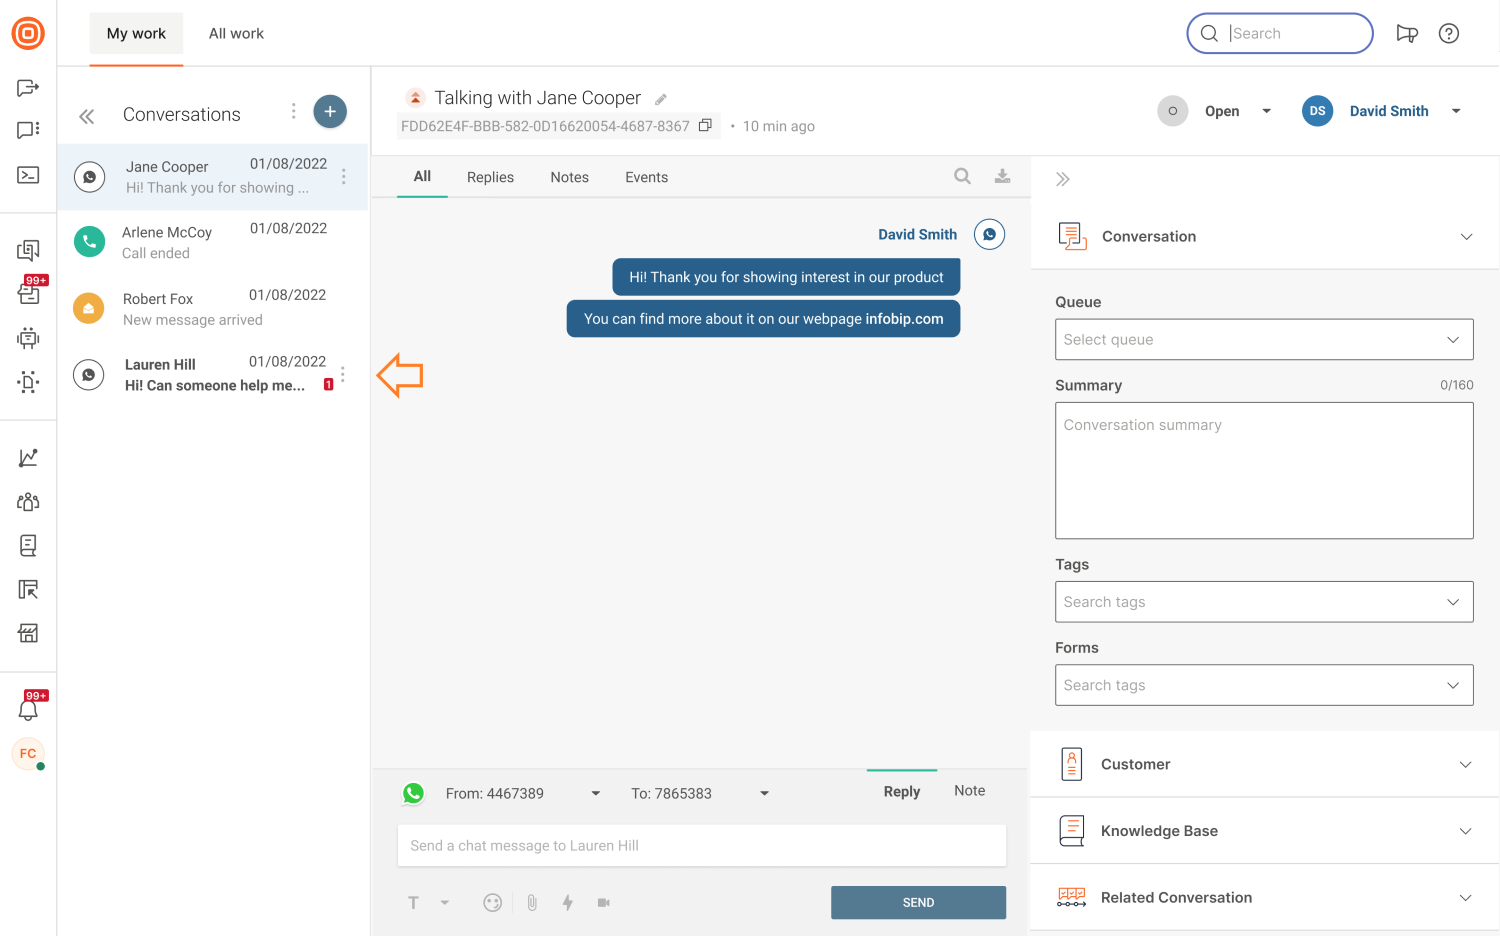
Message bubbles
To improve visibility for agents inside the conversations window, customer messages are aligned to the left side while keeping the agent messages aligned to the right.
Message status
Different message statuses can occur:
- Single grey tick ✓- The message is in the sending process or if a channel does not support message delivery status, and the message has been sent out from Infobip, but it is unknown if the provider has received it or not, means that the message is in the sent process.
- Double grey tick ✓✓ - The message has been delivered to the user.
- Double green tick ✓✓- The message was seen by the user.
- Red triangle ▲- A delivery error occurred or the processing failed.
Message preview
The Message preview feature allows agents to quickly preview the conversation details without opening the specific conversation. With this, they can easily review the message content, understand the urgency of the matter, and prioritize the conversation among all the others, resulting in faster resolutions for customer issues.
My work limit
The number of conversations visible to the agent on My Work is limited to 50. If an agent has more than 50 assigned conversations at any moment, they can access all their conversations by clicking View All which will open the All Work panel with this predefined filter.
MESSAGES LIMIT
Agents will only see up to 150 newest messages displayed in the conversation body. Older messages inside that conversation will not be displayed.
Conversation transcript
Contact center managers will often need to download a conversation transcript to examine them for quality assurance and reporting purposes. Other times you will need to send the chat transcript to your end users.
This feature allows supervisors to download all messages that have been exchanged between an agent and customer - and now each conversation can be downloaded from the Conversations interface.
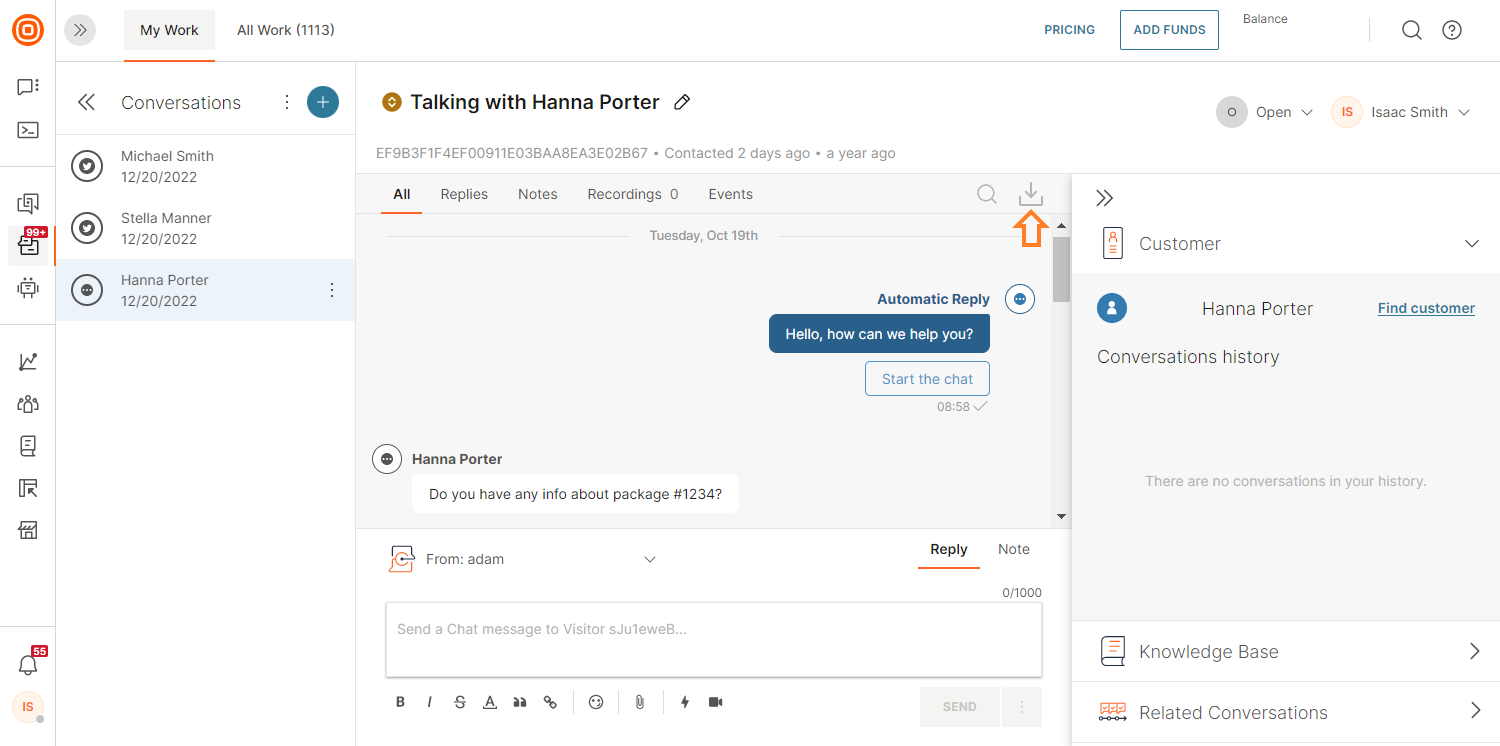
You can download the conversation transcript in .txt or .xlsx format. Both formats include information about the conversation channel, priority, queue and date of creation. Additionally, the supervisor can decide whether they want to include internal messages (notes) or only messages that were exchanged with the customer.
The download conversation transcript functionality is available under Reports → Conversation Transcript. Supervisors can use it to download transcripts of all conversations that were handled by a particular agent during a defined period.
Events
Any changes you have made to conversations are tracked and displayed within the conversation body (and within the Events tab). With new audit logs, you now have trackable insight into changes on My Work's conversation level covering the most important information. It will tell if and which changes were made by the agent, supervisor, or automation and ensure better visibility and transparency for supervisors about each conversation and agent.
On the Logs page, you can see that all events from all conversations are consolidated.
Currently, the following changes are shown for conversation properties:
- Conversation Status changed
- Conversation Assignment changed
- Conversation Queue changed
- Conversation Priority changed
- Conversation Tag added
- Conversation Tag removed
- Customer linked
- Customer unlinked
- Title changed
- Conversation merged
Short ID
NOTE
This feature is released as Early Access, and it is available only in the Grow and Scale package.
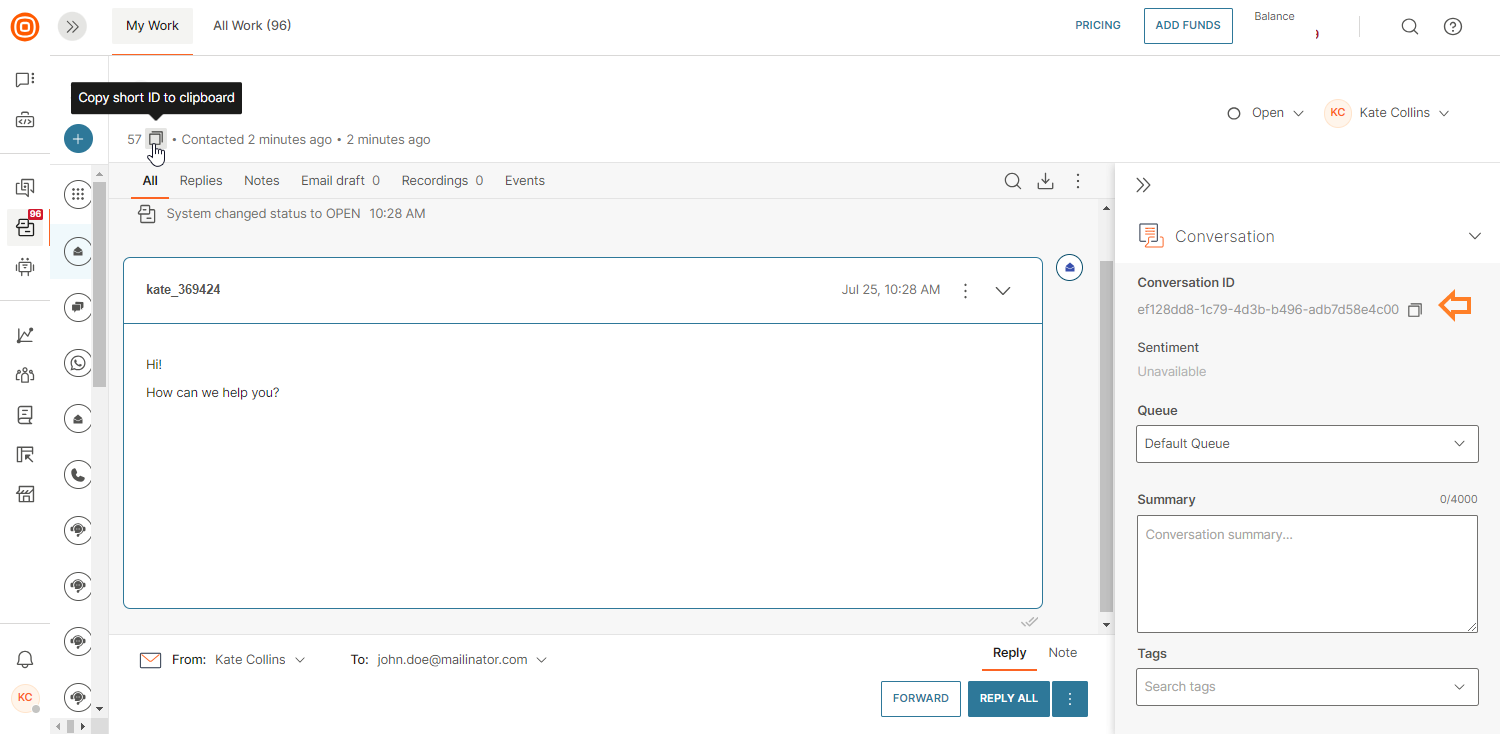
Short Conversation IDs are concise and easy-to-use identifiers that streamline the process of referencing and organizing conversations. They enable both customers and agents to quickly refer back to specific conversations and issues.
In My Work, the Short ID appears at the top of the conversation, where you can copy it by clicking the respective button. In case you need the longer Conversation ID, it can be found within the Conversation Context Card.
Internal conversations
Internal conversations enable agents to communicate with other agents (sort of behind the scenes). Every agent can create a new conversation and assign it to a specific queue. Agents who are part of that queue can be assigned to the conversation.
To create an internal conversation, click on the + sign and then Start Internal Conversation. After entering the necessary details and composing your message, click on the Start Internal Conversation button located in the bottom right corner.
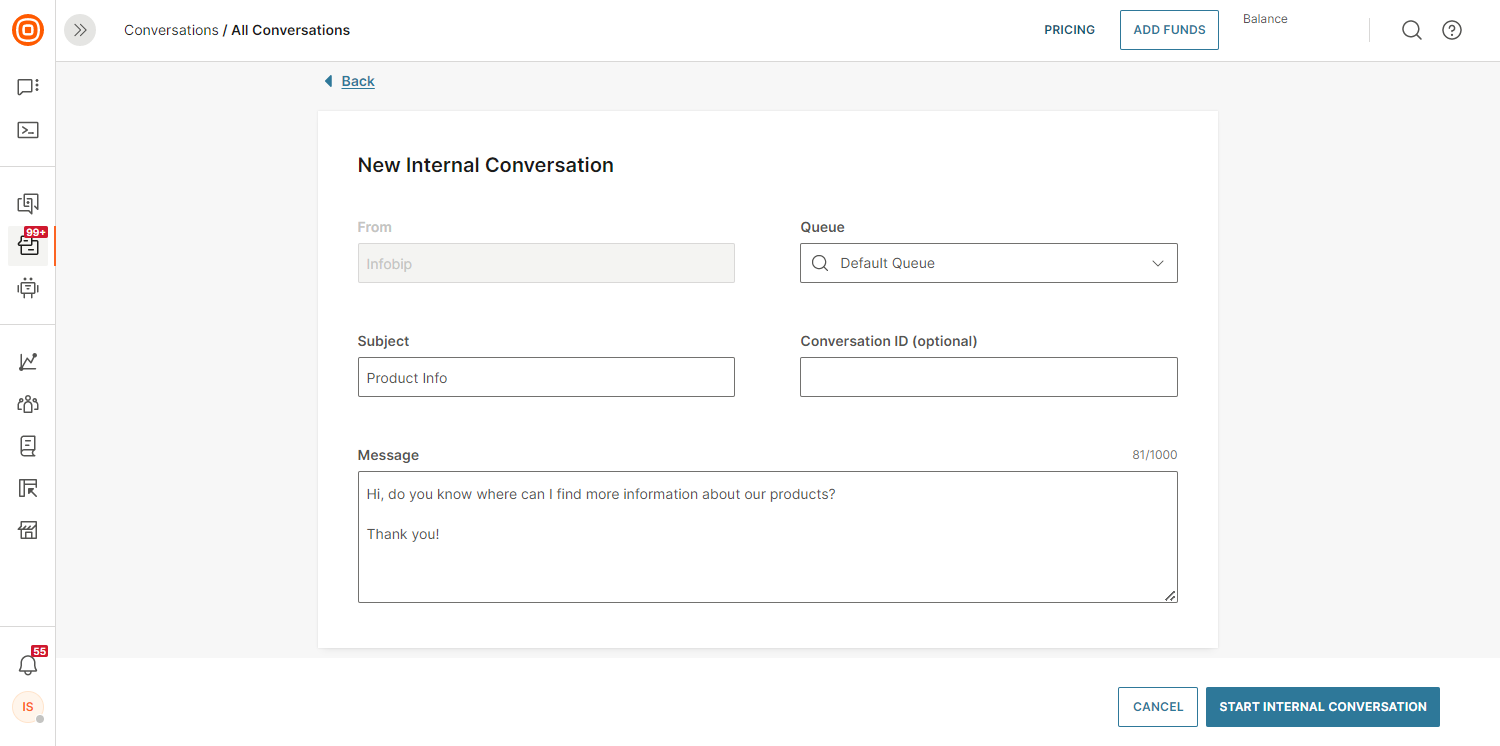
Another option is to create it from the context card. You need to enter the queue and the subject and body of the internal conversation on that screen.
Conversation ID is the only optional parameter that you can use to link the internal conversation with an existing one. However, if an internal conversation is created from another conversation, the Conversation ID will be prepopulated.
When you create an internal conversation, the flow is more or less the same as with any other conversation, albeit with minor exceptions. Besides the agent who created the conversation and the agent assigned to actually handle the conversation, other users can also write messages.
Messages from the agent who's working on the conversation are displayed on the agent panel's right side. Messages from any other user working on this conversation are shown on the left side.
Related conversations
You can merge several different conversations into one. This is usually the case when more conversations cover the same topic.
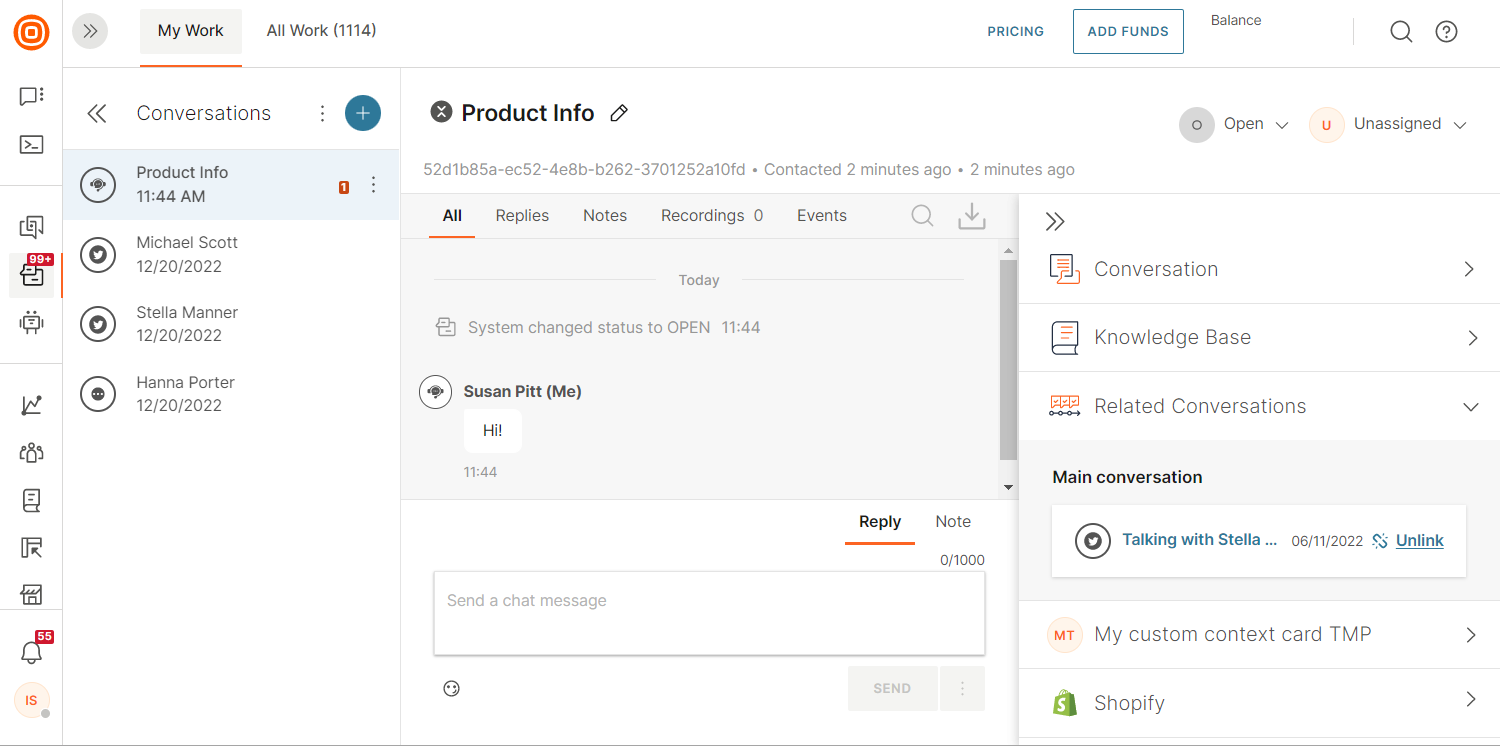
The Related Conversations card consists of:
- Main conversation
- You can link conversations here but only if the current conversation is a follow-up from a previous one
- For now, this option is used for Facebook Posts only (to route private messages to Messenger)
- Follow-up conversations
- You can create follow-up conversations from closed conversations only
- Linked conversations
- To link a conversation, you will need the conversation ID which you can get from the URL. Then copy-paste that ID into the Related Conversations card in the agent panel.
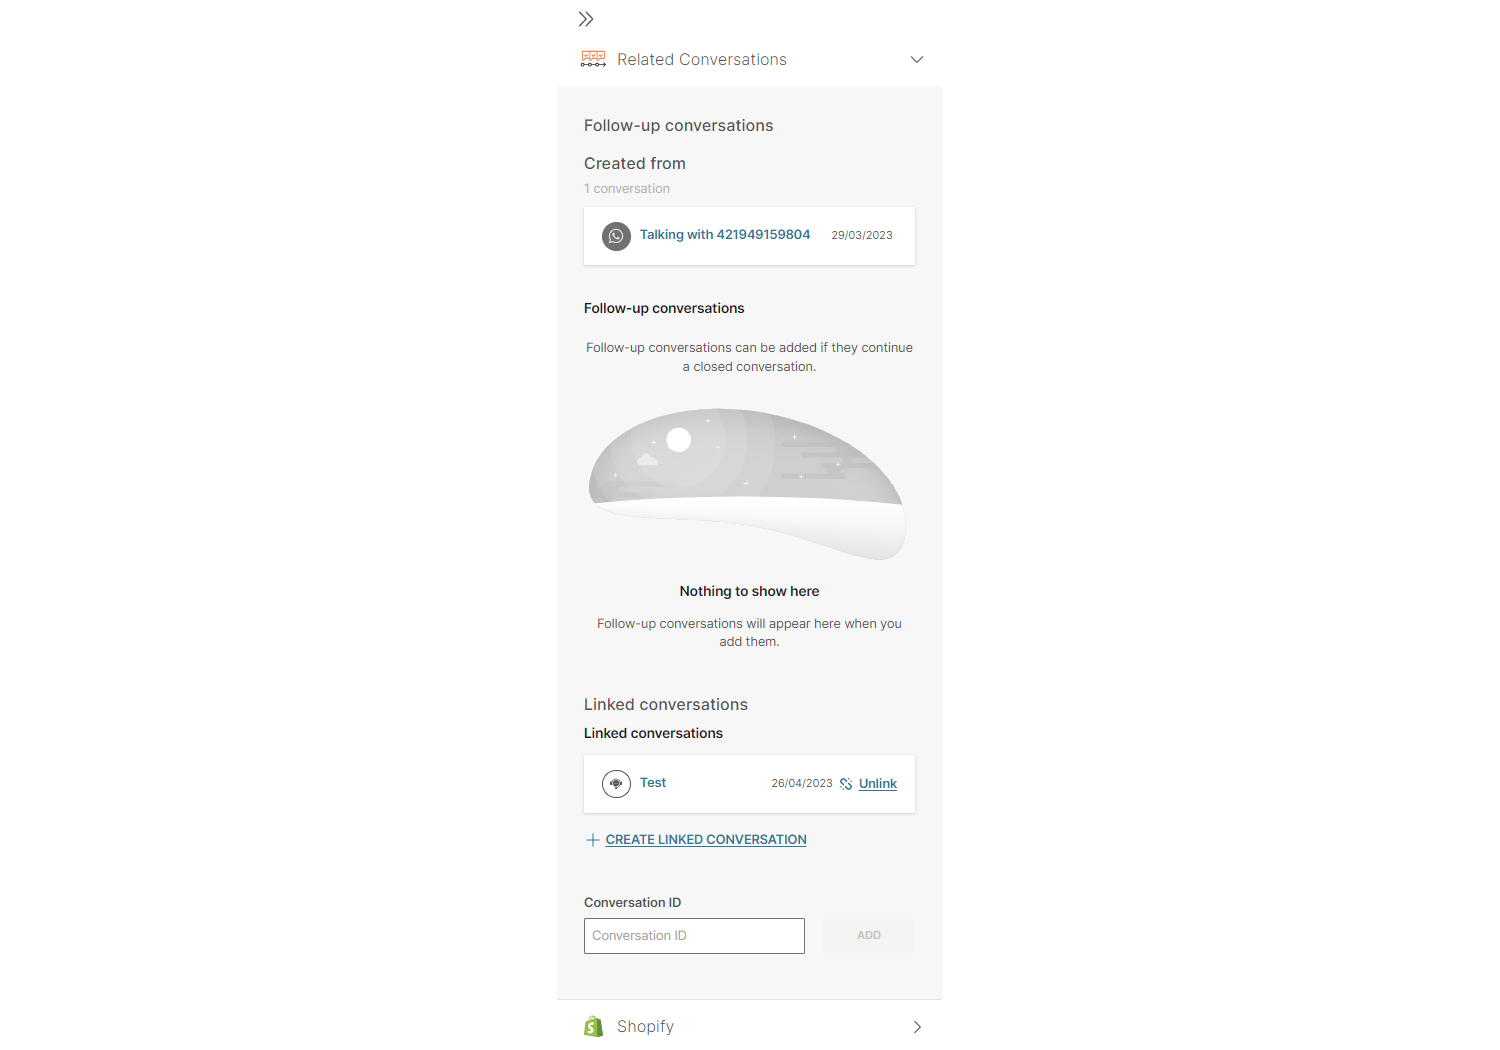
If you are linking multiple conversations, the one that you are linking to is the main conversation. Think of all others that you are linking as followers. Additionally, if for some reason you need to unlink any of the conversations you have added, simply click the Unlink button next to each conversation.
Follow-up conversations
INFO
This feature is released as Early Access.
You can create follow-up conversations from closed conversations only.
By creating follow-up conversations, agents can easily track and resolve customer issues promptly which leads to a higher level of customer satisfaction and retention. Generating follow-up tickets enables agents to document customer issues and monitor their progress, as well as communicate more efficiently with the customers.
A follow-up conversation is available through the following:
- If a customer replies to an email communication where the previous conversation is already closed, a follow-up conversation will be created automatically and linked to the previous one.
- If a user utilized the option to reply via private direct message in Facebook Posts, the system automatically creates a new Messenger conversation as a follow-up.
- Agent can create a follow-up for any closed conversation through the Related Conversations context card.
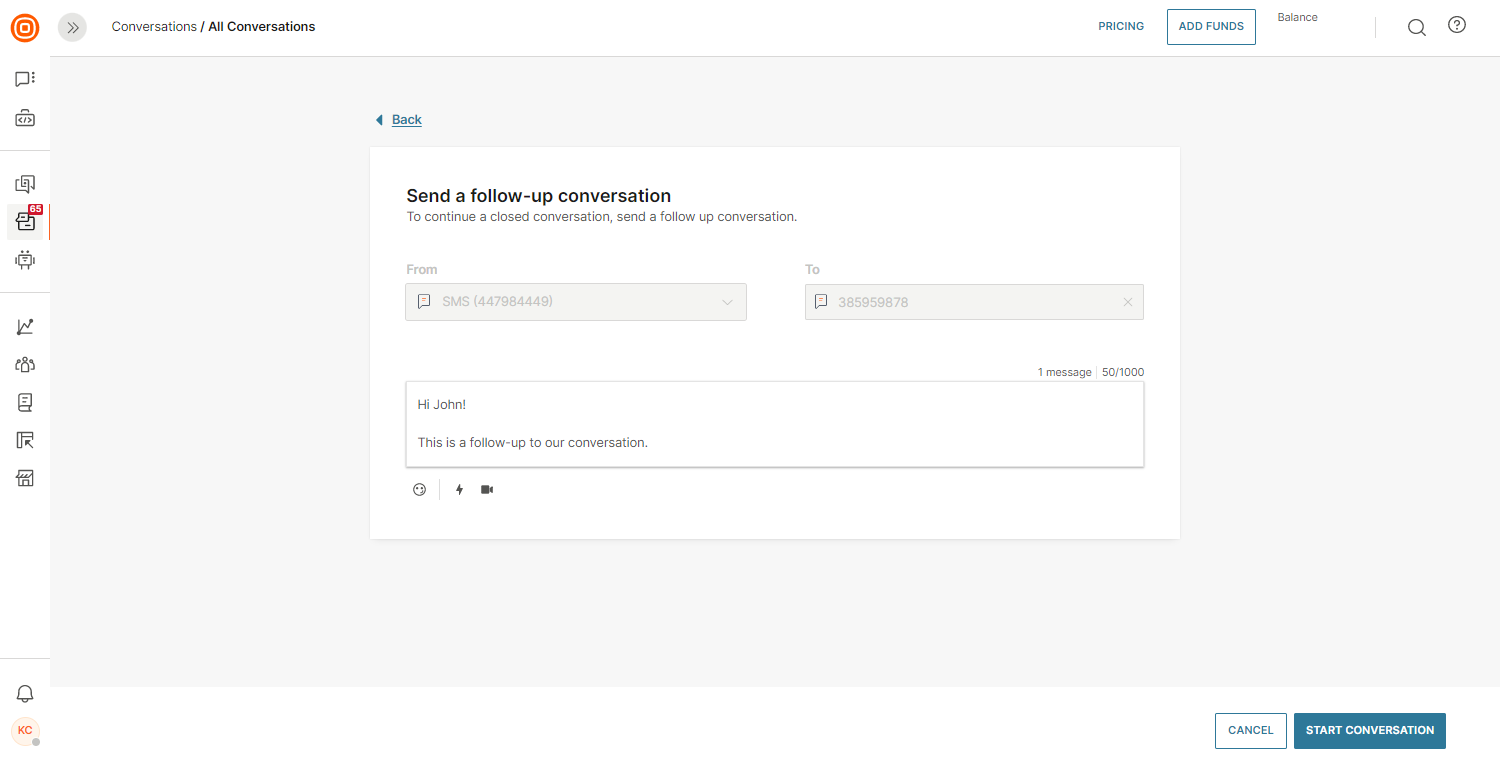
 When the follow-up button is clicked, a modal for starting a new conversation is presented to the user with a predefined sender From and To (without the option to change it).
INFO
The follow-up link is working only for channels that support the creation of new conversations by agents.
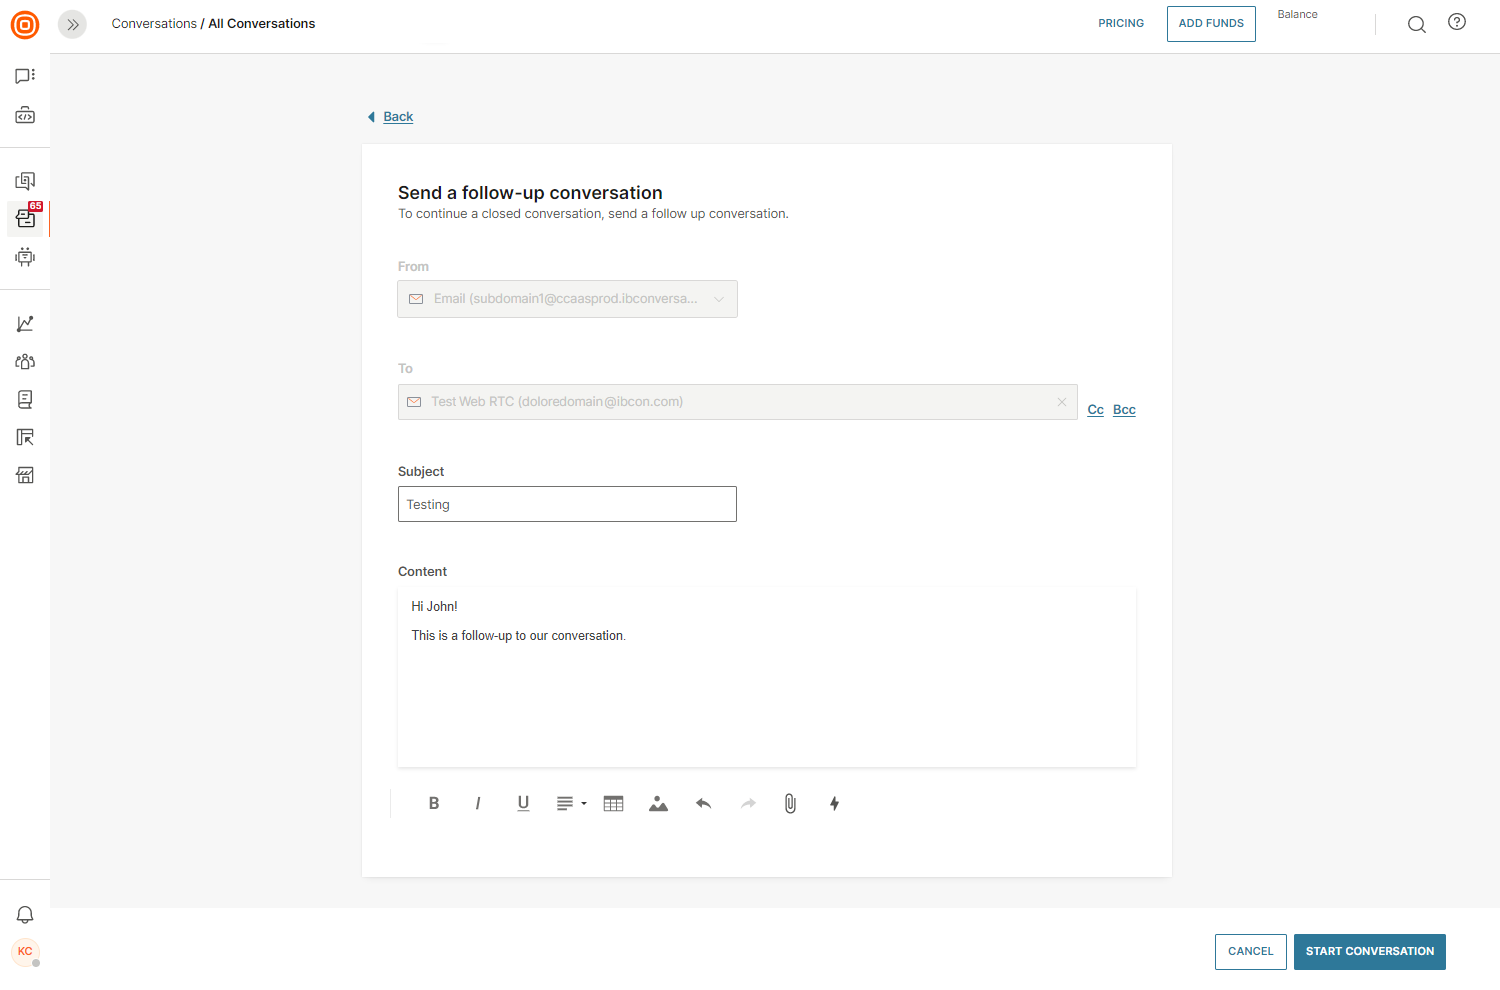
 If the follow-up conversation is an Email, it will have a predefined Subject and all needed technical information to appear in the same thread on the end customer side.
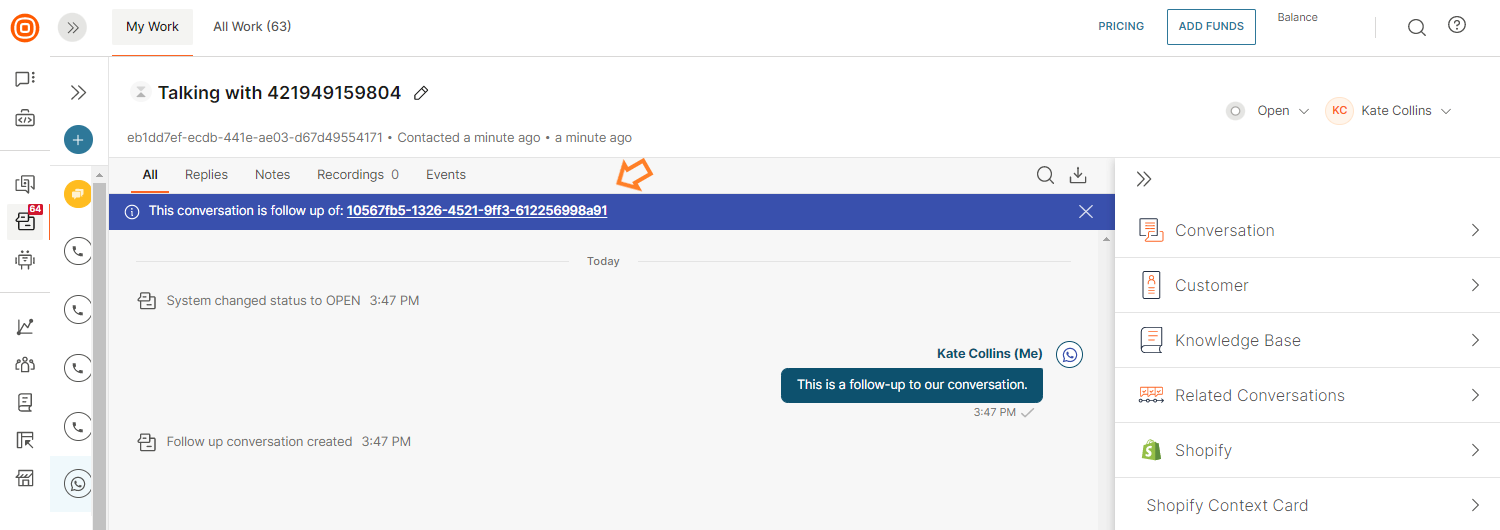
 Once you create a follow-up conversation, you will see a note indicating this info with a clickable link for the previous conversation.
INFO
One conversation can have multiple Linked and Follow-up conversations.
Conversation status indicators
The color of the bubbles in linked and follow-up conversations are indicating the status of the conversation:
- White - In progress
- Yellow - Waiting
- Green - Solved
- Grey - Closed

Knowledge Base
Agents can use the Infobip Knowledge Base, which is a shared component, to share knowledge either within their organization or when talking to customers.
It allows them to access any manuals or important pieces of content that the supervisors/managers have created and shared across the organization and thus help out customers with any frequently asked questions.
NOTE
To use the Knowledge Base, you need to contact your dedicated Account Manager to enable it.
While in a conversation with a customer, the agents can access the Knowledge Base articles by searching for a particular piece in the customer context card. To search for an article, simply start typing and it will appear in the results list.
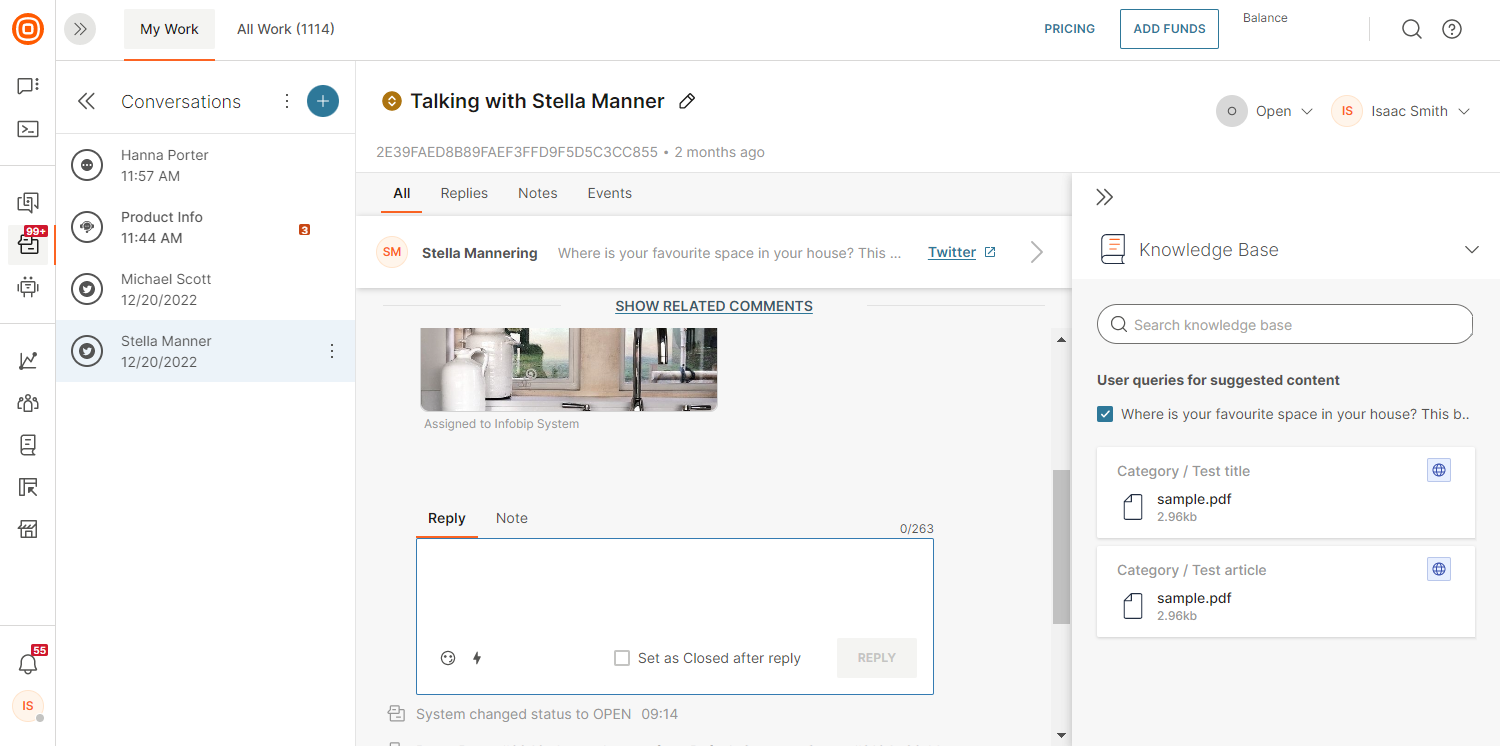
Also, agents will see suggested knowledge base articles. These will appear in the context card based on five previous active conversations between the agent and the end user.
If the agent manually searches for something in the knowledge base, these automatic suggestions will disappear for a moment.
Service-level agreement
SLA in My Work offers a broader and intuitive view of policies applicable to each conversation:
- Counter time for valid SLA that always represents two time counters:
- First response time and Total resolution time
- Or Next reply time and Total resolution time
- Red color indicates that the breach has already happened
- Green color indicates that the breach has not happened yet
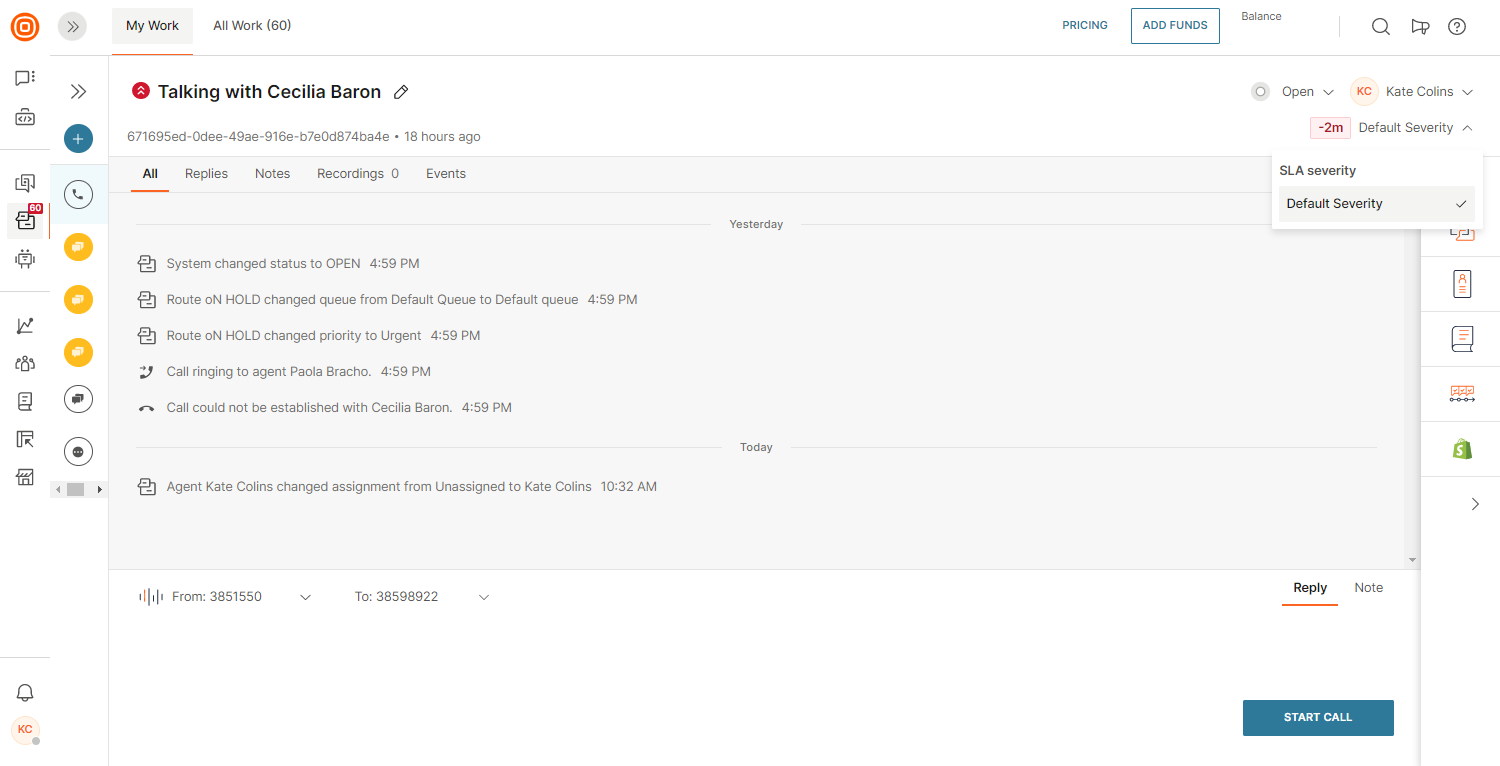
Severity
- This drop-down consists of all severities the supervisor has set in SLA policies, which can be changed to different severity per agent
- If the severity has changed, all currently counted times will be updated to follow the SLA policy configuration
The list of conversations assigned to an agent in My Work is ordered based on the highest valid breach from the ones with no breach yet to the ones with the longest time to achieve the breach of SLA. In case a conversation has already been breached and the breach is still valid and growing, this information will also be displayed in My Work.
In case any time counter has been paused due to the change of the status (e.g., Solved, Closed), this will be displayed instead of the On Hold status in the top right corner of the agent panel.
Templates and tags
Removing repetitive tasks and increasing agent productivity by minimizing their effort in resolving tedious and low-value tasks can be achieved through the use of predefined templates.
Every support agent knows that even the most extensive knowledge base cannot stop some common questions from popping up more than once. Such questions can force agents to keep repeating themselves while more serious queries pile up.
With Templates, agents can use a predefined set of replies that they can send out with a single click and focus on more valuable and complex inquiries.
Only Supervisors can manage/create templates. Agents can only use templates available within the agent panel.
For easier search and categorization, supervisors can add tags to templates.
There are two types of templates:
-
User-defined
-
WhatsApp pre-registered templates that go through the approval process. More information on WhatsApp pre-registered templates below.
WhatsApp pre-registered templates
WhatsApp templates are mandatory if you need to send either a first message to a customer or in case more than 24 hours elapsed since the last message was received from the customer. The WhatsApp Message Templates Guidelines has all the information you need to set up a template.
There are two instances where you can use a WhatsApp template:
-
Within ongoing conversations
-
When starting a new conversation
Starting a new conversation is described in detail here, but you can follow the same principle for WhatsApp template selection as described below.
When selecting WhatsApp as a channel, the system automatically detects if this is the first contact or if more than 24 hours have elapsed from the last customer interaction.
This is shown as an alert within the message reply box:
 When you click the templates icon, a pop-up opens where the user can select a template from already registered and approved WhatsApp templates. A template can also contain placeholders (variables) for personalization purposes. In this case, the user will need to map all placeholders by entering a value for each.
The experience is same the as for user-defined templates but agents cannot edit the content other than the variables part.
NOTE
You can only use text templates at the moment, not media templates.
Email templates
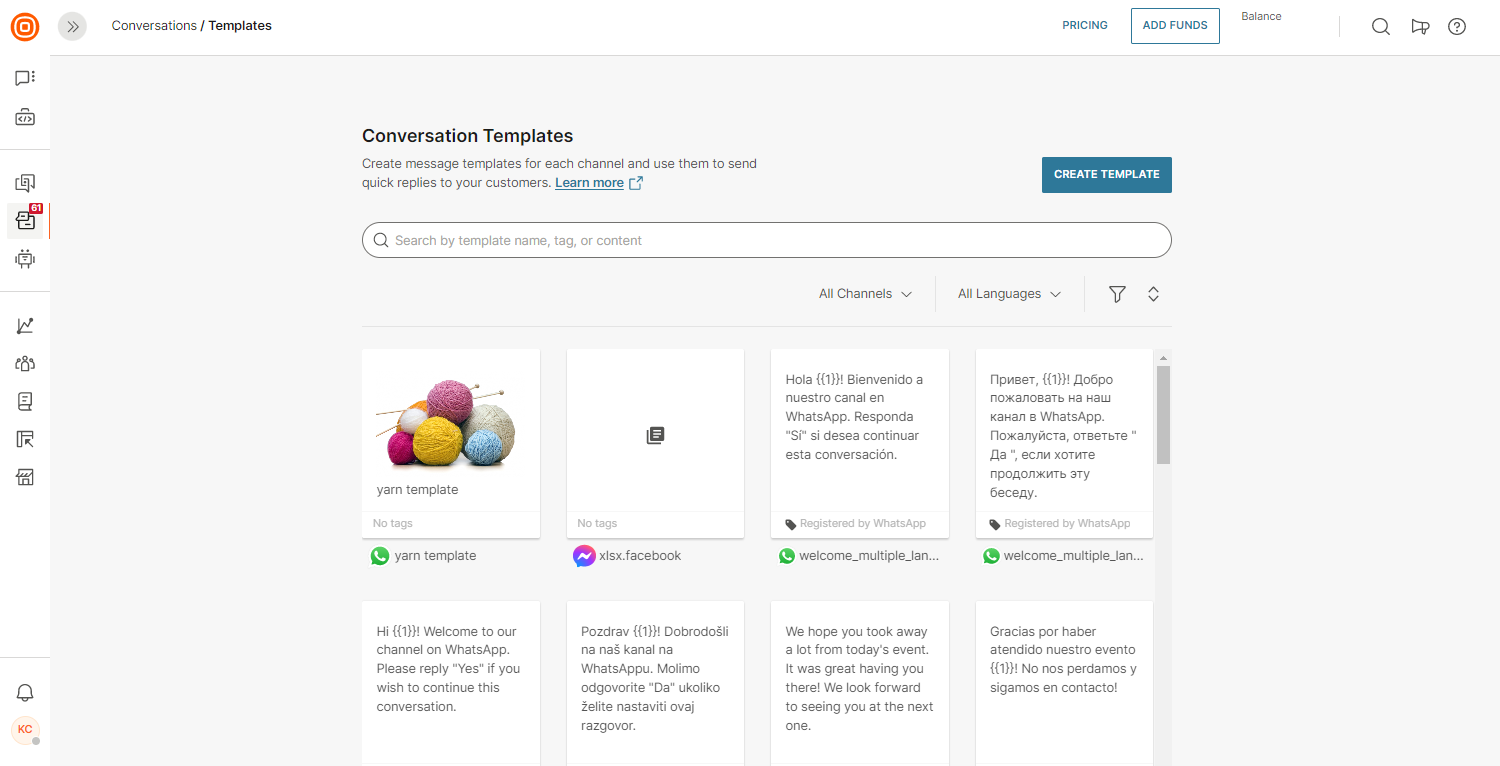
Create Email templates so your agents can use them to quickly compose a message and send it to end users.
In the Conversations section, navigate to the Agent panel and click on Templates → Create Template.
On the page, select the Email channel, and give a name to your email template (lower left corner). Choose your language, and add/create tags if you want to (this is optional).
Enter your message content. In this message box, you can use different styling options to tidy up the final product and how you want your email to be presented to your end users. If necessary, add attachments as well.
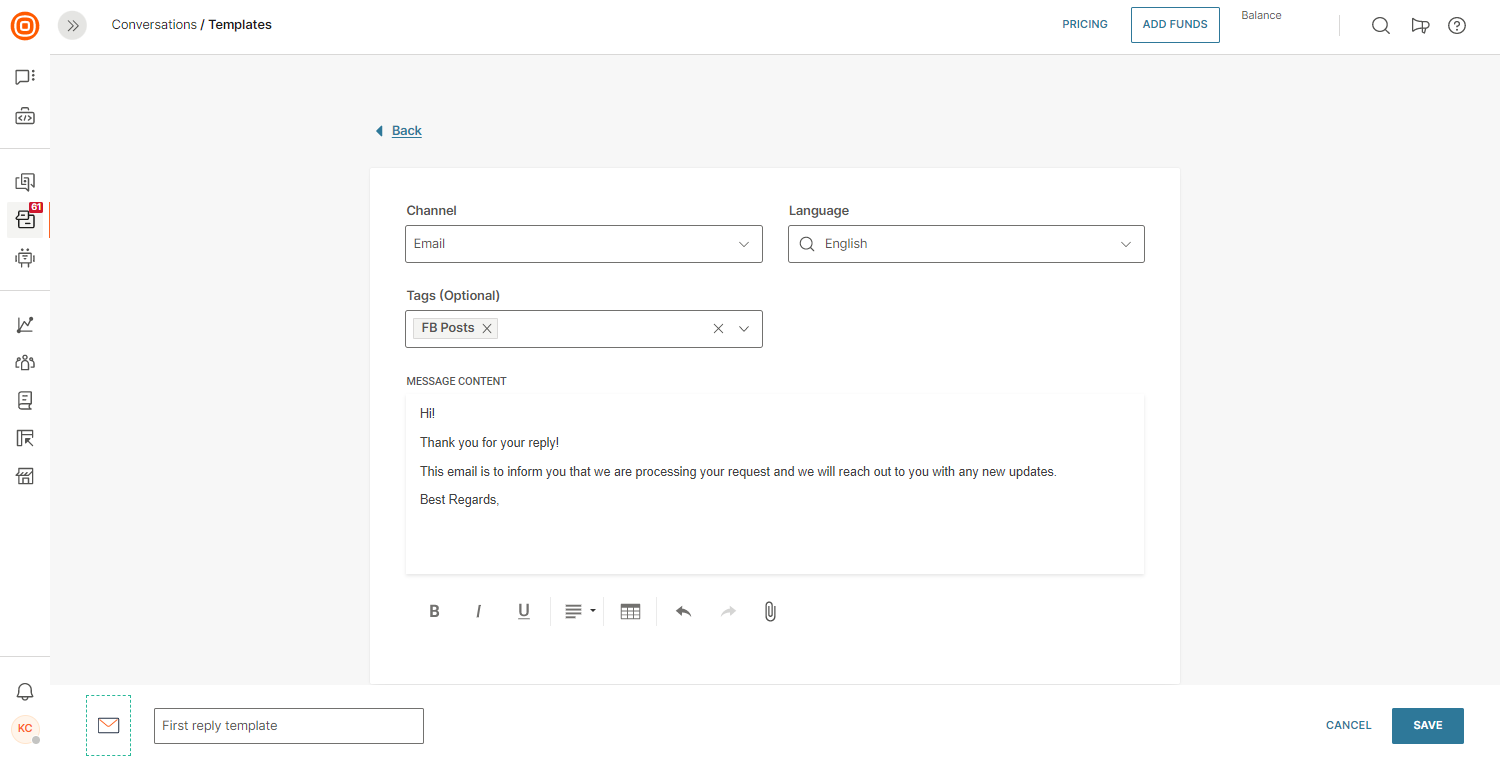
Once ready, click Save in the lower right corner. Afterward, agents can look for and use this template when starting a new conversation with the end user.
Agent panel
Agents can select a template with quick action in the message content box by typing “/” which results in a pop-up opening to select a template:
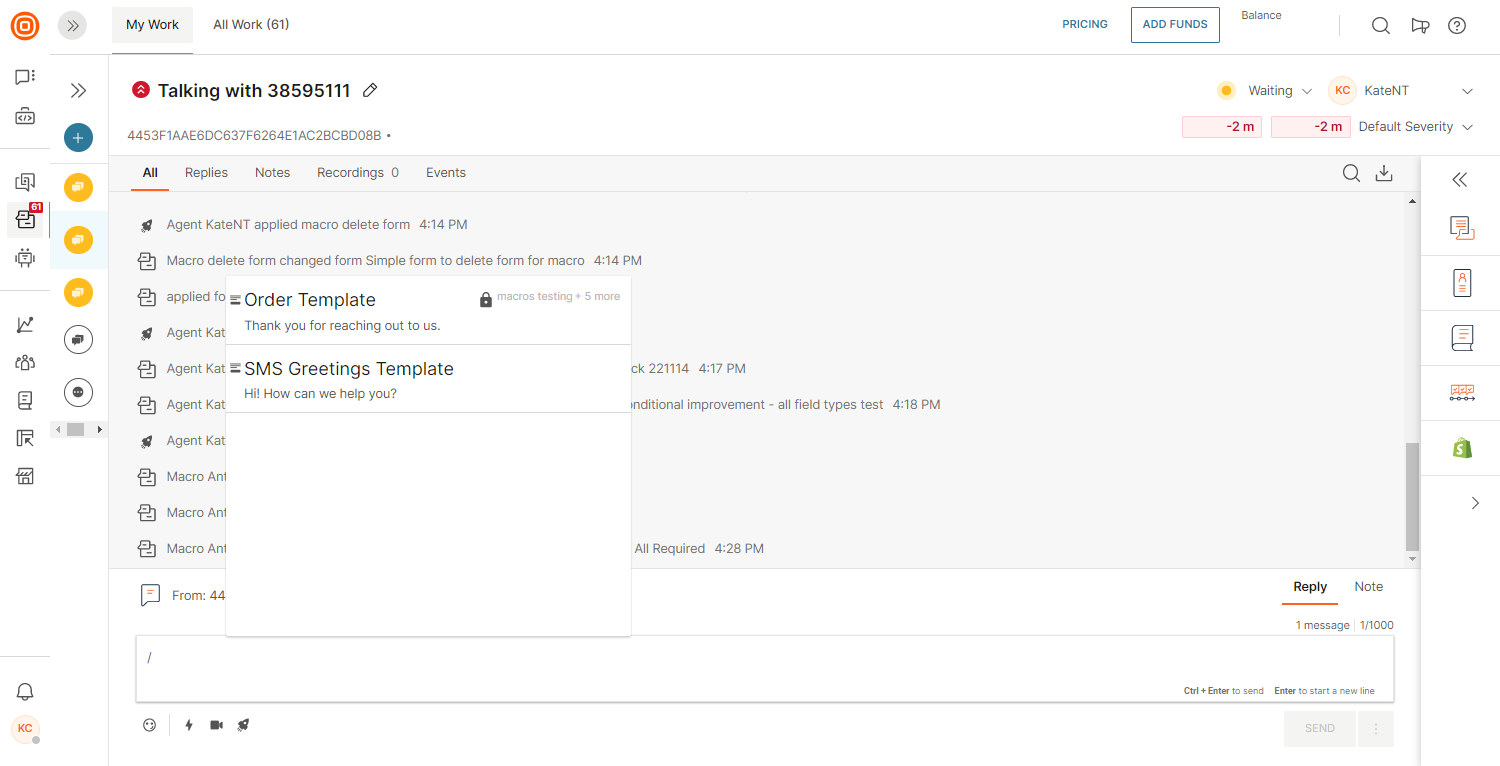
Another way to access templates is by selecting the Templates icon at the bottom of the messages content box:
![]()
The template pop-up opens and you can search for a specific template.
After you have selected the template, you can change the whole text for user-defined templates or map variables only for WhatsApp pre-registered templates.
You can map variables by selecting the highlighted area of the text, and entering a value:

And the very last - you just need to click the Send message button to reach out to the customer.
Check the Supported attachments and templates table to learn what templates and attachments are supported in the Email channel.
Tags
Tags can be assigned to conversations to better categorize conversation topics or customer intent. Tags are connected to the dashboard where Supervisors can analyze the number of conversations per specific tag, and they can be used within journey automation so each conversation transferred from Flow to Conversations can have a specific tag automatically assigned.
You would be able to create tags for Conversations and Templates by navigating to Conversations Settings → Tags.
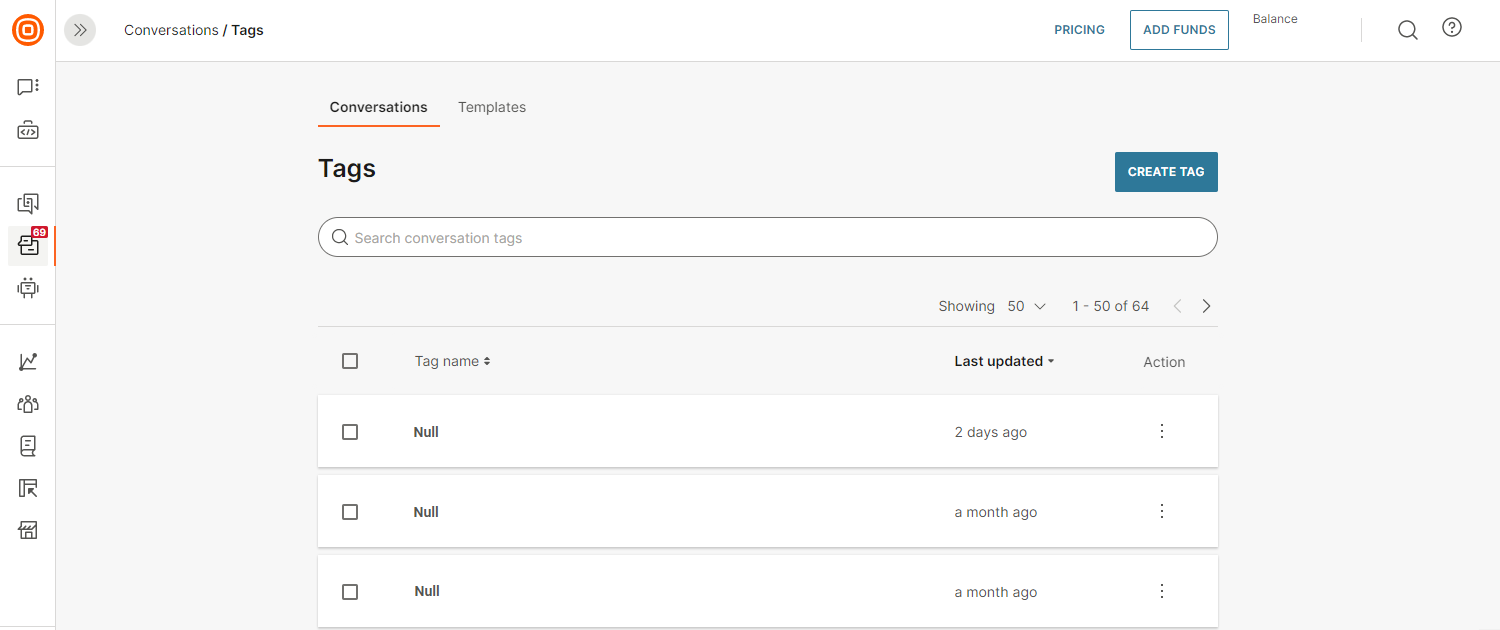
Once the page opens, you can see two modals:
- Conversations
- Templates
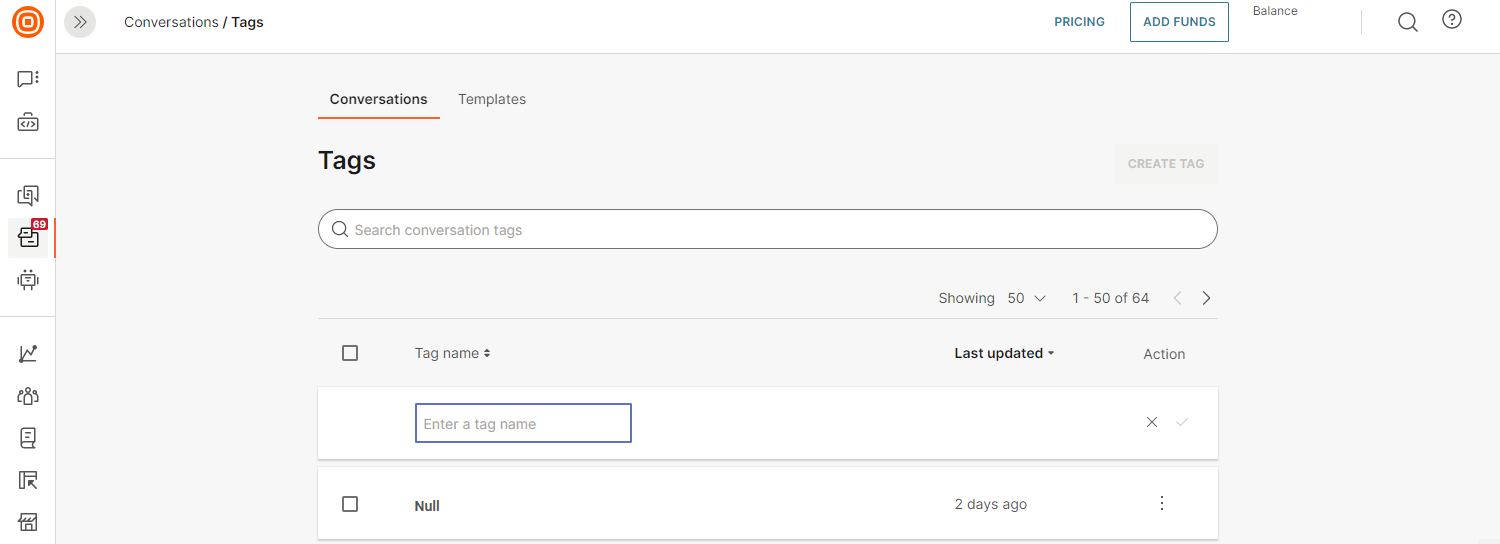
Depending on which tag you want to create, navigate to the wanted modal and click the Create New button, enter the tag name, and click the check mark.
Tags can be used within journey automation so each conversation transferred from Flow to Conversations can have a specific tag automatically assigned. The Tag management section allows Supervisors to manage both conversations and template tags. This way supervisors can predefine and categorize tags used by agents so they can have categories for conversations ready for use or they can easily search through templates by a specific topic.
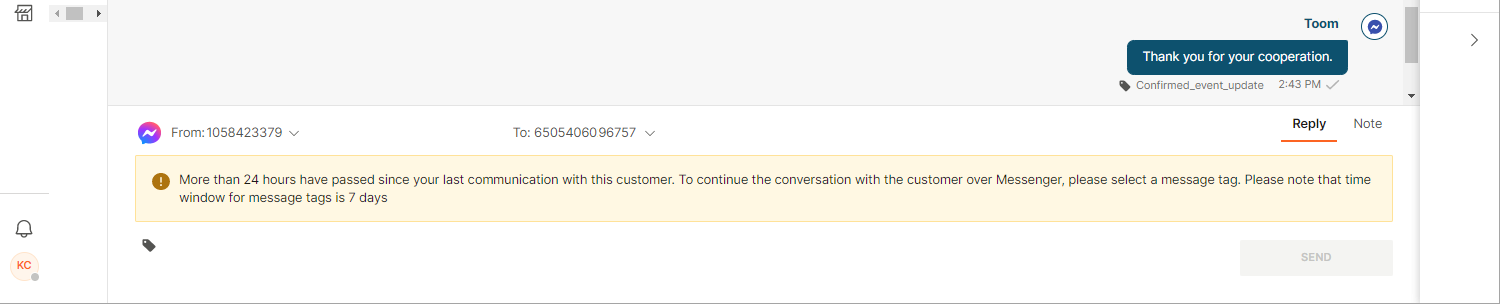
Messenger tags
Messenger by Facebook has introduced message tags that are used in MT (mobile-terminated) initiated scenarios. This means that it is possible to send a message to a customer even 24 hours after the customer’s last message was received.
To be able to send the message you need to select one of the three message tags predefined by Facebook. The message content is free-form, meaning it is not predefined by any template.
 Once a message has been sent, the tag that was used will be visible under the actual message inside the agent's desktop window.
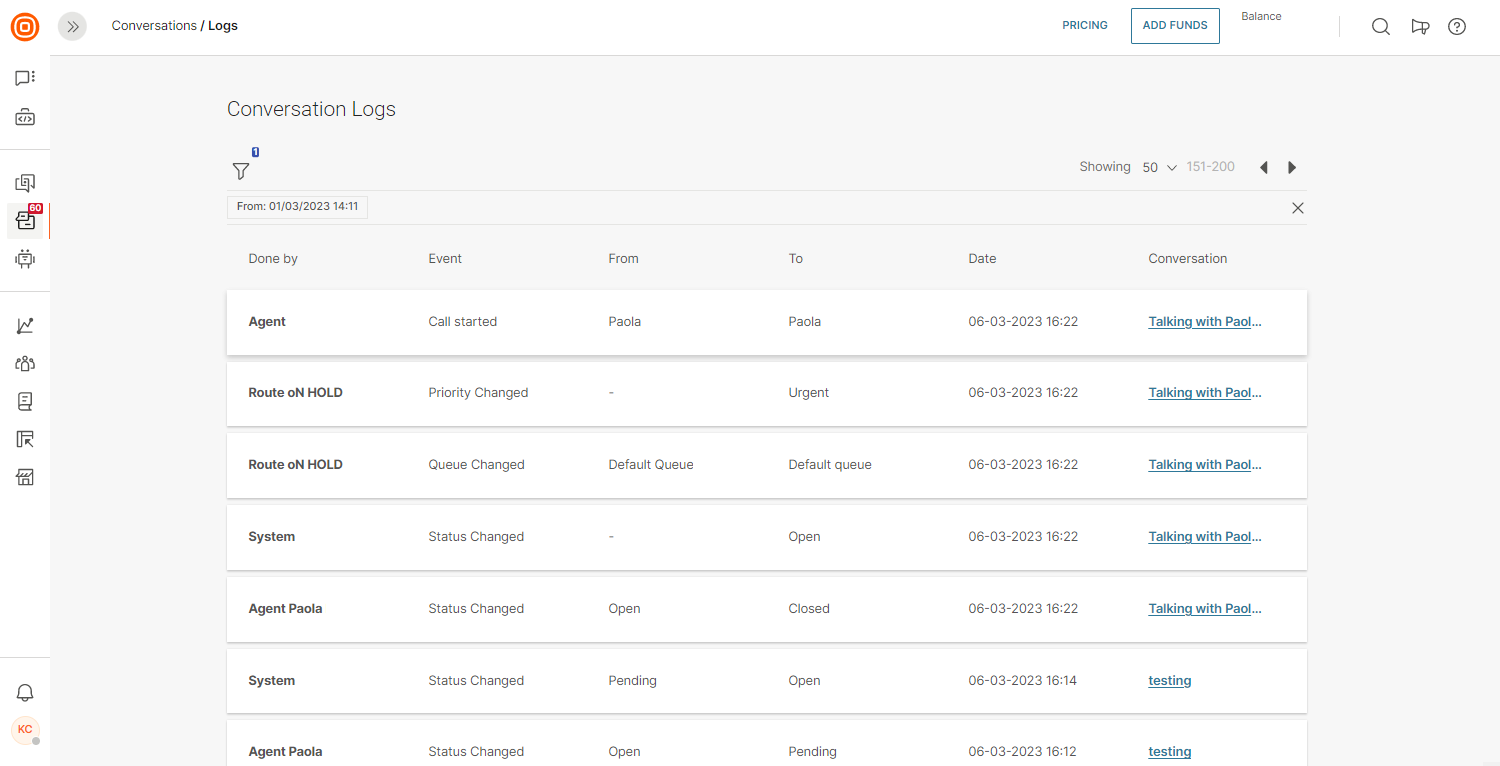
Logs
Conversations Logs is a page where you can see that all events mentioned in Conversation Events are consolidated. The events are ordered chronologically and provide detailed information about who made any changes to a certain conversation.
Also, there are values being displayed before and after a change has been done, as well as a link to the conversation.
You can filter these logs by the event type, the actor, or the date period when an event occurred.
Manage conversations
Topic
Each conversation gets a default name that can be changed anytime - Talking with ‘Name of the customer’ and a unique conversation ID.
Priority
Conversation priority is visible in the header and is assigned according to the routing rules. Priority can be changed manually at any time.
Status
There are four possible conversation statuses:
- Open
- Waiting
- Solved
- Closed
The default status when the conversation is created is Open and the agent can change their status manually while interacting with the customer.
Statuses can be used to move from an omnichannel continuous conversation to a ticket-based system as follows:
Waiting indicator
- Agent responds to a customer with a question and changes the status from ‘Open’ to ‘Waiting’.
- The conversation is still assigned to the agent and it is still visible in the list of assigned conversations. However, it is marked orange as the agent still expects the customer to respond and then eventually close the issue.
Solved indicator
- Customer and agent are exchanging messages and when the agent thinks that the customer's problem is resolved, the agent can change the status to ‘Solved’.
- The ‘Solved’ status is marked green and indicates that the agent does not expect further interaction from the end customer. In case the customer sends another question, new conversation is not created.
Closed indicator
When the Agent is sure that the issue is solved, the conversation can be marked as Closed and will no longer appear on the agent’s to-do list.
Conversation status impacts the following:
- Color change in the list of conversations (My Work, Recently viewed, and Conversation history list panels)
- Analytics section where you can check conversations distributed by status
NOTE
Inbound messages will change the conversation status from Waiting or Solved to Open.
Assignee
Conversation can have two assignee statuses, Assigned (containing information to whom it is assigned) and Unassigned. You can check and change the status in the upper right corner.
Click the drop-down icon to see a list of all agents. The user can then assign or unassign a conversation to any agent. Use the Search agents option if the agent list is too long for scrolling.
If a conversation is closed, you cannot change the assignee.
Queue
On the right-side panel of Conversations details, check to which queue the selected conversation is assigned to. Only the user who is at the same time also the assignee can change the conversation queue by clicking on the drop-down list and checking the new destination queue.
Summary
Summary is a short text input used to write a quick summary about the conversation.
Tags
Tags can be assigned to conversations to better categorize a conversation topics or customer intent. Tags are connected to the dashboard where supervisors can analyze the number of conversations per specific tag. Tags can be used within journey automation so each conversation transferred from Flow to Conversations can have a specific tag automatically assigned.
Customer details
Conversation is built on a combination of participants (customer and agents) and messages exchanged between participants. A customer participating in a conversation can be known or unknown. Customer is known if their contact number is connected to the People profile. In case of a known customer, the agent can see on the right-side panel default customer attributes:
- Customer name – Associated with that destination number/ID in the People module.
- Gender – If associated with person in the People module.
- City – If associated with person in the People module.
- Country – If associated with person in the People module.
More customer details can be found using the View and Edit link in People. Agent can update customer attributes in the People module (e.g., change name, add destination, add tags, and more).
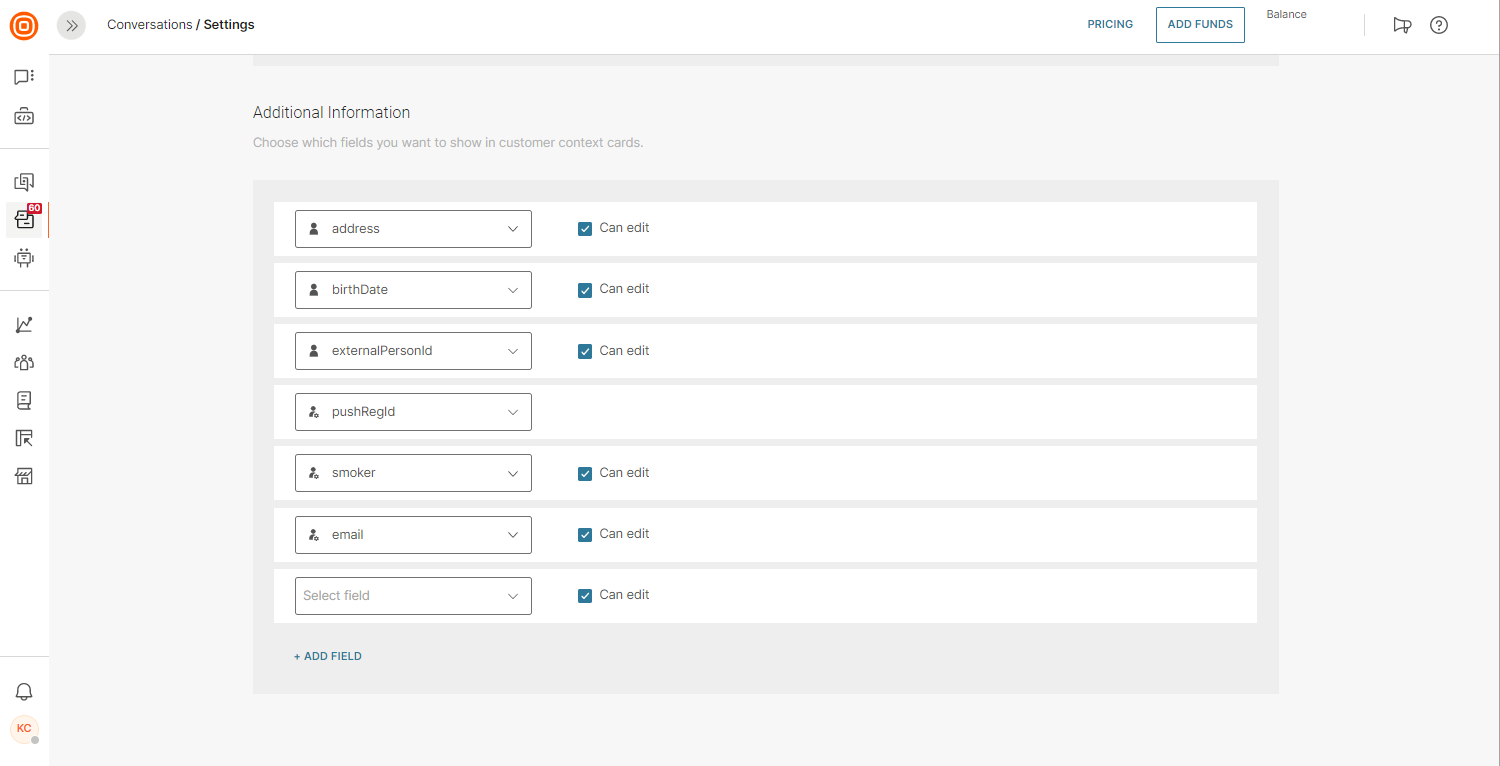
Additionally, a Supervisor can configure customer attributes in the agent panel through Conversations module → Settings (far left) → Customer Context Card.
Customer details can be configured in a way that any attribute available through the People module can be added to Customer details context card. Beside adding attribute, supervisor can choose if agent will be able to view or edit attribute directly through context card.
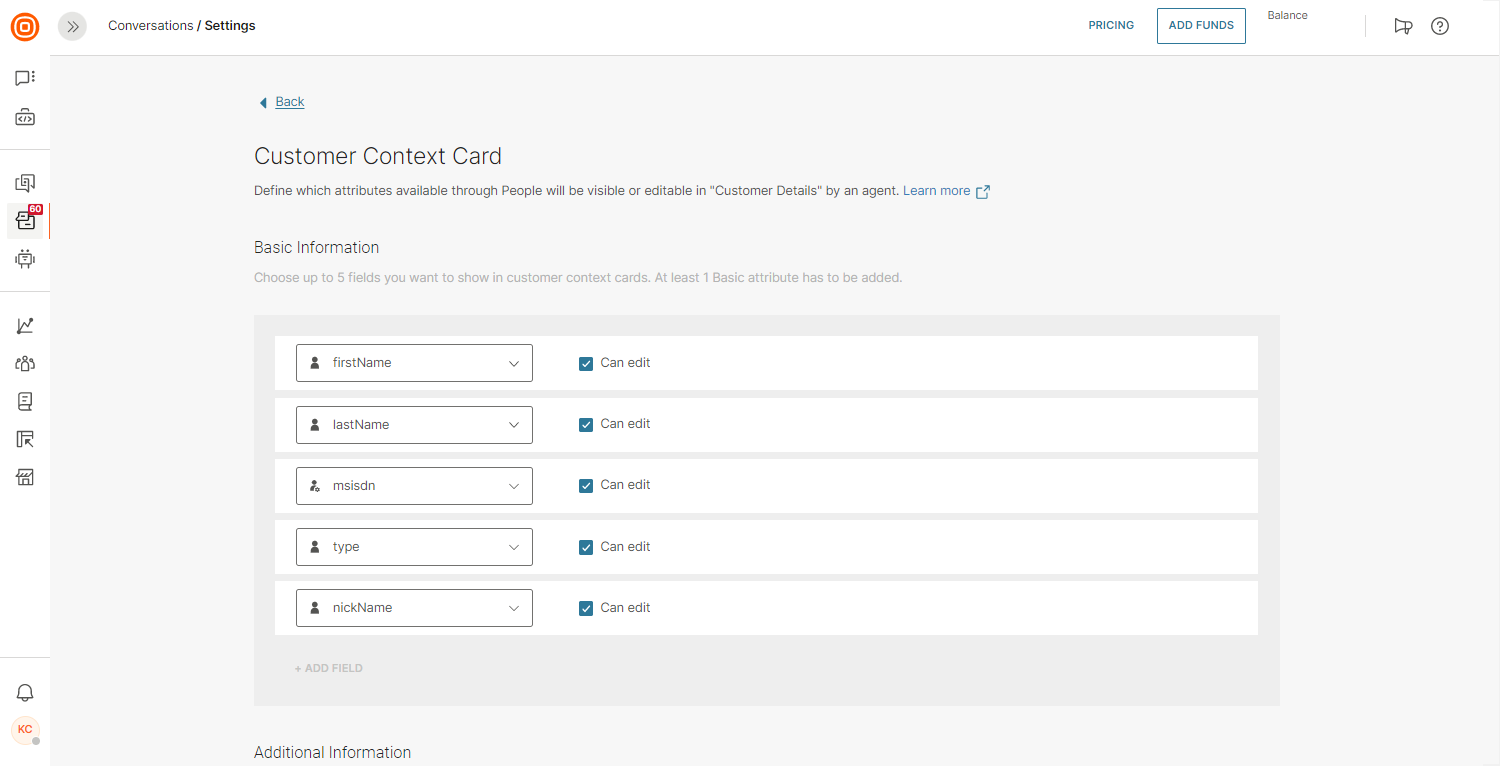
When configuring attributes, supervisor can choose maximum of 5 attributes to be shown in customer details immediately (those are Basic attributes) and unlimited number of Additional attributes that will be hidden behind See more in customer details.
Attributes in the customer details card will be listed based on how the supervisor has set these up in the Conversations configuration. The configuration can be changed at any time.
Regardless of the customer details configuration, the agent can update customer attributes in People (e.g., change name, add destination, add tags).
Within customer details, the entire conversation history is listed as well. Conversation history shows all open and closed conversations that were associated with a unique customer. It can happen that a wrong conversation is linked with a customer so there is the Unlink option that enables agents to fix this.
A vice-versa situation is possible as well. For example, a conversation is by default linked with an unknown customer by mistake but then the agent realizes that there is an ongoing conversation with a known customer who already exists within People. In that case, the agent can link the conversation with the existing customer and customer details will appear.
Channels
Conversations are either established over one channel where the channel icon represents a single channel in use or consists of multiple channels within a single conversation.

Omnichannel conversations have a special icon and they can be created in the following cases:
- The customer sends messages over two or more communication channels regarding the same topic and the agent merges the conversations.
- Agents initiate a conversation over a new communication channel within one conversation. Learn how to change channels.
Conversations mobile app
Conversations is mobile! This means that you can use Conversations in your contact center on your smartphone and help customers resolve their issues even quicker and on the go.
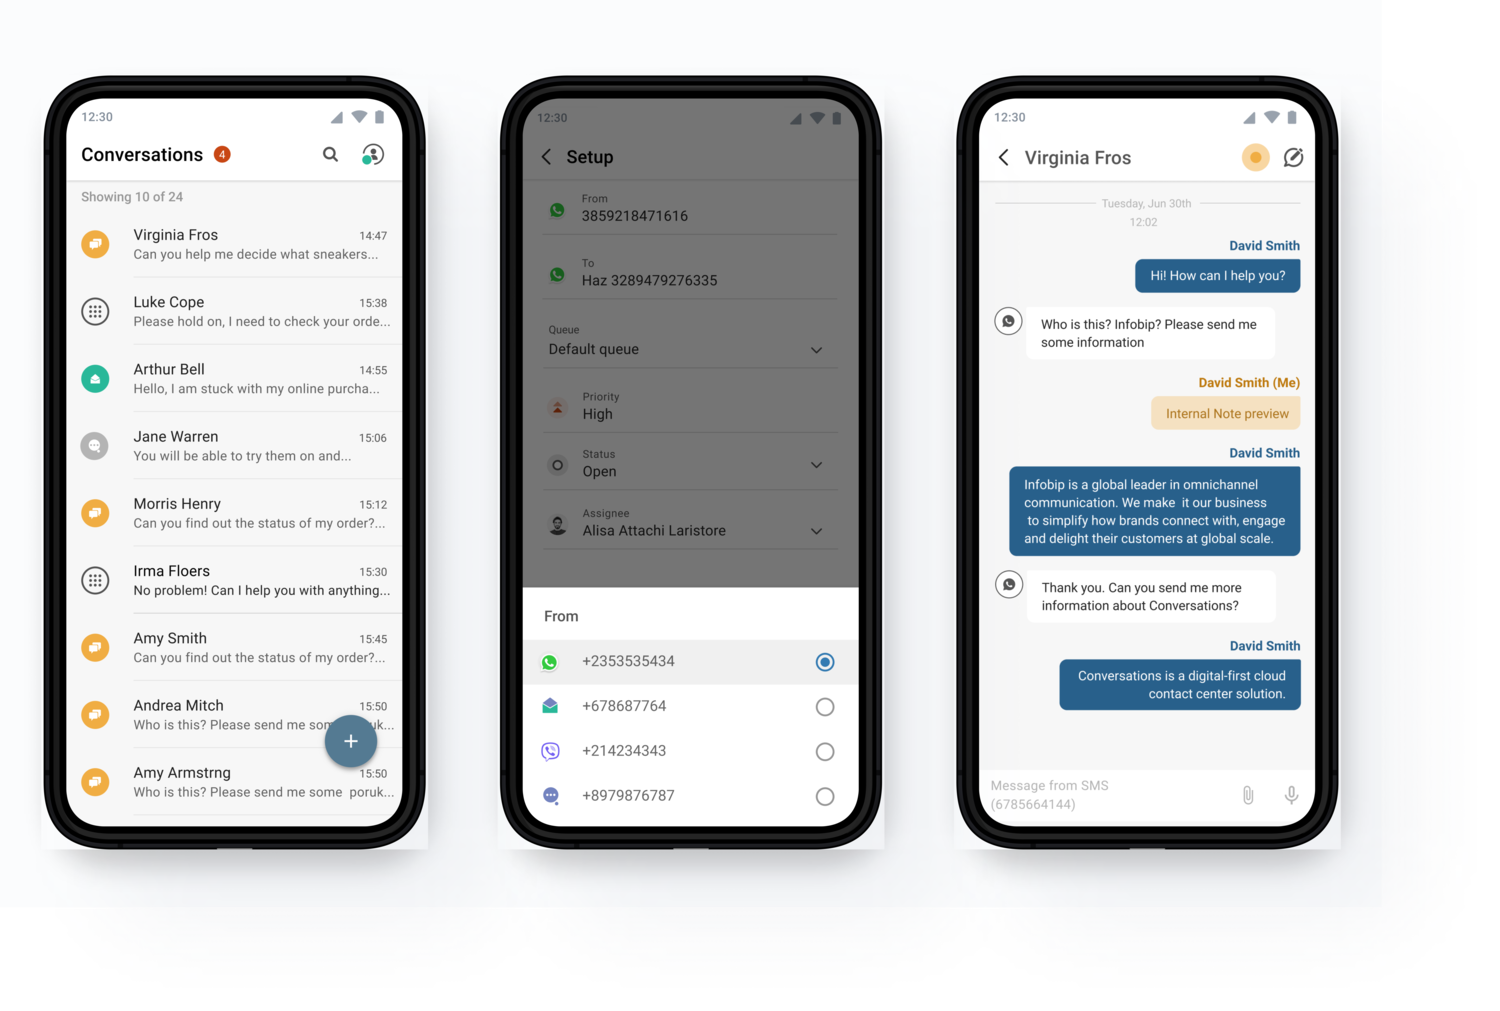
Features
- Real-time multi-channel messaging in a native smartphone environment
- My Work overview with quick access to agent conversation lists
- Search functionality in conversations and messages across All Work
- Chat-like user experience for messaging with end users
- WhatsApp templates as easy conversation starters
- Ability to display and send all multimedia types
- Record and send Voice messages
- Receive or initiate phone calls
- Send a call link in chat to start a video call
- Ability to change conversation status and agent availability
- Push notifications for incoming messages
- Location sharing
Get started
What you need to get started with the Conversations mobile app:
-
License or access to Conversations
-
Download the Android app from the Google Play Store, or the iOS app from the App Store
- Log in to the app with your Infobip username and password
Learn how to use the Conversations mobile app.
Available channels
You can use the following channels in the mobile app:
- Calls
- Live Chat
- Messenger by Facebook
- Facebook Posts
- Viber and Viber Bots
- Google's Business Messages
- Instagram Messaging
- Instagram Posts
- Twitter Tweets
- Kakao Sangdam
AI conversation topic recognition
AI conversation topic recognition is a feature that analyzes the content the customers have sent (inbound) and recognizes the topic of the message using artificial intelligence.
Let's say that a customer has sent the following message: ''My credit card is not working.” to an agent. This message is categorized as a credit card-related inquiry and the CardServices tag is added to the conversation.
Agents can use these AI tags that are added to conversations to quickly obtain information about the conversation and start the communication with the customer immediately.

Also, Analytics Managers can use AI tags to see what are the most common topics handled by their contact center.

NOTE
You are free to use the feature in combination with any language and industry but you need to train the model to be specific to your business needs, meaning that every business will have different customer-specific labeled messages as prerequisites.
SPECIAL OFFER FOR FIRST 5 CUSTOMERS:
Implement this feature and we will offer you the initial data-labeling service free of charge. However, note that only companies from the banking industry using English can be considered for this scope.
The below are currently available tags (applicable to the banking industry):
- AI_General
- AI_DigitalServices
- AI_Complaint
- AI_AccountServices
- AI_Transactions
- AI_FinanceServices
- AI_CardServices
Note that this is not the full scope of available tags. In collaboration with Infobip professional services, we can define the number of tags and the naming convention during model building.
There is no self-service available for this feature at the moment. Reach out to your Account Manager if you wish to try it out.