Number masking
The Number masking service enables two parties to engage in a conversation over the phone without exposing real phone numbers to one another. This service is ideal for businesses that want to avoid sharing end user information with third parties. It joins two calls using a Voice number instead of the end-user's real phone number.
Number Masking can be used via API or web interface.
Also, Number Masking calls can be recorded. Learn more about Recording. To enable this add-on, contact your dedicated Account Manager.
COUNTRY REGULATIONS AND COMPLIANCE
Certain types of Voice and Video calls and call recordings might be subjected to specific country regulations. Before you set up and start using Voice and Video, make sure you have checked the country's telecom regulations.
Technical specifications
Number masking is a service on the Infobip platform that can be enabled for inbound calls. Check out the high-level overview and see how it works:
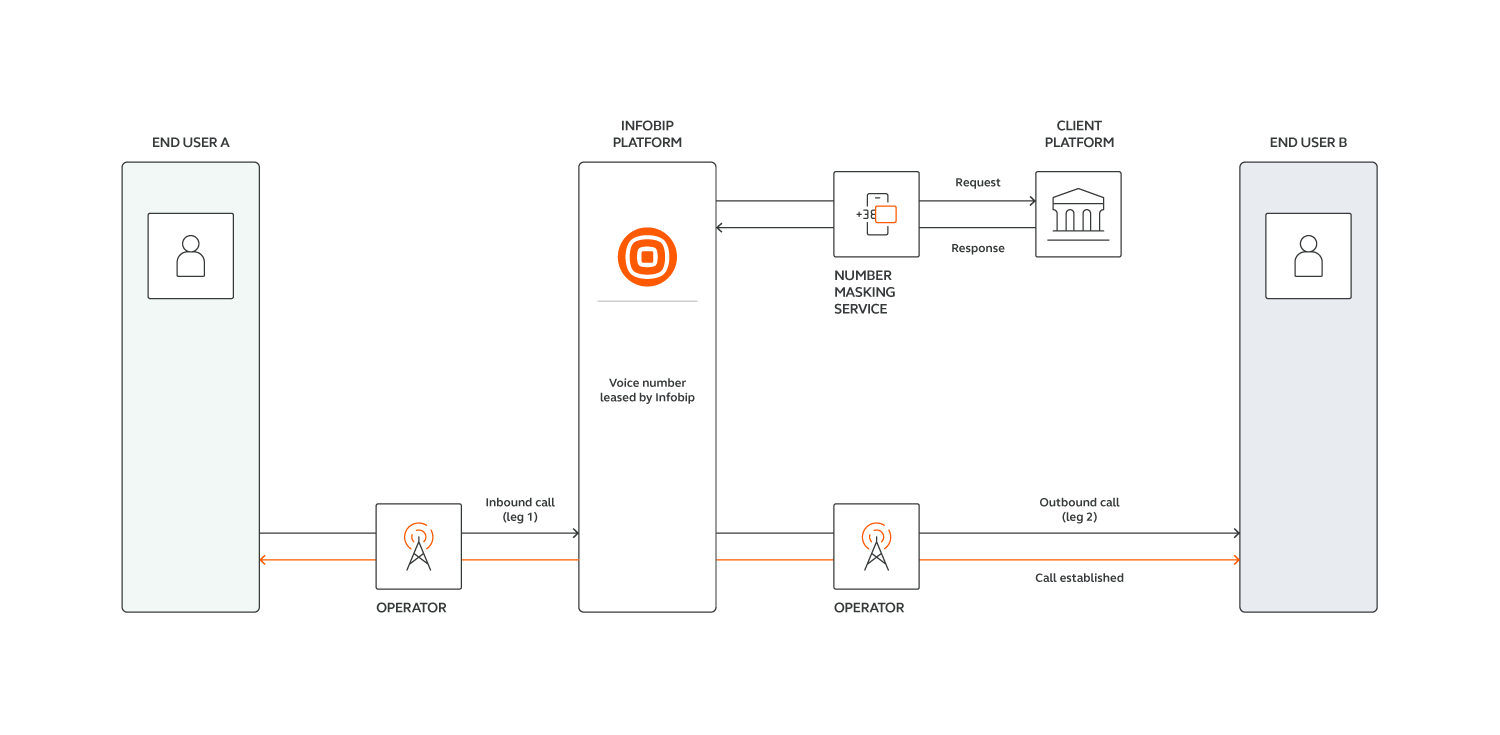
Once the Infobip platform receives an inbound call, it sends an HTTP request to your platform to determine where to forward the call, and what caller ID to present.
Infobip sends an HTTP request to a callbackUrl you provided. This request contains the caller number and the called Voice number. Refer to the Number masking callback API for more details.
In a response from your platform, the Infobip platform expects to receive a phone number to which the inbound call should be forwarded.
It is also possible to receive a fileID, and, instead of forwarding the call to another person's phone number, our platform would play an audio file that corresponds to this fileID. You have to upload the file beforehand, of course.
When the Number Masking call is finalized, Infobip sends the statusURL with the call details. For example, whether the call was answered, the duration of the call, the phone number involved in that conversation, etc.
Refer to the Number masking status API for more details about the statusURL request.
You can consider the Infobip platform as a bridge. Number Masking connects two parties while safeguarding their private information. In other words, it allows two-way communication between the likes of buyers and sellers, customers, and delivery service staff, without exposing personal phone numbers.
For more information, refer to How Number masking provides privacy and anonymity
Setup
You can set up Number Masking using the web interface or API.
To start using Number masking service, you will need the following:
- Voice number
- Voice setup assigned to a Voice number
- Developed Number Masking mapping logic on your side
We'll cover all these how-to steps below.
Using API
Learn how to configure Number Masking via API.
Prerequisites
Refer to the How to get started with the Infobip API article for more information.
If you need help creating your Infobip account, visit Create Account.
NOTE
When sending an API request use account credentials for basic authentication.
Here's how to set up Number masking using API.
-
Lease a Voice number using API.
To receive voice calls, you need a phone number with voice capabilities. To get the list of available Infobip numbers and their numberKeys send the following API request with capabilities query parameter set to VOICE. Refer to Get available numbers.
If you already have a number leased, skip to step 2 of this guide.
GET /numbers/1/numbers/availableThe response will contain the list of first 50 phone numbers by default. However, you can get the rest by setting page or limit query parameters in the API request.
Choose a phone number you want and then send its numberKey in the request body of the API request to purchase it. Refer to Purchase a number.
POST /numbers/1/Request example:
{
"numberKey":"1C7CC9A282372F17A68C4163C429AFE2"
}
Response example:
{
"numberKey": "1C7CC9A282372F17A68C4163C429AFE2",
"number": "402570768389",
"country": "RO",
"countryName": "Romania",
"type": "VIRTUAL_LONG_NUMBER",
"capabilities": [
"VOICE",
"SMS"
],
"shared": false,
"price": {
"pricePerMonth": 10.0,
"setupPrice": 0.0,
"currency": "EUR"
},
"additionalSetupRequired": true
}-
Get the
numberkey.
After you have leased the number, you can start creating the Voice setup for that number. In case you already have a number leased, you can get its numberKey by sending the following API request.
This will return a list of numbers you already have on your Infobip account. From this list, select a Voice number to create a Voice setup for it. Refer to List of purchased numbers.
GET /numbers/1/numbers-
Get the
voiceNumberMaskingConfigKey.
This value is the identification of the Number masking configuration. It represents the group of Number Masking details and can be assigned to a Voice number.
By assigning it to your number, you are creating a new Voice setup. In other words, the Voice setup has information about the connection between the Voice number and the number masking configuration.
In case you already have a Number Masking configuration, use its voiceNumberMaskingConfigKey.Send the following API request to get the list of all already created Number Masking Configurations and their voiceNumberMaskingConfigKeys. Refer to Get number masking configurations.
GET /voice/masking/2/config-
Create a Number masking configuration.
Send the following API request with specified setup name and callbackUrl. These fields are required in the request body.
POST voice/masking/2/configRequest example:
{
"name": "UniqueConfigurationName",
"callbackUrl": "https://hangup4.free.beeceptor.com",
"statusUrl": "https://hangup4.free.beeceptor.com"
}
Response example:
{
"key": "8351C327C90923C29AD79D1645F65486",
"name": "UniqueConfigurationName",
"callbackUrl": "https://callback.com",
"statusUrl": "https://status.com",
"backupCallbackUrl": null,
"backupStatusUrl": null,
"description": null,
"insertDateTime": "2021-08-11T13:17:38.937",
"updateDateTime": "2021-08-11T13:17:38.937"
}- Callback URL and status URL.
These URLs are the APIs which you should generate and provide to Infobip. When you receive a call to the Voice number, the Infobip platform generates a POST request to the callbackUrl you provided.
This request contains:
- the callee number
- the Voice number that was called
- correlationID
- nmCorrelationID (used as identifiers for this call request)
Additionally, you could add the audio parameter (audio file is previously uploaded to the Infobip platform).
Request example:
{
  "from": "40257076838",
  "to": "40257879513",
  "correlationId": "7cb72e4b-cf9f-40b6-9fc4-79588d18a666",
  "nmCorrelationId": "0f754338-1aff-4e09-a933-7d205ca7aed4"
}
In return, the Infobip platform needs to receive the following:
- command on what to do with the call
- phone number to forward the call to
- caller ID that should be presented
Response example:
{
  "command": "dial",
  "phoneNumber": "40257879513",
  "callerId": "40257076838"
}
It's also possible to receive a fileID and, instead of forwarding the call to another person's phone number, our platform would play an audio file that corresponds to this fileID. You have to upload the file beforehand. Refer to upload audio files for more information.
Response example:
{
   "command": "audio",
   "fileId": "382a92df-1f6d-4d30-8274-cf508a0c7d62"
}
When a call is finished, the Infobip platform sends a status report to the statusUrl that was provided during the number setup. The report contains information about both the caller and end user, as well as call duration.
Request example:
{
  "action": "dial",
  "from": "41793026727",
  "to": "41793026731",
  "transferTo": "41793026785",
  "duration": "15",
  "status": "answered",
  "ringingTime": "2018-01-01 12:00:00",
  "answeredTime": "2018-01-01 12:00:10",
  "correlationId": "0f754338-1aff-4e09-a933-7d205ca7aed4",
  "inboundDuration": "30"
}
- Create a Voice setup on a Voice number.
Send the following API request with numberKey you got when leasing the number.
POST /numbers/2/numbers/{numberKey}/voice Specify the action with VOICE_NUMBER_MASKING type and voiceNumberMaskingConfigKey of the specific Number masking setup you want to assign to the number.
/numbers/2/numbers/1C7CC9A282372F17A68C4163C429AFE2/voiceRefer to Create Voice setup on a number for more details.
Request example:
{
"action": {
"voiceNumberMaskingConfigKey": "8351C327C90923C29AD79D1645F65486",
"type": "VOICE_NUMBER_MASKING"
}
}
Response example:
{
"action": {
"voiceNumberMaskingConfigKey": "8351C327C90923C29AD79D1645F65486",
"type": "VOICE_NUMBER_MASKING"
}
}
And that's it! You are ready to use the Infobip Number masking service.
IMPORTANT
To match the caller with the phone number you want to forward the call to, you must develop the logic on your end. This should handle the mapping and provide information to Infobip via callBack URL.
Using web interface
Here's how to set up Number Masking using the web interface.
Prerequisites
- Infobip account. Log in If you don’t have an account, sign up. If you need help creating your Infobip account, visit Create Account.
- Voice number
- Voice setup assigned to a Voice number
- Developed number masking mapping logic on your side
NOTE
Voice, a communication channel, is available in free trial.
Follow these steps to set up Number masking via the web interface.
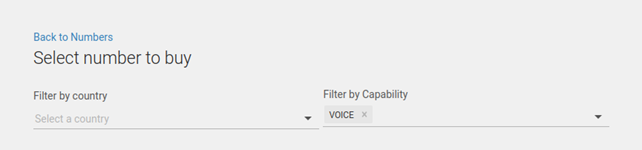
- Lease a Voice number. To receive voice calls, you need a phone number with voice capabilities. If you have already leased a number you can skip this step. Log in to the web interface, navigate to the Channels and Numbers module located at the bottom left > Voice > BUY NUMBER. All numbers from that list have Voice capability and can be used for number masking. To refine the list, filter by country.
- Select your desired number and click BUY. Now you can proceed to configure your Voice number. Refer to Voice Numbers for more details.
- Create a Voice setup on your leased Voice number. Navigate to the Channels and Numbers module located at the bottom left > Voice > Number Masking. Click ADD NEW. Fill in the mandatory fields, NAME (to name your configuration), and CALLBACK URL. Click SAVE.
- To connect this setup to your number, navigate to the Channels and Numbers module located at the bottom left > Voice > Numbers. Find the number you want to assign number masking. You'll see a Configuration dialog appear.
- Under TYPE, select Trigger Number masking. Under Number masking, select the Voice setup you have created. Click SAVE.
Now you are ready to use the Number Masking service.
IMPORTANT
To match the caller with the phone number you want to forward the call to, you must develop the logic on your end. This should handle the mapping and provide information to Infobip via CallBack URL.
Number masking mapping logic
Infobip's Number masking API and webhook communications allow your application to determine how an inbound call should be handled.
As you may have already concluded while reading this documentation, what the above means is that your application tells the Infobip platform whether:
- To make an outbound call to an external fixed or mobile number with a specific caller ID and connect the inbound and outbound calls together.
- To play an audio message to the calling party (e.g., "You are not allowed to connect to this party at this time.").
The Number Masking mapping logic definition you implemented in your backend application is where your application tells the Infobip platform to perform one of the actions mentioned above.
While not being strict guidance, here are a few best practices to help you get started about what to consider in such implementation.
Number pools
First, decide how many voice numbers you will require on the Infobip platform to serve your market.
There is no simple formula to use but bear in mind that you can use the very same voice number to handle multiple parallel calls that connect to different destination numbers.
e.g., if 1(809)7712916 is the voice number you have associated with your Number Masking application, end user A might be calling it and be connected to end user B while at the same time, end user C calls it and gets connected to end user D.
By Implementing proper session management, your application will be able to deal better with these associations.
Regardless of the number of virtual phone numbers you want to start with, each and every one must be linked to the same Number Masking application. It might be a good idea to build your own number pool reference, such as a table keeping track of all numbers you have associated with your Number Masking application.
Also, consider the following elements when leasing voice numbers for Number Masking from the Infobip platform:
- Geo coverage: Do you have voice numbers covering all local markets you are serving?
A UK customer will most likely not want to call a US number to communicate with their driver or delivery person. - Voice only or SMS as well: Infobip rents various types of (virtual) phone numbers.
Some are limited to specific channels (only SMS, or only Voice) while others support both voice and SMS. While the Number Masking APIs and webhook actions do support voice only, having numbers that also support SMS might be beneficial in some cases.
Manage sessions
Let's suppose you are a ride-sharing company willing to implement Number Masking so drivers and customers can communicate in full respect of their privacy. Typically, a session would be started on your side as soon as the end customer reserves a ride with one of your drivers. Once that session is created you will associate one of your virtual phone numbers to each of the session's participants, ie one for the driver and one for the end customer. It's up to you to decide whether you want to include other parameters to that session or do some updates on your number pool table, such as:
- a "time to live" definition for the session: how long are each of these participants allowed to contact each other over these virtual numbers, if it makes sense for your use case
- a "number reservation" flag, which means flagging the number assigned to a participant in your number pool table if you want that number to be reserved for that session (meaning you won't assign it to other concurrent sessions). Again, if this makes sense for your use case.
Once numbers are associated to the active participants' session, you will most likely send an update to both driver's and end customer's application to reflect the number they can call to get in touch with the other session participant.
Now, let's say someone is calling one of the virtual phone numbers associated with your Number Masking application. Upon reception of this inbound call, your application will receive a message on its callBackUrl. Your application will extract both from and to numbers from the message and run through your list of currently active sessions.
- If it finds a match to an active session, your application will reply to the callBackUrl request with a Dial payload, so Infobip will call the real number of the other session participant and use the other participant's virtual phone number as caller ID. As you will search for active sessions considering both from (caller's number) and to (virtual phone number on Infobip), there is no risk that you route the call to an inadequate participant.
- If it finds a match to a session marked as closed (the end user has been driven to its destination and the ride is over), you would most likely not allow that person to get back in touch with the other participant from this terminated session, whether to respect and enforce privacy or to avoid off-platform transactions, but you could reply to the callBackUrl request with a Dial payload in order for this person to be connected to your call center - who knows, maybe the end user forgot something important or valuable in the rider's car.
- If it doesn't find a match, your application will reply to the callBackUrl request with a Play payload, so Infobip will play an audio message to the calling party such as "We are sorry, but you are not allowed to place this call at this moment".
When the ride-sharing session is completed, your application would flag it as such but could keep the associated virtual phone number information, as it might prove useful if you are required at some point to understand how end users and riders have been able to contact each other. If your session came with a notion of number reservation, your application would remove that reservation flag from the virtual phone number of your number pool table.
Secure your API communications
This section covers the necessary steps you need to take to secure your API communications, both From Infobip to Your Application, and From Your Application to Infobip. Jump to one of the accompanied sections below to start the process of securing your API communications.
From Infobip to your application
By default, Infobip will post data to your application's CallbackURL and StatusURL without any specific security scheme other than using HTTPS communications, provided your exposed URLs support HTTPS. If you wish to enhance the security of these communications, you can request Infobip to include an Authorization header to every post made toward your CallbackURL and StatusURL.
Here are the steps you need to do to be able to use an Authorization header:
- Use the
POST/voice/masking/2/credentialsmethod to create a new Number Masking credential
The method will reply with a200 OKto confirm bothapiIDandkeyvalues in the response's payload.
A credential composes of two key parts the user generates (apiIDandkey), both being alphanumerical strings (80 characters max).
Once your credentials are confirmed, any data posted to your application'sCallbackURLandStatusURLwill have an Authorization header whose value is computed based on your keys.
Note that Number Masking credentials are not application-specific. If you have multiple Number Masking configurations, the sameapiIDandkey areused to build the Authorization header's content. - Understand the Authorization header's content
Authorization headers generated by Infobip and added to POST requests to your application'sCallbackURLandStatusURLare built on the following logic:
apiId:hashed(webhookUrl+requestBody+key)Where:
webhookURL is the URL of your Callback or Status webhook
requestBody is the body of the message posted to your Callback or Status webhook
apiKey is the first part of your Number Masking credentials
key is the second part of your Number Masking credentials
The hashing algorithm is SHA256.
Example:
Here we will use the following CallbackURL is https://my.company.server/nmcallback, and Infobip sends the following message towards that URL:
{
  "from": "40257076838",
  "to": "40257879513",
  "nmCorrelationId": "7cb72e4b-cf9f-40b6-9fc4-79588d18a666",
  "correlationId": "0f754338-1aff-4e09-a933-7d205ca7aed4"
}
We will use the following Number masking credentials as an example:
{
"apiId": "55ddccad2df62a4b615b7e3c472b2ab6",
"key": "5da086b6a8e4424993646b8699c333ca"
}
Then, Infobip adds the Authorization header that is shown as:
55ddccad2df62a4b615b7e3c472b2ab6:hashed(https://my.company.server/nmcallback{"from":"40257076838","to":"40257879513","nmCorrelationId":"7cb72e4b-cf9f-40b6-9fc4-79588d18a666","correlationId":"0f754338-1aff-4e09-a933-7d205ca7aed4"}5da086b6a8e4424993646b8699c333ca)As such, the value of the header is:
Authorization 55ddccad2df62a4b615b7e3c472b2ab6:66c5985cf14f92e29c5647d4d9c4f12107a17507fe4ecfb3f5d4d2065e3dfab3- Status callback important information
When computing the Authorization header for messages sent to your Status URL, Infobip will purposely omit 3 key-value pairs from the message body.
The affected keys are:
calculatedDuration
currency
pricePerSecond
If the body of the message received from the statusURL is:
{
  "action": "dial",
  "from": "41793026727",
  "to": "41793026731",
  "transferTo": "41793026785",
  "duration": "15",
  "status": "answered",
  "fileId": null,
  "fileUrl": null,
  "nmCorrelationId": "6ag710o6ihb23q06epc23n46ihd0nilcibb0nq9ccbq6mmsdgbp4nghefjs67vgo7200",
  "inboundDuration": 15,
  "calculatedDuration": 15,
  "pricePerSecond": 0.0,
  "currency": "EUR",
  "ringingTime": "2018-01-01 12:00:00",
  "answeredTime": "2018-01-01 12:00:10",
  "correlationId": "0f754338-1aff-4e09-a933-7d205ca7aed4",
  "inboundDuration": "30"
}
What this means is that the Authorization header will only take the following elements into account:
{
  "action": "dial",
  "from": "41793026727",
  "to": "41793026731",
  "transferTo": "41793026785",
  "duration": "15",
  "status": "answered",
  "fileId": null,
  "fileUrl": null,
  "nmCorrelationId": "6ag710o6ihb23q06epc23n46ihd0nilcibb0nq9ccbq6mmsdgbp4nghefjs67vgo7200",
  "inboundDuration":15,
  "ringingTime": "2018-01-01 12:00:00",
  "answeredTime": "2018-01-01 12:00:10",
  "correlationId": "0f754338-1aff-4e09-a933-7d205ca7aed4",
  "inboundDuration": "30"
}- Validate incoming messages to your application's Callback and status URLs
When you receive a message from Infobip to your Callback or statusURLs, you need to apply the same logic as explained in steps 2 and 3 to compute what should be the expected Authorization value and compare it to the one you will receive in the message. If the values match, you can be sure that this message was sent by Infobip and is safe.
NOTE
When concatenating your webhookURL, body and key and before hashing that concatenated string, make sure to strip off any potential new line characters from the body. New lines would not appear when string concatenation and hashing is performed by your application code, but can happen in debugging phase if you copy/paste the body content manually in text editors.
From your application to Infobip
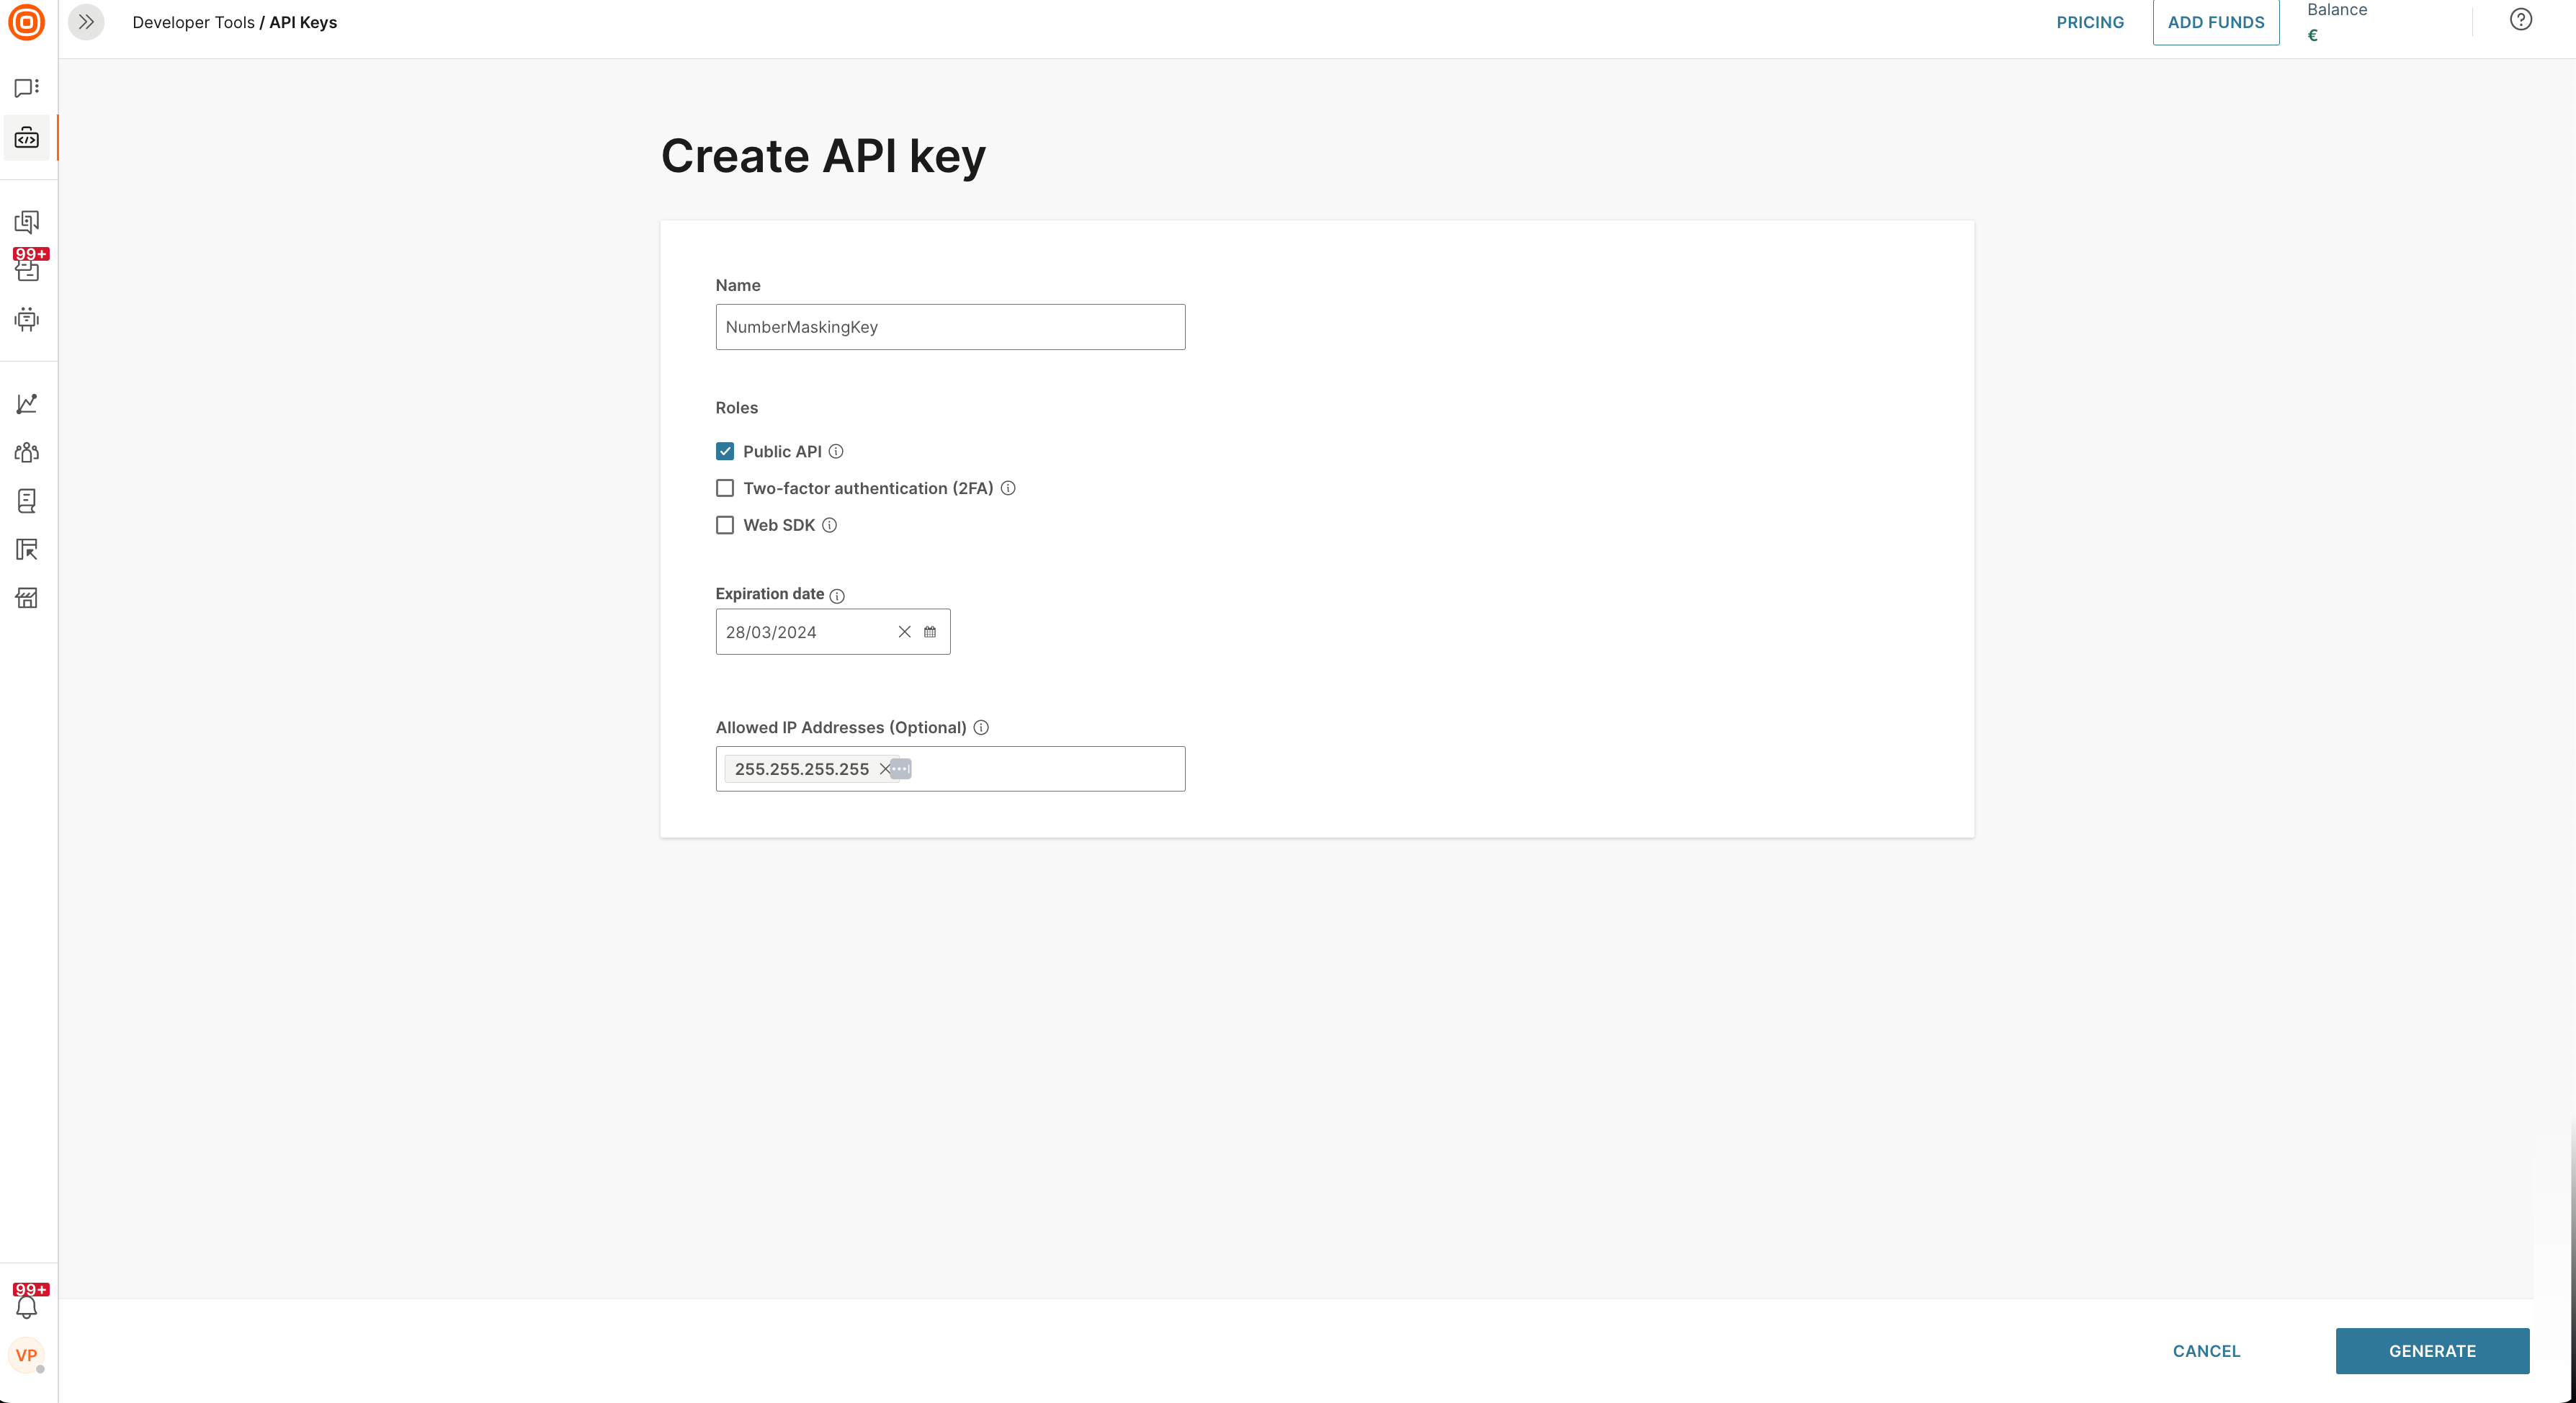
Although not a specific feature in Number Masking, if you wish to add an extra layer of security to HTTP requests your application sends to Infobip, you can generate a specific API Key that will be limited to predefined IP addresses. The IP address(es) are the fixed address(es) behind your application.
On the API Key Management page of the Infobip web interface, you can easily create an API key and assign your IPs:
For even stronger security, you can use the OAUTH2 authentication in your application as we have described this setup in our API Key Authentication documentation.